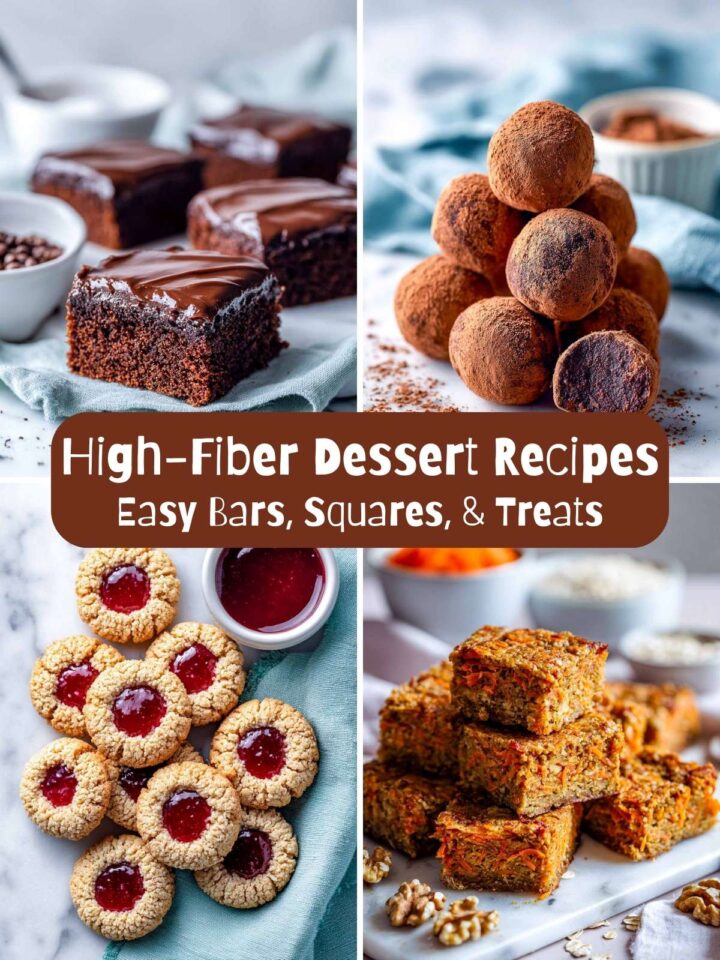
20 High-Fiber Desserts and Sweet Treats for Kids and Grown-Ups
Desserts can be comforting and familiar when the flavors and textures are kept simple. These high fiber dessert recipes include brownies, bars, cakes, cookies, and a few chilled treats that are easy to make and easy to enjoy. The ingredients are simple, and the focus stays on desserts that taste good and feel satisfying. Some of the high-fiber desserts are baked, others are chilled, but all are meant to fit into everyday routines. This is a collection you can come back to when you want something sweet that feels reliable and familiar.
Date-Sweetened Oatmeal Brownies With Cocoa Swirl
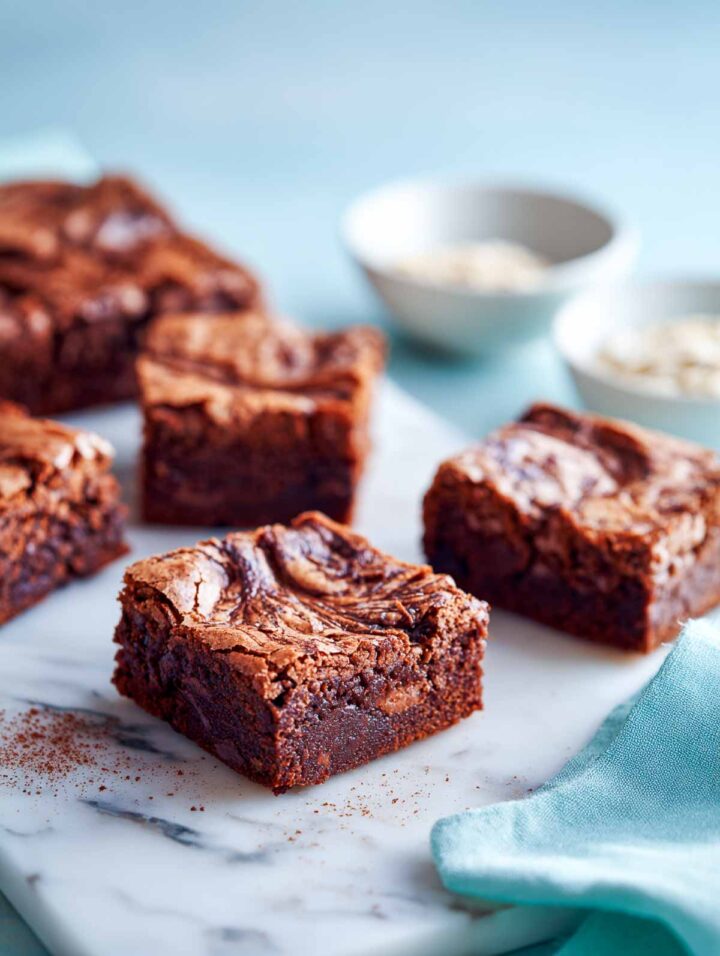
Date-sweetened oatmeal brownies with cocoa swirl bring a deep chocolate flavor with a soft, almost fudgy bite that feels familiar and comforting. The sweetness comes entirely from dates. The oat base adds structure and makes these feel more substantial than a typical brownie. They’re a great option when you want high-fiber brownies that still feel like a proper dessert.
Ingredients
- 1 cup packed pitted Medjool dates (about 10 to 12 dates)
- ½ cup hot water
- 1½ cups rolled oats
- ¼ cup unsweetened cocoa powder
- ½ teaspoon baking soda
- ¼ teaspoon salt
- 2 large eggs, at room temperature
- ¼ cup neutral oil (avocado oil or light olive oil)
- 1 teaspoon vanilla extract
- For the Cocoa Swirl
- 2 tablespoons unsweetened cocoa powder
- 1½ tablespoons hot water
Instructions
- Preheat the oven to 350°F. Line an 8×8-inch baking pan with parchment paper, leaving overhang on two sides.
- Place the dates in a heatproof bowl and pour the hot water over them. Let soak for 10 minutes until very soft. Transfer the dates and soaking liquid to a blender or food processor. Blend until completely smooth and glossy, with no visible date pieces.
- Add the rolled oats and pulse until the mixture resembles a coarse flour. Stop before it turns powdery. Add the cocoa powder, baking soda, salt, eggs, oil, and vanilla extract. Blend just until smooth and evenly combined. The batter should be thick but pourable.
- In a small bowl, mix the cocoa powder and hot water for the swirl until smooth and thick.
- Pour the brownie batter into the prepared pan and spread evenly. Spoon the cocoa swirl mixture over the surface in small dollops. Use a skewer or toothpick to gently swirl the cocoa into the batter.
- Bake for 25-27 minutes, until the edges are set and a toothpick inserted in the center comes out with a few moist crumbs but no wet batter. Cool completely in the pan before lifting out and slicing into squares.
Cinnamon Raisin Oat Squares With Honey Glaze
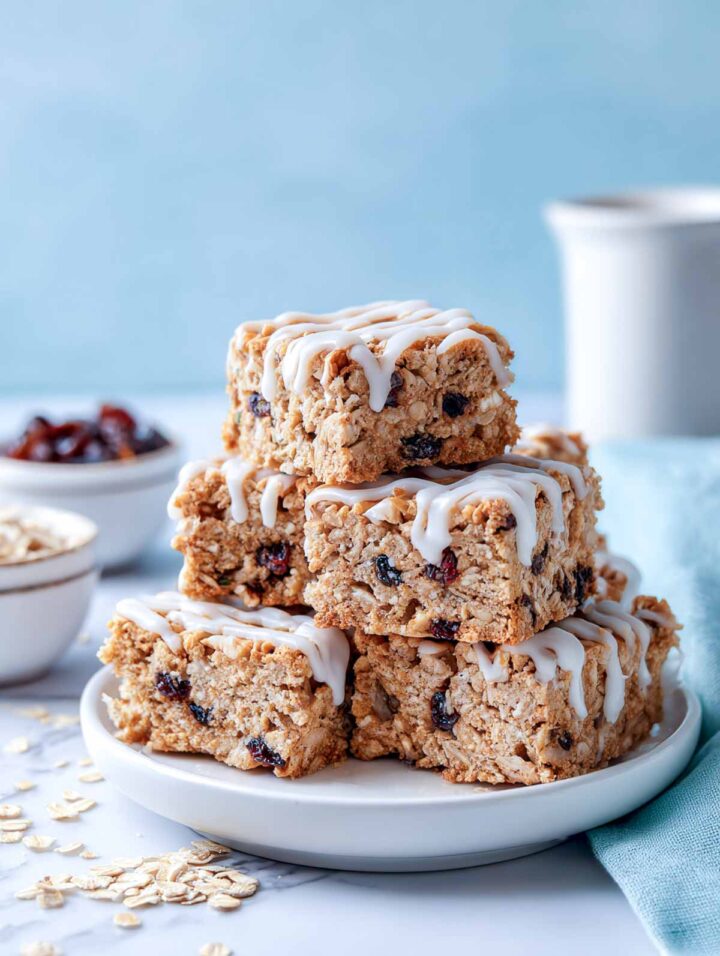
With warm spice and chewy texture, cinnamon raisin oat squares with honey glaze feel like something you’d reach for alongside coffee or as a late afternoon treat. The oats give the squares a hearty base, while the honey glaze adds just enough sweetness on top. These work especially well for anyone drawn to desserts with oats that feel comforting and familiar.
Ingredients
- For the Oat Squares
- 1½ cups rolled oats
- ¾ cup all-purpose flour
- ½ cup raisins
- ½ cup packed brown sugar
- 1 teaspoon ground cinnamon
- ½ teaspoon baking powder
- ¼ teaspoon baking soda
- ¼ teaspoon salt
- 1 large egg, at room temperature
- ⅓ cup melted unsalted butter, slightly cooled
- ¼ cup milk
- 1 teaspoon vanilla extract
- For the Honey Glaze
- ¼ cup powdered sugar
- 1½ tablespoons honey
- 1 to 2 tablespoons milk, as needed
Instructions
- Preheat the oven to 350°F. Line an 8×8-inch baking pan with parchment paper, leaving overhang on two sides.
- In a large bowl, whisk together the rolled oats, flour, brown sugar, cinnamon, baking powder, baking soda, and salt until evenly combined. Stir in the raisins, making sure they are well distributed.
- In a separate bowl, whisk the egg, melted butter, milk, and vanilla extract until smooth. Pour the wet ingredients into the dry ingredients and mix just until combined. The mixture should be thick and evenly moistened. Transfer the batter to the prepared pan and press it evenly into the corners using a spatula or the back of a spoon.
- Bake for 22-26 minutes, until the top is lightly golden and the center feels set when gently pressed. A toothpick inserted in the center should come out clean or with a few moist crumbs. Remove from the oven and allow the bars to cool completely in the pan.
- To make the glaze, whisk the powdered sugar, honey, and 1 tablespoon milk in a small bowl until smooth. Add additional milk a little at a time until the glaze reaches a thick but drizzleable consistency. Drizzle the glaze evenly over the cooled oat squares. Let it sit for 10 to 15 minutes to set before slicing into squares.
Strawberry Chia Jam Thumbprint Cookies
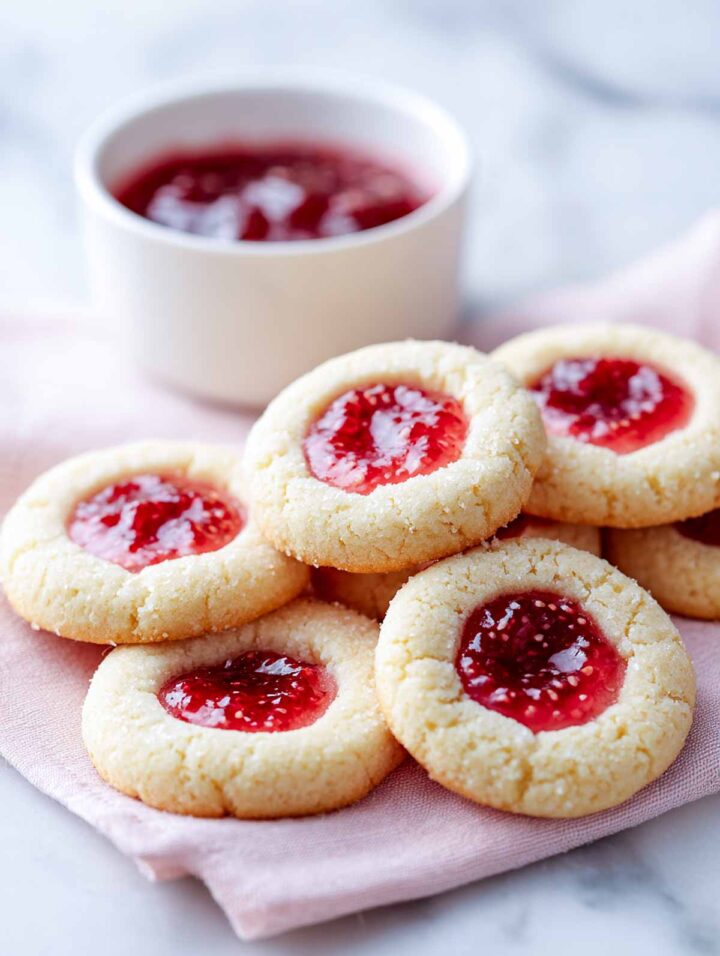
There’s something classic and inviting about strawberry chia jam thumbprint cookies, especially with the jam set neatly into the center of each cookie. The chia thickens the strawberry filling just enough to keep it from spilling while still tasting bright and fresh. The cookie itself stays tender rather than crisp, which balances the fruit nicely. They fit naturally among high fiber cookies that still look bakery-worthy.
Ingredients
- For the Strawberry Chia Jam Filling
- ½ cup smooth strawberry preserves
- 1 teaspoon chia seeds
- For the Cookies
- ½ cup unsalted butter, softened
- ½ cup granulated sugar
- 1 large egg yolk, at room temperature
- 1 teaspoon vanilla extract
- 1¼ cups all-purpose flour
- ¼ teaspoon salt
Instructions
- In a small bowl, mix together the strawberry preserves with the chia seeds. Set aside for at least 10 minutes to allow the mixture to thicken slightly. The jam should be smooth, glossy, and spoonable, not runny.
- Preheat the oven to 350°F. Line two baking sheets with parchment paper.
- In a mixing bowl, beat the softened butter and granulated sugar together until light and creamy, about 2 minutes. Add the egg yolk and vanilla extract and mix until fully incorporated. Add the flour and salt and mix just until a soft dough forms. Do not overmix.
- Scoop the dough into 1 tablespoon portions and roll into smooth balls. Place them 2 inches apart on the prepared baking sheets.
- Use your thumb or the back of a teaspoon to gently press an indentation into the center of each dough ball. If the edges crack slightly, gently smooth them with your fingers. Spoon about ½ teaspoon of the thickened jam mixture into each indentation.
- Bake for 12 to 14 minutes, until the cookies are set and the bottoms are lightly golden. The tops should remain pale. Let the cookies cool on the baking sheet for 5 minutes, then transfer to a wire rack to cool completely. The jam will finish setting as the cookies cool.
Blueberry Buckwheat Blondies With Honey Drizzle
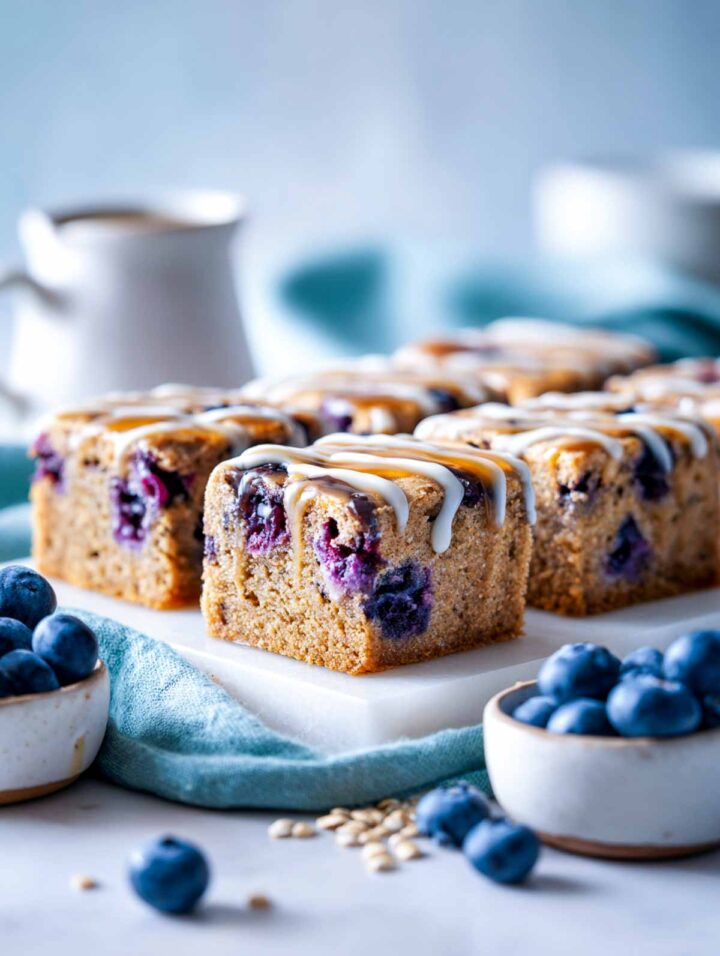
Blueberry buckwheat blondies with honey drizzle have a gentle nuttiness that makes them feel a little different from standard blondies. The blueberries soften as they bake, adding pockets of fruit throughout the bars. This is one of those high fiber dessert recipes that feels satisfying without announcing itself as such.
Ingredients
- For the Blondies
- ¾ cup buckwheat flour
- ½ cup all-purpose flour
- ½ cup granulated sugar
- ¼ cup packed brown sugar
- ½ teaspoon baking powder
- ¼ teaspoon salt
- ½ cup unsalted butter, melted and cooled slightly
- 1 large egg, at room temperature
- 1 teaspoon vanilla extract
- ¾ cup fresh blueberries
- For the Honey Drizzle
- ¼ cup powdered sugar
- 1½ tablespoons honey
- 1 to 2 tablespoons milk, as needed
Instructions
- Preheat the oven to 350°F. Line an 8×8-inch baking pan with parchment paper, leaving overhang on two sides.
- In a medium bowl, whisk together the buckwheat flour, all-purpose flour, granulated sugar, brown sugar, baking powder, and salt until evenly combined. In a separate bowl, whisk the melted butter, egg, and vanilla extract until smooth.
- Pour the wet ingredients into the dry ingredients and stir just until combined. The batter will be thick. Gently fold in the blueberries. Spread the batter evenly into the prepared pan, smoothing the top with a spatula.
- Bake for 25-28 minutes, until the edges are set and the center no longer looks wet. A toothpick inserted in the center should come out clean or with a few moist crumbs. Let the blondies cool completely in the pan before lifting out and slicing.
- To make the drizzle, whisk the powdered sugar, honey, and 1 tablespoon milk until smooth. Add additional milk a little at a time until the glaze is thick but drizzleable. Drizzle lightly over the cooled blondies before serving.
Orange Poppy Seed Yogurt Loaf

Bright citrus flavor sets this orange poppy seed yogurt loaf with whole wheat flour apart from other quick breads. Yogurt keeps the crumb moist, while whole-wheat flour gives the loaf structure without making it dense. The poppy seeds add subtle texture rather than crunch. It’s an easy slice-and-serve option that fits comfortably into whole wheat desserts you’ll actually want to make again.
Ingredients
- For the Loaf
- 1½ cups whole wheat flour
- ½ cup all-purpose flour
- 1 teaspoon baking powder
- ¼ teaspoon baking soda
- ¼ teaspoon salt
- 2 tablespoons poppy seeds
- ½ cup granulated sugar
- ¼ cup light brown sugar
- ½ cup plain full-fat yogurt, at room temperature
- ⅓ cup neutral oil, such as avocado or light olive oil
- 2 large eggs, at room temperature
- 2 tablespoons orange zest
- ¼ cup freshly squeezed orange juice
- 1 teaspoon vanilla extract
- For the Orange Glaze
- ¾ cup powdered sugar
- 1½ to 2 tablespoons orange juice
Instructions
- Preheat the oven to 350°F. Grease and line a standard 9×5-inch loaf pan with parchment paper, leaving overhang on the long sides.
- In a large bowl, whisk together the whole wheat flour, all-purpose flour, baking powder, baking soda, salt, and poppy seeds until evenly combined. In a separate bowl, whisk the granulated sugar, brown sugar, yogurt, oil, eggs, orange zest, orange juice, and vanilla extract until smooth and fully combined.
- Pour the wet ingredients into the dry ingredients and gently fold just until no dry streaks remain. Do not overmix. The batter will be thick but pourable. Transfer the batter to the prepared loaf pan and smooth the top evenly.
- Bake for 50-55 minutes, until the loaf is risen, lightly golden, and a toothpick inserted into the center comes out clean or with a few moist crumbs.
- Let the loaf cool in the pan for 10 minutes, then lift out and transfer to a wire rack to cool completely.
- To make the glaze, whisk the powdered sugar with 1½ tablespoons of orange juice until smooth. Add more juice a few drops at a time until the glaze is thick but drizzleable. Drizzle the glaze evenly over the cooled loaf. Let it set for 10 minutes before slicing.
Chocolate Chickpea Cake With Fudge Frosting
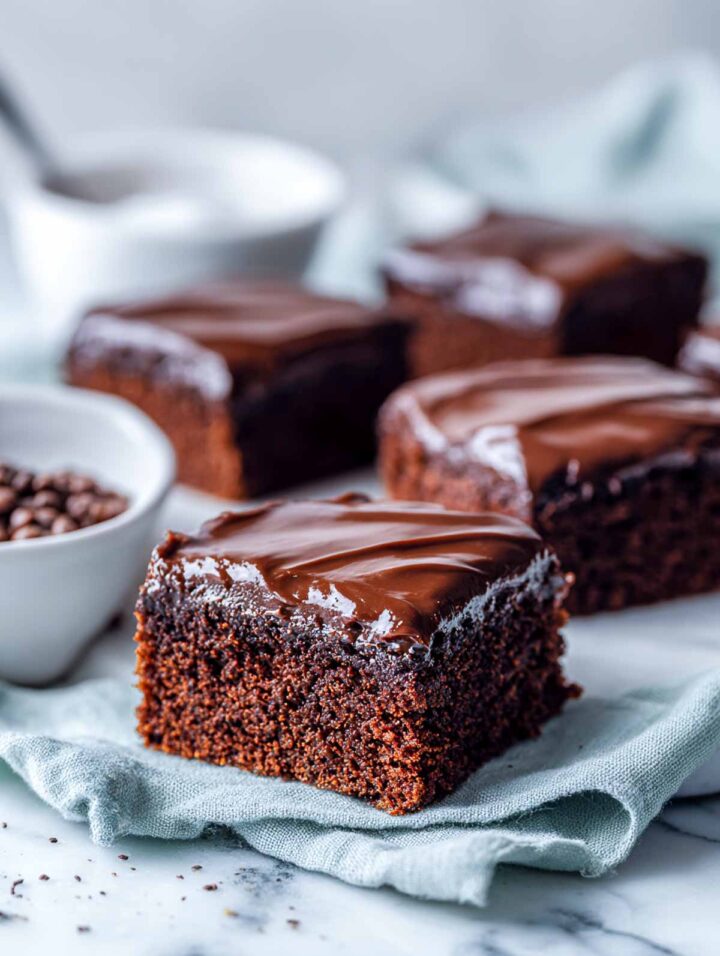
Chocolate chickpea snack cake with fudge frosting has a soft, cake-like crumb that feels rich without being heavy. The chickpeas melt into the batter, letting the chocolate flavor take the lead rather than standing out. A simple fudge frosting on top adds contrast and makes each slice feel finished. It’s a nice reminder that a chickpea dessert can still feel familiar.
Ingredients
- For the Cake
- 1 cup canned chickpeas, rinsed, drained, and patted very dry
- ¾ cup all-purpose flour
- ¼ cup unsweetened cocoa powder
- ¾ teaspoon baking powder
- ¼ teaspoon baking soda
- ¼ teaspoon salt
- ½ cup granulated sugar
- ⅓ cup neutral oil, such as avocado or light olive oil
- 2 large eggs, at room temperature
- ¼ cup milk
- 1 teaspoon vanilla extract
- For the Fudge Frosting
- ¼ cup unsalted butter
- ¼ cup unsweetened cocoa powder
- ¾ cup powdered sugar
- 2 to 3 tablespoons milk
- ½ teaspoon vanilla extract
Instructions
- Preheat the oven to 350°F. Line an 8×8-inch baking pan with parchment paper, leaving overhang on two sides.
- Place the chickpeas in a food processor and blend until completely smooth, scraping down the sides as needed. There should be no visible chunks.
- In a medium bowl, whisk together the flour, cocoa powder, baking powder, baking soda, and salt until evenly combined. In a separate bowl, whisk the sugar, oil, eggs, milk, and vanilla extract until smooth. Add the chickpea purée to the wet ingredients and whisk until fully incorporated.
- Add the dry ingredients to the wet mixture and stir just until combined. Do not overmix. The batter will be thick but pourable. Spread the batter evenly into the prepared pan and smooth the top.
- Bake for 25-28 minutes, until the center is set and a toothpick inserted comes out clean or with a few moist crumbs. Let the cake cool completely in the pan before frosting.
- In a small saucepan, melt the butter over low heat. Whisk in the cocoa powder until smooth. Remove from heat and whisk in the powdered sugar, 2 tablespoons milk, and vanilla extract until smooth and glossy. Add more milk, a teaspoon at a time if needed, until the consistency is spreadable.
- Spread the frosting evenly over the cooled cake. Let it set for 10 to 15 minutes before slicing into squares.
Oat Bran Snickerdoodle Bars With Cinnamon Crunch
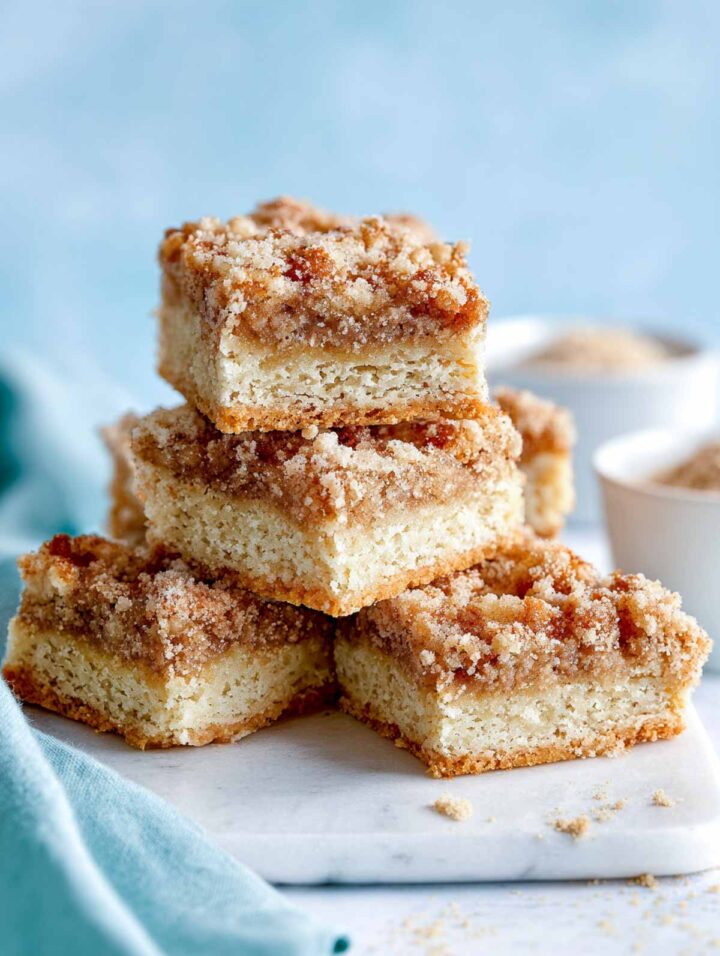
The layered structure of oat bran snickerdoodle bars with cinnamon crunch gives you a soft center with a crunchy topping. The cinnamon flavor comes through warmly. Oat bran keeps the bars sturdy enough to slice cleanly while still staying tender. These bars appeal to anyone who enjoys fiber-rich desserts with a nostalgic edge.
Ingredients
- For the Base Layer
- ¾ cup oat bran
- ¼ cup all-purpose flour
- 2 tablespoons light brown sugar
- ¼ teaspoon salt
- 4 tablespoons unsalted butter, melted
- For the Snickerdoodle Layer
- ½ cup unsalted butter, softened
- ½ cup granulated sugar
- ¼ cup light brown sugar
- 1 large egg, at room temperature
- ¼ cup milk
- 1 teaspoon vanilla extract
- ¾ cup all-purpose flour
- ½ cup oat bran
- 1 teaspoon cream of tartar
- ½ teaspoon baking soda
- ¼ teaspoon salt
- For the Cinnamon Crumb Topping
- ⅓ cup all-purpose flour
- ¼ cup granulated sugar
- 1 teaspoon ground cinnamon
- 3 tablespoons unsalted butter, melted
Instructions
- Preheat the oven to 350°F. Line an 8×8-inch baking pan with parchment paper, leaving overhang on two sides.
- In a bowl, mix oat bran, flour, brown sugar, salt, and melted butter until evenly moistened. Press firmly and evenly into the bottom of the prepared pan. Bake for 10 minutes. Remove and set aside while you prepare the remaining layers.
- In a mixing bowl, cream the softened butter, granulated sugar, and brown sugar until smooth. Add the egg, milk, and vanilla extract and mix until fully combined. Stir in the flour, oat bran, cream of tartar, baking soda, and salt just until a thick, smooth batter forms.
- Spoon the batter over the warm base layer and spread gently into an even layer using an offset spatula.
- In a small bowl, mix flour, sugar, and cinnamon. Add melted butter and stir until large, soft crumbs form. Sprinkle the crumb topping evenly over the batter.
- Bake for 25-30 minutes, until the topping is lightly golden and the center is set. Let the bars cool fully in the pan. Lift out using parchment and slice into squares with a sharp knife.
Raspberry Oat Fiber Thumbprint Cookies

Raspberry oat fiber thumbprint cookies have a bright berry center that stands out against the lightly sweet cookie base. The oat fiber blends into the dough, keeping the texture smooth. Each cookie holds its shape well, making them easy to stack or serve. They’re a great example of high fiber dessert recipes that still look bakery-style.
Ingredients
- ½ cup unsalted butter, softened
- ½ cup granulated sugar
- 1 large egg yolk, at room temperature
- 1 teaspoon vanilla extract
- ¾ cup all-purpose flour
- ½ cup oat fiber
- ¼ teaspoon baking powder
- ¼ teaspoon salt
- For the Filling: ½ cup smooth raspberry jam or seedless raspberry preserves
Instructions
- Preheat the oven to 350°F. Line two baking sheets with parchment paper.
- In a mixing bowl, beat the softened butter and granulated sugar together until light and creamy, about 2 minutes. Add the egg yolk and vanilla extract and mix until fully incorporated.
- In a separate bowl, whisk together the flour, oat fiber, baking powder, and salt until evenly combined. Add the dry ingredients to the butter mixture and mix just until a soft, cohesive dough forms. The dough should be firm but pliable, not sticky.
- Scoop the dough into 1 tablespoon portions and roll into smooth balls. Place them 2 inches apart on the prepared baking sheets.
- Use your thumb or the back of a teaspoon to press a shallow indentation into the center of each cookie. Smooth any cracks gently with your fingers. Spoon about ½ teaspoon of raspberry jam into each indentation, filling without overflowing.
- Bake for 12-14 minutes, until the cookies are set and the bottoms are lightly golden. The tops should remain pale. Let the cookies cool on the baking sheet for 5 minutes, then transfer to a wire rack to cool completely. The jam will firm up as the cookies cool.
Mocha Breakfast Cookies With Chicory Root Fiber
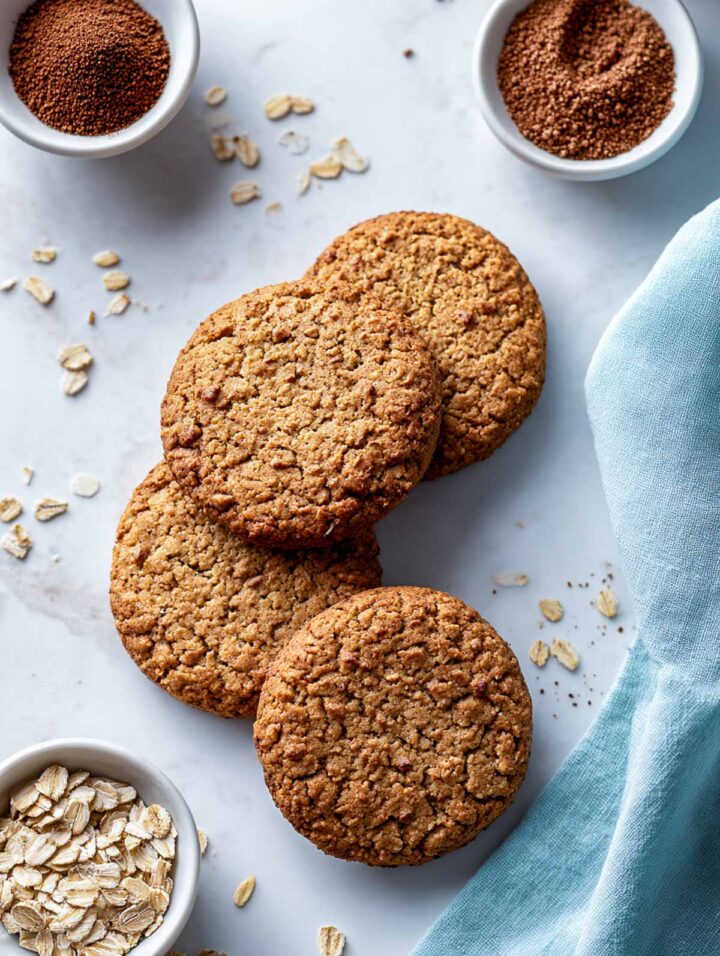
Coffee and cocoa come together in mocha breakfast cookies with chicory root fiber, giving them a deeper, slightly bittersweet flavor. The cookies stay soft with a hearty texture that makes them feel more substantial than a standard cookie. Chicory root fiber blends quietly into the dough without affecting taste. These are a good fit for anyone browsing high fiber sweets that are less sugary.
Ingredients
- 1½ cups rolled oats
- ¾ cup all-purpose flour
- ¼ cup chicory root fiber
- ¼ cup unsweetened cocoa powder
- ½ cup light brown sugar
- ¼ cup granulated sugar
- ½ teaspoon baking powder
- ¼ teaspoon baking soda
- ¼ teaspoon salt
- ½ teaspoon instant coffee granules
- ½ cup unsalted butter, melted and cooled slightly
- 1 large egg, at room temperature
- ¼ cup milk
- 1 teaspoon vanilla extract
Instructions
- Preheat the oven to 350°F. Line two baking sheets with parchment paper.
- In a large bowl, whisk together the rolled oats, flour, chicory root fiber, cocoa powder, brown sugar, granulated sugar, baking powder, baking soda, salt, and instant coffee granules until evenly combined.
- In a separate bowl, whisk the melted butter, egg, milk, and vanilla extract until smooth. Pour the wet ingredients into the dry ingredients and stir just until fully combined. The dough will be thick and slightly textured.
- Let the dough rest for 10 minutes to allow the oats and fiber to hydrate. This step is important for structure.
- Scoop the dough into 2 tablespoon portions and roll lightly into balls. Place them 2½ inches apart on the prepared baking sheets. Gently flatten each ball slightly with the palm of your hand.
- Bake for 14 to 16 minutes, until the edges are set and the centers no longer look wet. Let the cookies cool on the baking sheet for 5 minutes, then transfer to a wire rack to cool completely. They will firm up as they cool.
Fig And Almond Cake With Whole Wheat Crumb
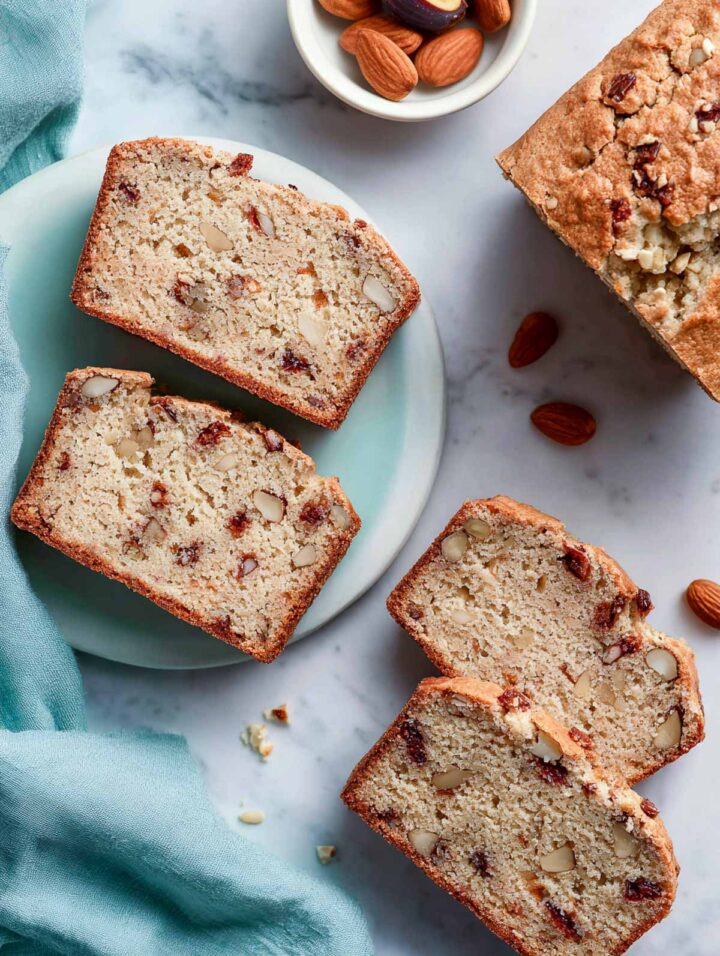
Fig and almond breakfast cake with whole wheat crumb has a gently sweet flavor that lets the figs do most of the work. Almonds add subtle texture, while the whole-wheat crumb keeps the cake grounded and sliceable. It’s the kind of cake that feels just as right in the morning as it does later in the day. This one works especially well for fans of whole-grain desserts.
Ingredients
- 1½ cups whole wheat flour
- ½ cup all-purpose flour
- 1 teaspoon baking powder
- ¼ teaspoon baking soda
- ¼ teaspoon salt
- ½ teaspoon ground cinnamon
- ½ cup chopped dried figs
- ⅓ cup sliced almonds
- ½ cup granulated sugar
- ¼ cup light brown sugar
- ½ cup plain full-fat yogurt, at room temperature
- ⅓ cup neutral oil, such as avocado or light olive oil
- 2 large eggs, at room temperature
- ¼ cup milk
- 1 teaspoon vanilla extract
Instructions
- Preheat the oven to 350°F. Grease and line a standard 9×5-inch loaf pan with parchment paper, leaving overhang on the long sides.
- In a medium bowl, whisk together the whole wheat flour, all-purpose flour, baking powder, baking soda, salt, and cinnamon until evenly combined. In a small bowl, toss the chopped figs and sliced almonds with 1 tablespoon of the dry flour mixture to prevent sinking.
- In a large bowl, whisk together the granulated sugar, brown sugar, yogurt, oil, eggs, milk, and vanilla extract until smooth. Add the dry ingredients to the wet ingredients and gently fold just until no dry streaks remain. Do not overmix.
- Fold in the figs and almonds evenly throughout the batter. The batter will be thick but pourable. Transfer the batter to the prepared loaf pan and smooth the top.
- Bake for 45-50 minutes, until the loaf is lightly golden and a toothpick inserted into the center comes out clean or with a few moist crumbs. Let the cake cool in the pan for 10 minutes, then lift out and transfer to a wire rack to cool completely before slicing.
Apple Cinnamon Yogurt Bark With Granola Crunch
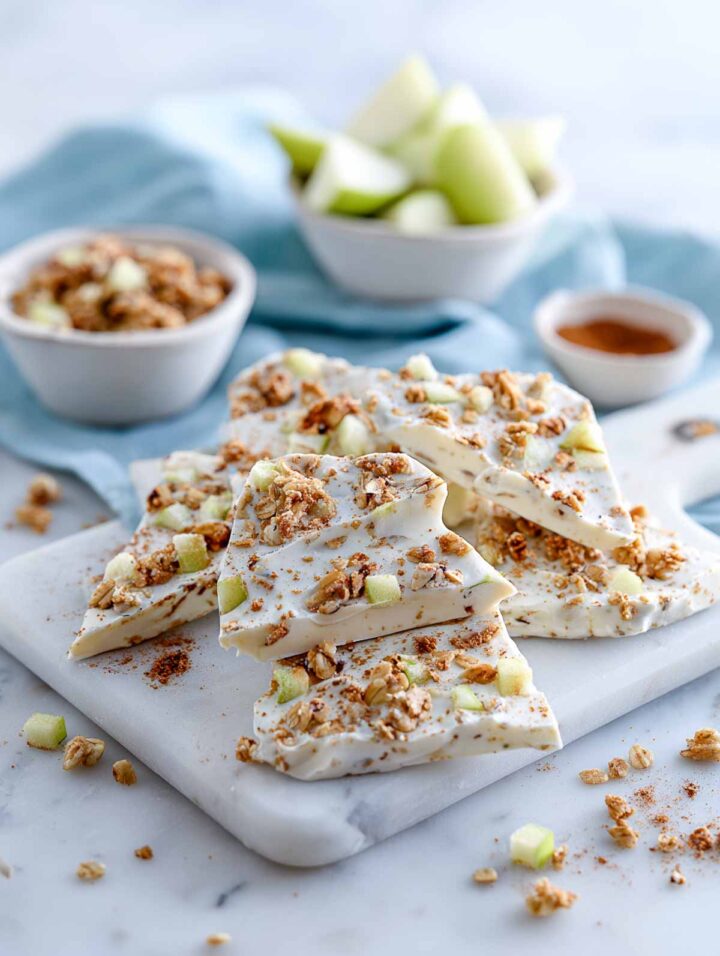
The creamy base of this apple cinnamon yogurt bark contrasts nicely with the crisp granola and small bits of apple throughout. Breaking it into uneven pieces keeps it casual and snackable. It fits naturally into conversations around high fiber desserts that feel light and freezer-friendly.
Ingredients
- 2 cups plain Greek yogurt, full-fat
- 2 tablespoons honey
- ½ teaspoon ground cinnamon
- 2 tablespoons finely ground oat bran
- 1 tablespoon ground flaxseed
- ½ cup finely diced apple, very well patted dry
- ½ cup granola, lightly crushed
Instructions
- Line a rimmed baking sheet or small tray with parchment paper and set aside.
- In a medium bowl, stir together the Greek yogurt, honey, cinnamon, finely ground oat bran, and ground flaxseed until completely smooth. The mixture should look lightly speckled and slightly thicker than plain yogurt.
- Gently fold in ¼ cup of the diced apple and ¼ cup of the crushed granola, mixing just until evenly distributed. Do not overmix. Spread the yogurt mixture into an even layer on the prepared tray. Smooth lightly with a spatula.
- Sprinkle the remaining diced apple evenly over the yogurt, followed by the crushed granola. Lightly press the toppings into the yogurt so they adhere. Freeze uncovered for 3 to 4 hours, or until completely firm and set throughout.
- Once frozen solid, lift the bark out using the parchment paper and break it into pieces. Serve immediately, or transfer to an airtight container and store in the freezer.
Berry Skyr Parfaits With Ground Flax Crumble
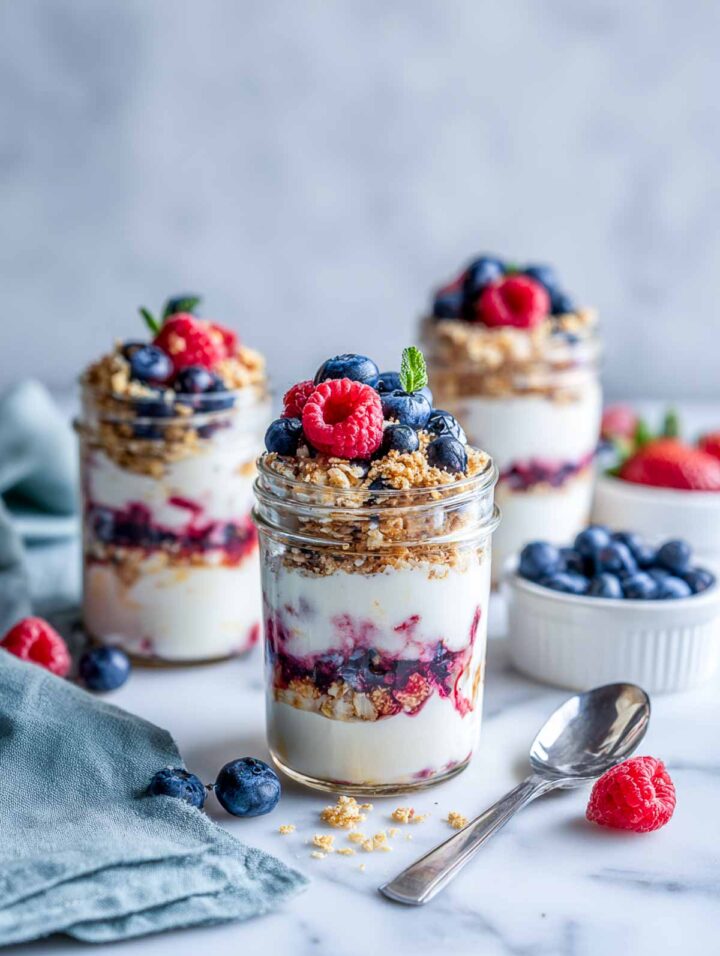
Berry skyr parfait with ground flax crumble relies on clean layers and bright color for its appeal. The berry compote adds a vivid middle layer that breaks up the creamy skyr. A small amount of flax crumbled on top adds texture without overwhelming the spoonful. These parfaits are an easy way to enjoy simple Greek yogurt dessert ideas with a little structure.
Ingredients
- For the Berry Compote
- 1½ cups mixed berries (blueberries, raspberries, or a mix)
- 1½ tablespoons honey
- 1 teaspoon lemon juice
- For the Parfaits
- 2 cups plain skyr yogurt
- ½ cup granola
- For the Flax Crumble
- 2 tablespoons ground flaxseed
- 1 tablespoon honey
- 1 tablespoon finely crushed granola
Instructions
- Add the berries, honey, and lemon juice to a small saucepan. Cook over medium heat for 6-8 minutes, stirring occasionally, until the berries break down and the mixture becomes glossy and jam-like. Remove from heat and let cool completely.
- In a small bowl, mix the ground flaxseed, honey, and crushed granola until clumpy and evenly combined. Set aside.
- Spoon 2 tablespoons of granola into the bottom of each parfait jar to form the base. Add a thick layer of skyr yogurt, smoothing it gently. Add a layer of crushed granola.
- Spoon 2-3 tablespoons of cooled berry compote over the yogurt, spreading it into an even layer. Add another layer of Skyr yogurt. Sprinkle a small amount of granola and flax crumble near the top for texture. Finish with fresh berries and a final pinch of flax crumble.
Dark Chocolate Lentil Truffles With Cocoa Dust
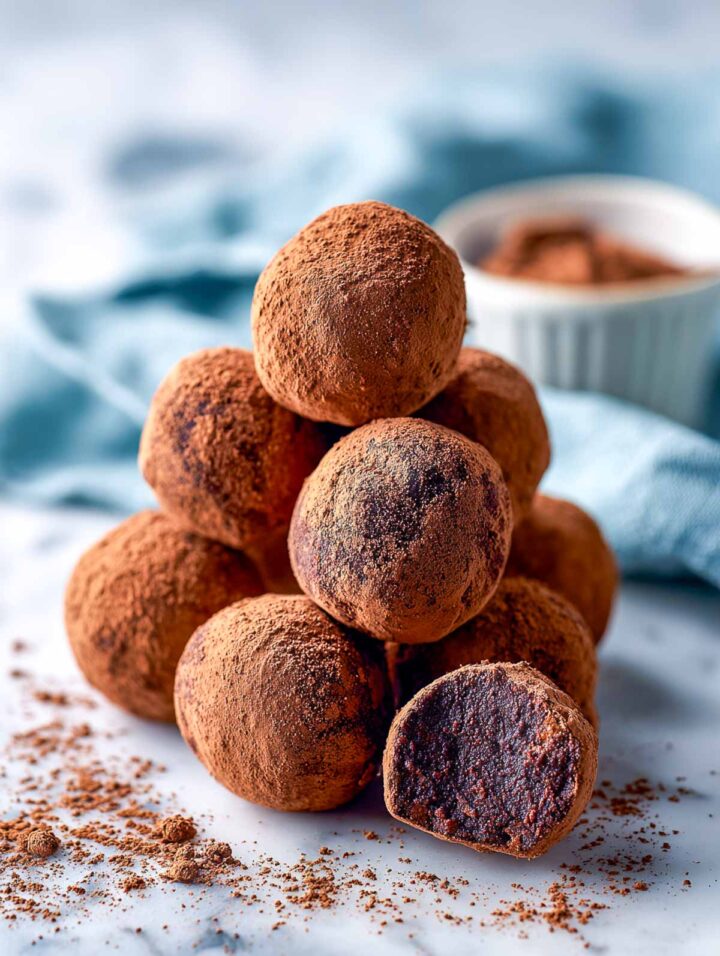
Rich and smooth, dark chocolate lentil truffles feel surprisingly classic once plated. The lentils disappear into the chocolate, creating a creamy interior rather than a dense bite. A light cocoa coating keeps them from feeling overly sweet. They’re often appreciated as high protein high fiber dessert options that still feel indulgent.
Ingredients
- 1 cup cooked lentils, very well drained
- ¾ cup dark chocolate chips (70% cacao)
- ¼ cup unsweetened cocoa powder, plus more for dusting
- 3 tablespoons maple syrup
- 2 tablespoons almond butter
- 1 teaspoon vanilla extract
- ¼ teaspoon salt
Instructions
- Place the cooked lentils on a clean kitchen towel and pat them completely dry. Excess moisture will prevent the truffles from setting properly. Add the lentils to a food processor and blend until fully smooth, scraping down the sides as needed. There should be no visible lentil pieces.
- Melt the dark chocolate chips gently in the microwave or over a double boiler, stirring until smooth. Add the melted chocolate, cocoa powder, maple syrup, almond butter, vanilla extract, and salt to the lentil purée.
- Process until the mixture is completely smooth, glossy, and uniform in color. Taste and adjust the sweetness if needed.
- Transfer the mixture to a bowl and refrigerate for 30 to 40 minutes, until firm enough to scoop but not hard.
- Scoop the mixture into 1 tablespoon portions and roll quickly between your palms to form smooth balls. Roll each truffle lightly in cocoa powder to coat evenly. Chill the finished truffles for 15 minutes to set before serving.
Warm Date Oat Muffins With Barley Beta Glucan
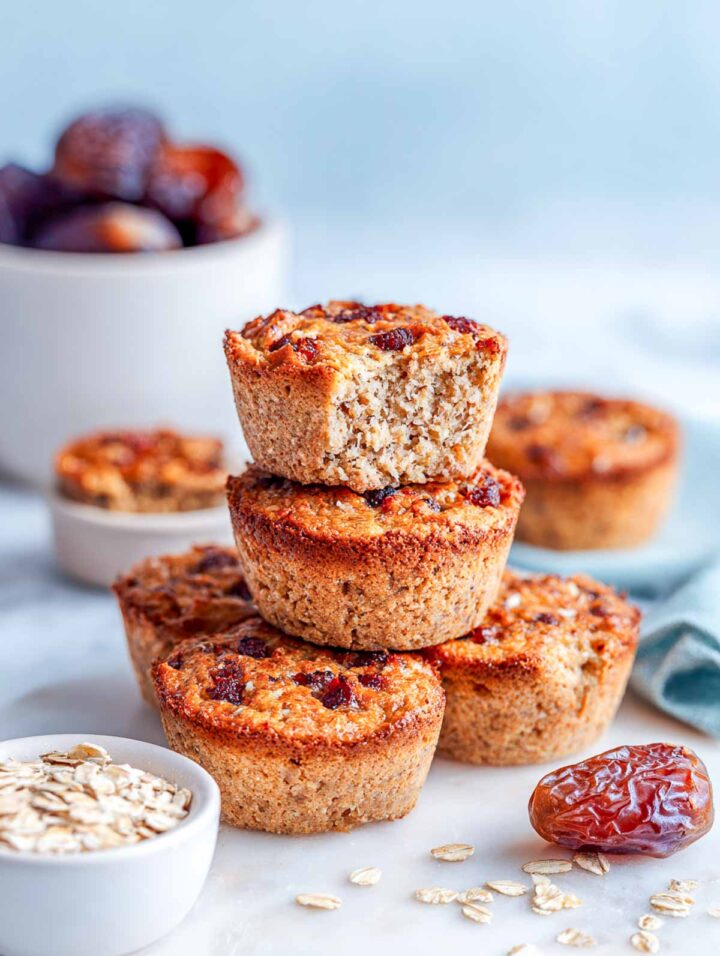
Warm date oat cakes with barley beta-glucan have a soft, comforting texture that pairs well with their gentle sweetness. Dates provide most of the flavor, letting the oats and barley stay in the background. These cakes are especially nice served slightly warm. They suit anyone looking for fiber rich foods recipes that feel cozy.
Ingredients
- 1 cup rolled oats
- ½ cup whole wheat flour
- ¼ cup barley beta-glucan powder
- ⅓ cup light brown sugar
- 1 teaspoon baking powder
- ¼ teaspoon baking soda
- ¼ teaspoon salt
- ½ teaspoon ground cinnamon
- ¾ cup chopped dates
- ½ cup milk
- ¼ cup neutral oil, such as avocado or light olive oil
- 1 large egg, at room temperature
- 1 teaspoon vanilla extract
Instructions
- Preheat the oven to 350°F. Lightly grease a standard 12-cup muffin pan or line with parchment liners.
- In a large bowl, whisk together the rolled oats, whole wheat flour, barley beta-glucan powder, brown sugar, baking powder, baking soda, salt, and cinnamon until evenly combined. Stir the chopped dates into the dry mixture, tossing to coat so they distribute evenly during baking.
- In a separate bowl, whisk together the milk, oil, egg, and vanilla extract until smooth. Pour the wet ingredients into the dry ingredients and stir just until combined. The batter will be thick but spoonable.
- Divide the batter evenly among the prepared muffin cups, filling each about ¾ full.
- Bake for 18 to 22 minutes, until the tops are set and a toothpick inserted into the center comes out clean or with a few moist crumbs. Let the cakes cool in the pan for 5 minutes, then transfer to a wire rack. Serve warm or at room temperature.
Apple Crisp Jars With Inulin Oat Topping
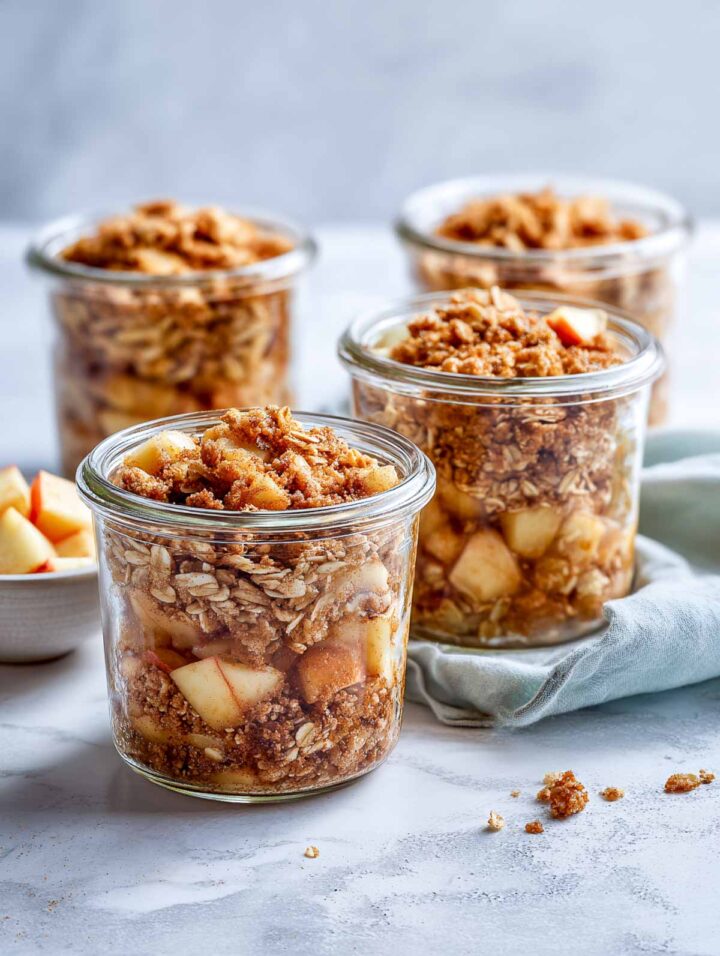
Layered and spoonable, apple crisp jars with inulin oat topping combine tender fruit with a lightly crisp finish. The oat topping stays structured even after chilling, which helps the layers stay distinct. This dessert works well when you’re in the mood for a granola dessert with a softer base.
Ingredients
- For the Apple Filling
- 3 cups peeled, diced apples (about 3 medium apples)
- 2 tablespoons granulated sugar
- 1 tablespoon lemon juice
- ½ teaspoon ground cinnamon
- ¼ teaspoon salt
- 1 teaspoon cornstarch
- For the Inulin Oat Topping
- ¾ cup rolled oats
- ¼ cup all-purpose flour
- 2 tablespoons inulin powder
- ¼ cup light brown sugar
- ¼ teaspoon ground cinnamon
- ¼ teaspoon salt
- 4 tablespoons unsalted butter, melted and cooled slightly
Instructions
- Preheat the oven to 350°F. Place four heat-safe glass jars on a rimmed baking sheet and set aside.
- In a medium bowl, toss the diced apples with granulated sugar, lemon juice, cinnamon, salt, and cornstarch until evenly coated. Divide the apple mixture evenly among the jars, pressing lightly so the apples sit compactly but are not packed tightly.
- In a separate bowl, stir together the rolled oats, flour, inulin powder, brown sugar, cinnamon, and salt. Pour the melted butter over the oat mixture and stir until the mixture is crumbly and evenly moistened.
- Spoon the oat topping evenly over the apples in each jar, gently pressing just enough so it sits level without compacting.
- Bake for 28 to 32 minutes, until the apples are tender, bubbling slightly at the edges, and the topping is lightly golden. Remove from the oven and let cool for 10 minutes before serving. The filling will thicken as it cools.
Pear Almond Crumble With Resistant Starch Oats
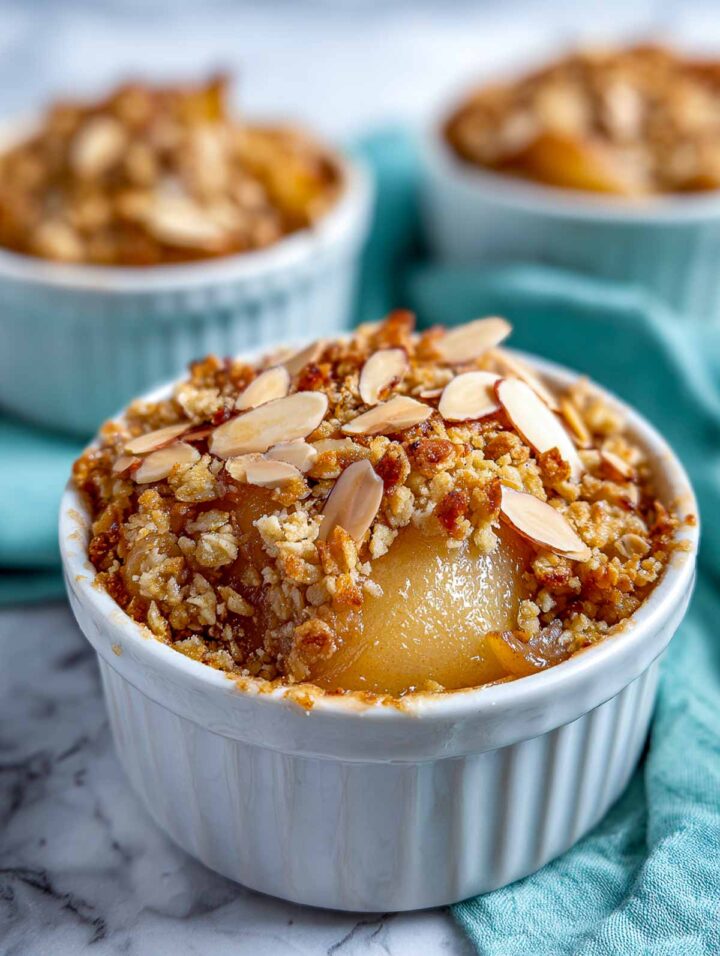
Pear almond crumble with resistant starch oats keeps things understated and elegant. The pears soften into the base while the almond crumble adds gentle texture on top. Resistant starch oats help the crumble hold its shape without becoming hard. This is one of those high fiber dessert recipes that feels calm and familiar.
Ingredients
- For the Pear Filling
- 3 cups peeled, diced pears (about 3 medium pears)
- 2 tablespoons granulated sugar
- 1 tablespoon lemon juice
- ½ teaspoon ground cinnamon
- ¼ teaspoon salt
- 1½ teaspoons cornstarch
- For the Almond Oat Crumble
- ¾ cup rolled oats
- ¼ cup all-purpose flour
- 2 tablespoons resistant starch (green banana flour)
- ¼ cup light brown sugar
- ¼ teaspoon salt
- ¼ teaspoon ground cinnamon
- ¼ cup sliced almonds
- 4 tablespoons unsalted butter, melted and cooled slightly
Instructions
- Preheat the oven to 350°F. Place four small oven-safe ramekins on a baking sheet.
- In a bowl, toss the diced pears with granulated sugar, lemon juice, cinnamon, salt, and cornstarch until evenly coated. Divide the pear mixture evenly among the ramekins, filling them close to the rim without packing tightly.
- In a separate bowl, stir together the rolled oats, flour, resistant starch, brown sugar, salt, cinnamon, and sliced almonds. Pour the melted butter over the oat mixture and stir until evenly moistened and crumbly.
- Spoon the crumble topping evenly over the pears, lightly leveling the surface without pressing it down.
- Bake for 30 to 35 minutes, until the topping is golden brown and the pear filling is bubbling gently around the edges. Remove from the oven and let cool for 10 minutes before serving. The filling will thicken as it rests.
Strawberry Ricotta Cups With Citrus Fiber
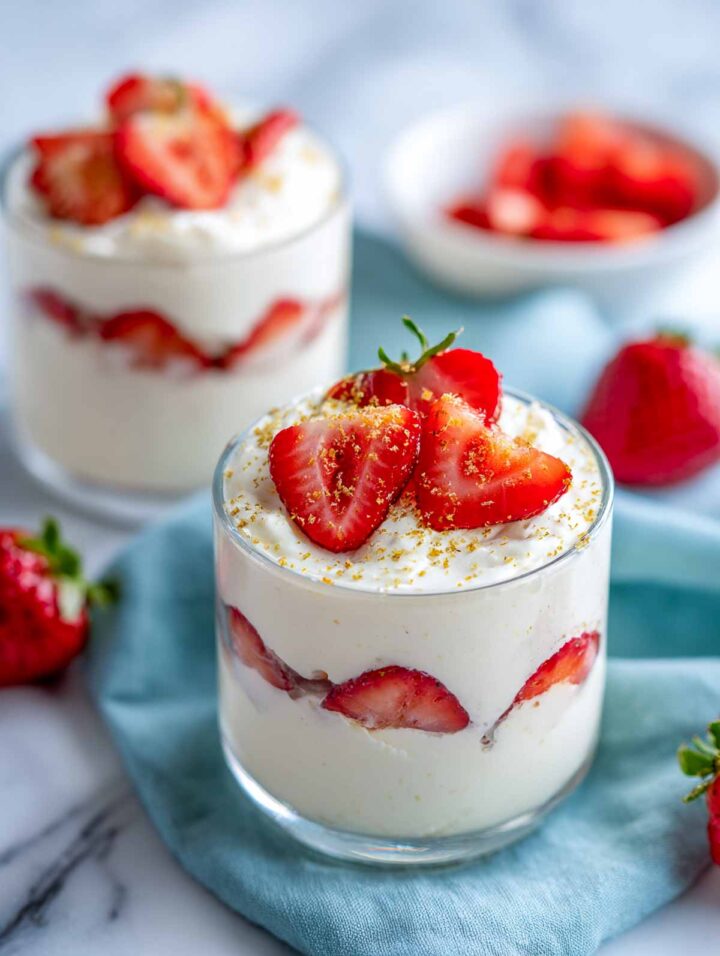
Light and creamy, strawberry ricotta cups with citrus fiber have clean flavors and neat layers. The ricotta mixture stays smooth while the strawberries add brightness throughout. A fine citrus finish ties everything together without overpowering the fruit. These cups fit naturally among healthy sweet treats that still feel dessert-forward.
Ingredients
- 1½ cups whole milk ricotta cheese
- ¼ cup powdered sugar
- ½ teaspoon vanilla extract
- ¾ cup heavy cream, cold
- 1 teaspoon citrus fiber powder (orange fiber or citrus fiber)
- 1½ cups fresh strawberries, hulled and thinly sliced
- ½ teaspoon finely grated lemon zest
- ¼ teaspoon finely grated orange zest
Instructions
- In a medium bowl, whisk the ricotta cheese until smooth and creamy. This step is important to remove any graininess. Add the powdered sugar, vanilla extract, and citrus fiber to the ricotta and mix until fully combined and smooth.
- In a separate bowl, whip the cold heavy cream to soft peaks using a hand mixer. The cream should hold its shape but still look soft. Gently fold the whipped cream into the ricotta mixture in two additions, using a spatula and light strokes to keep the mixture airy.
- To assemble, place a spoonful of ricotta cream into the bottom of each serving glass. Add a layer of strawberries.
- Spoon more ricotta cream over the strawberries and smooth the top. Repeat the layers once more. Finish by lightly sprinkling lemon and orange zest over each cup.
- Chill for at least 30 minutes before serving to allow the layers to set and flavors to meld.
Coconut Milk Panna Cotta With Citrus Fiber Zest

Coconut milk panna cotta with citrus fiber sets into a silky texture that holds clean lines when spooned. The coconut milk brings richness while the citrus keeps the flavor from feeling flat. It’s a dessert that looks elegant without requiring complicated steps. This one appeals to those seeking high-fiber desserts with a refined feel.
Ingredients
- 1¾ cups full-fat canned coconut milk, well shaken
- ¼ cup granulated sugar
- 1½ teaspoons powdered gelatin
- 2 tablespoons cold water
- 1 teaspoon vanilla extract
- 1 teaspoon citrus fiber
- 1 teaspoon finely grated lemon or orange zest
- Pinch of salt
Instructions
- In a small bowl, sprinkle the gelatin evenly over the cold water. Let it sit undisturbed for 5 minutes until fully hydrated and spongy.
- Add the coconut milk, sugar, salt, citrus fiber, and citrus zest to a saucepan. Heat over medium-low, stirring frequently, until the sugar is fully dissolved and the mixture is hot but not boiling. Do not let it simmer or bubble.
- Remove the saucepan from the heat. Add the bloomed gelatin and whisk gently until completely dissolved. The mixture should be smooth with no visible gelatin granules. Stir in the vanilla extract. Strain the mixture through a fine-mesh sieve into a measuring jug to remove excess zest and ensure a silky texture.
- Pour the mixture evenly into 4 small glasses or ramekins. Let cool at room temperature for 15 minutes, then refrigerate uncovered for at least 4 hours, or until fully set.
- Just before serving, top with a light sprinkle of freshly grated citrus zest.
Frozen Banana Pops With Acacia Fiber Chocolate
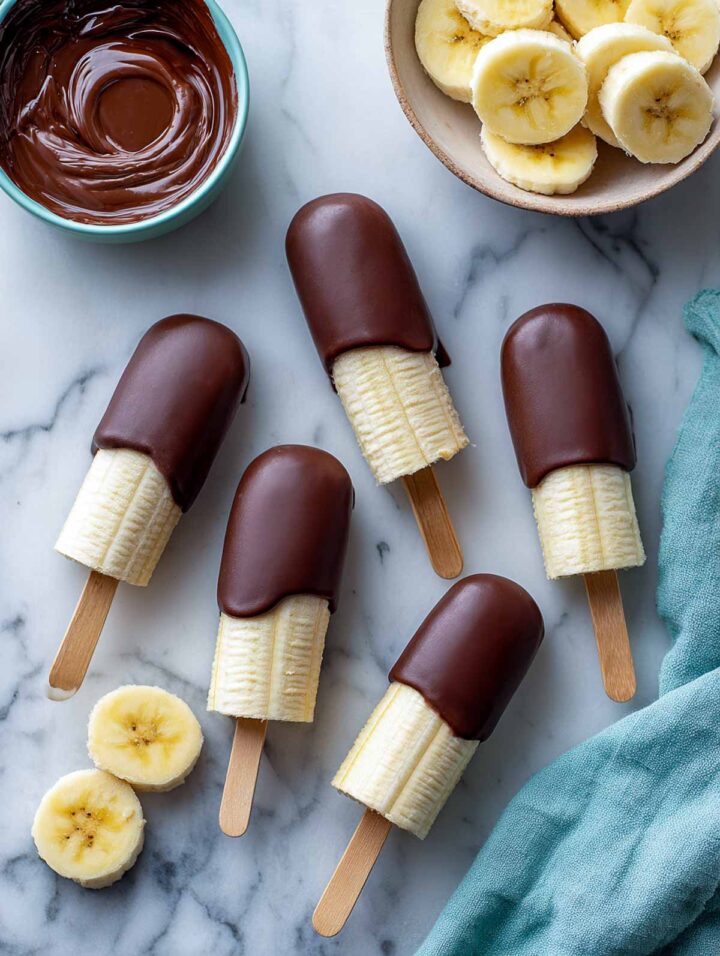
Frozen and playful, banana pops with acacia fiber chocolate balance creamy fruit with a thin chocolate shell. The contrast in textures makes each bite feel satisfying without being heavy. They’re especially appealing when you want something fun that still feels thoughtful. These pops are often enjoyed as high-fiber foods for kids.
Ingredients
- 3 large ripe bananas
- 6 wooden popsicle sticks
- ¾ cup dark chocolate chips or chopped dark chocolate
- 1 tablespoon coconut oil
- 1 tablespoon acacia fiber powder
Instructions
- Peel the bananas and cut each one in half crosswise. Insert a wooden popsicle stick into the cut end of each banana half. Place on a parchment-lined tray and freeze for at least 2 hours, until completely firm.
- Add the dark chocolate and coconut oil to a heat-safe bowl. Melt gently in the microwave in 20-second intervals, or over a double boiler, stirring until smooth. Stir in the acacia fiber powder until fully dissolved, and the chocolate looks glossy and uniform.
- Working one at a time, dip the frozen banana halves into the melted chocolate, coating the banana end opposite the stick. Let excess chocolate drip back into the bowl.
- Place the dipped banana pops back onto the parchment-lined tray. The chocolate will begin to set quickly. Return the tray to the freezer for 15 to 20 minutes, or until the chocolate shell is fully hardened.
- Serve immediately or transfer to an airtight container and keep frozen until ready to eat.
Carrot Cake Energy Squares With Wheat Dextrin
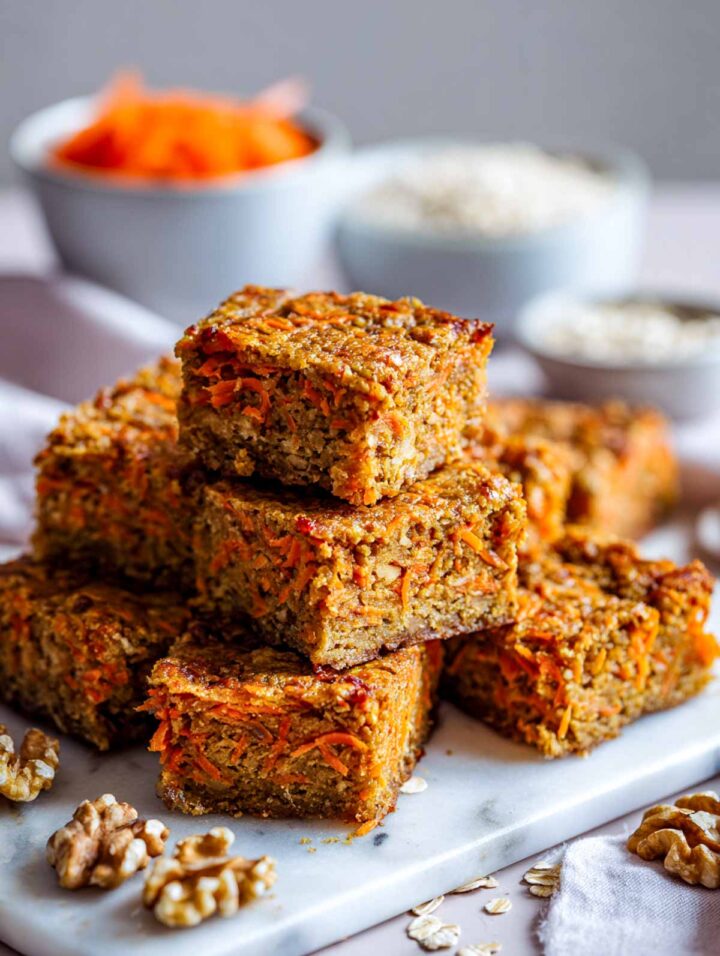
Carrot cake energy squares with wheat dextrin pack classic carrot cake flavor into compact, sliceable pieces. The texture stays moist, with visible carrot throughout rather than a dense crumb. Wheat dextrin blends in quietly, letting the spices and sweetness shine. These squares round out the list as dependable, high-fiber desserts you can make ahead.
Ingredients
- 1 cup finely grated carrot, lightly packed
- ¾ cup rolled oats
- ½ cup almond flour
- ¼ cup chopped walnuts
- ¼ cup wheat dextrin powder
- ¼ cup maple syrup
- ¼ cup almond butter
- 1 large egg
- 1 teaspoon vanilla extract
- 1 teaspoon ground cinnamon
- ¼ teaspoon ground nutmeg
- ¼ teaspoon salt
- ½ teaspoon baking powder
Instructions
- Preheat oven to 350°F. Line an 8×8-inch baking pan with parchment paper, leaving a slight overhang for easy removal.
- In a large bowl, combine rolled oats, almond flour, chopped walnuts, wheat dextrin, cinnamon, nutmeg, salt, and baking powder. Stir until evenly mixed. In a separate bowl, whisk together maple syrup, almond butter, egg, and vanilla extract until smooth and fully combined.
- Add the wet mixture to the dry ingredients. Fold gently until mostly combined, then fold in the grated carrot. The batter should be thick, cohesive, and slightly sticky.
- Transfer batter to the prepared pan and press evenly into the corners. Bake for 18 to 22 minutes, until the top is set and the center no longer looks wet.
- Remove from the oven and allow to cool fully in the pan. This step is essential for clean cuts and proper texture. Lift out using parchment and cut into even squares with a sharp knife.
More High-Fiber Recipes
Make-ahead mornings feel easier with these high-fiber breakfast recipes made from overnight oats and chia puddings. The flavors range from fruit-forward and cozy to nutty and savory, with textures that stay creamy by morning. An easy way to try fibermaxxing at breakfast.