21 Baby Shower Food Ideas for Sweet Celebrations When You Can Bear-ly Wait
Putting together food for a baby shower is a chance to create a table that feels joyful, inviting, and easy to enjoy. These baby shower food ideas bring together a mix of sweet and savory recipes that work well for a variety of themes and guest lists. You’ll find finger foods, make-ahead snacks, and simple desserts that are easy to serve and easy to eat. From fresh fruit displays and bite-sized appetizers to playful pastel treats, this list helps you plan a spread that feels thoughtful, balanced, and stress-free.

Caprese Skewers
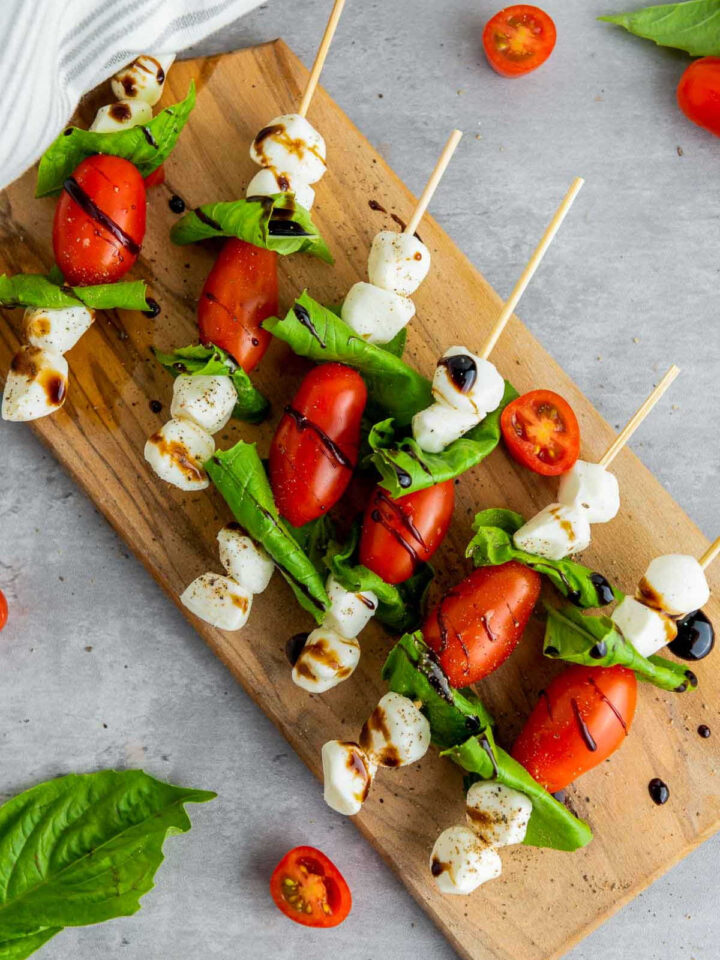
Caprese skewers bring a fresh, colorful option to the table that feels light yet special. Juicy tomatoes, creamy mozzarella, and basil make these easy to assemble and easy to eat. They work beautifully as baby shower appetizers and pair well with both brunch and afternoon menus. This is one of those good-for-baby-shower food choices that always disappear fast.
Get the recipe: Caprese Skewers.
Tea Sandwich Squares With Cucumber And Dill
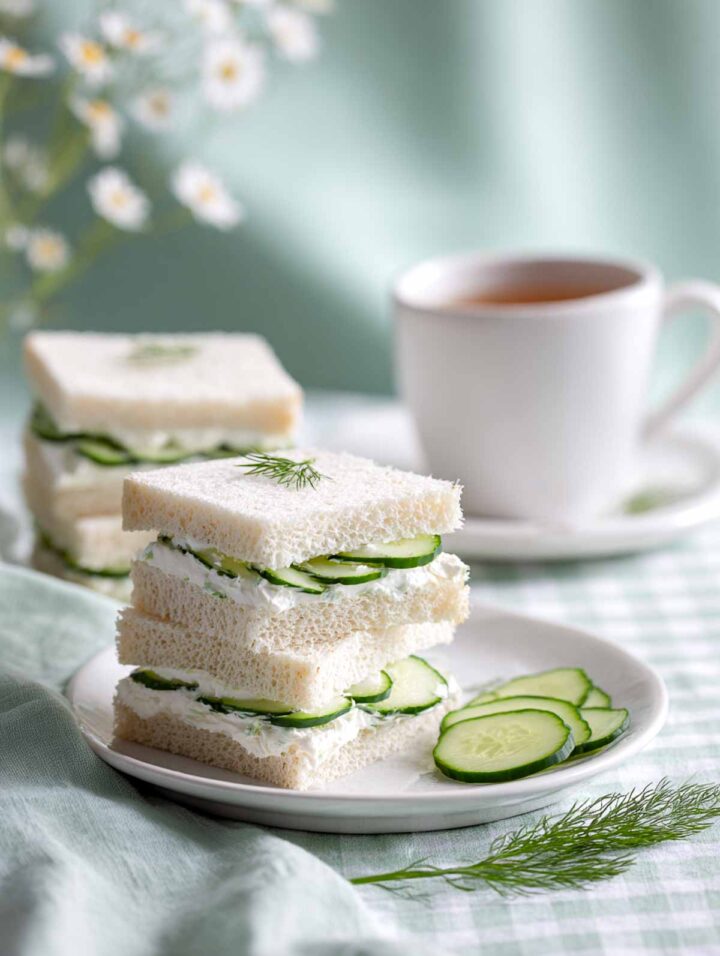
These tea sandwich squares feel classic and polished, perfect for showers that lean elegant. The crisp cucumber and creamy dill spread keep them refreshing and balanced. These easy cucumber finger sandwiches are perfect for baby shower brunch ideas. Serve them chilled on a platter for a clean, timeless look.
Ingredients
- 8 slices soft white sandwich bread
- ¾ cup full-fat cream cheese, softened
- 1 tablespoon fresh dill, finely chopped
- 1 teaspoon lemon juice
- Salt and pepper to taste
- 1 English cucumber, thinly sliced
Instructions
- In a small bowl, stir together the softened cream cheese, chopped dill, lemon juice, salt, and black pepper until smooth and evenly combined.
- Lay the bread slices flat on a cutting board and spread an even layer of the cream cheese mixture on all eight slices. Arrange a single, even layer of thin cucumber slices on four of the bread slices, keeping the slices flat and slightly overlapping.
- Top with the remaining bread slices to form sandwiches, gently pressing to set without compressing. Trim off the crusts using a sharp knife, then cut each sandwich into four even squares. Refrigerate for 15 to 20 minutes before serving to help the sandwiches hold their shape cleanly.
Pastel Veggie Pinwheel Wraps With Herb Spread
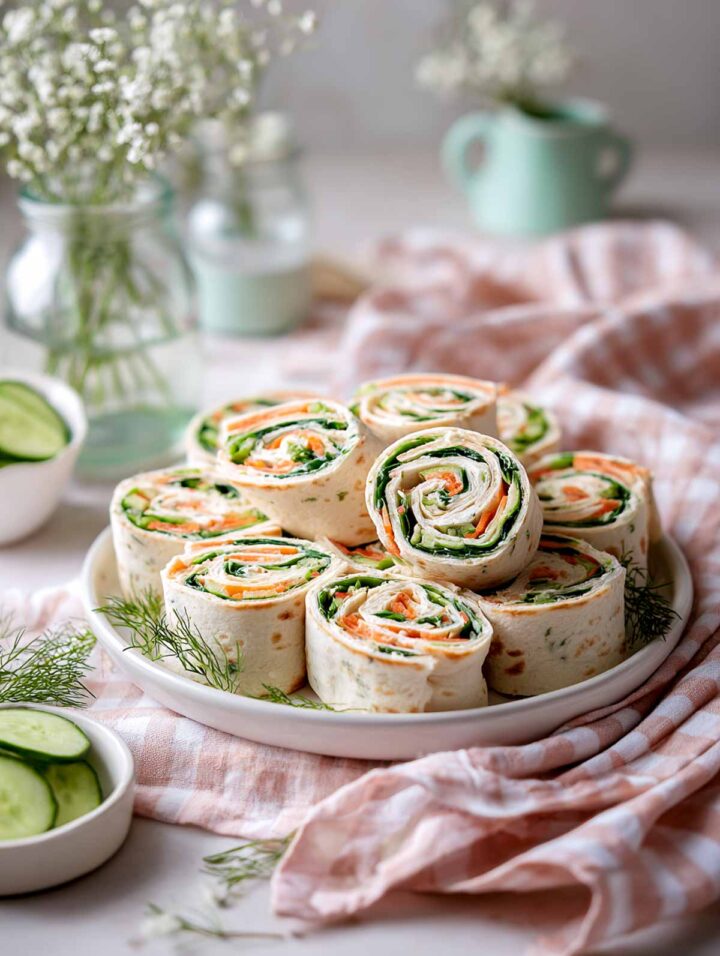
Pastel veggie pinwheel wraps add color and texture. The creamy herb spread ties everything together while keeping the filling light and fresh. These wraps are ideal for work baby shower food, or as baby shower finger foods for brunch. They hold up well and can be prepped ahead of time.
Ingredients
- 4 large flour tortillas, soft and pliable
- 8 ounces full-fat cream cheese, softened
- 2 tablespoons fresh parsley, finely chopped
- 1 tablespoon fresh dill, finely chopped
- 1 tablespoon fresh chives, finely chopped
- 1 teaspoon lemon juice
- Salt and pepper to taste
- ½ English cucumber, thinly sliced into strips
- 1 cup finely shredded carrot
- 1 cup baby spinach leaves, thinly sliced
Instructions
- In a medium bowl, mix the softened cream cheese, parsley, dill, chives, lemon juice, salt, and black pepper until smooth and evenly combined.
- Lay the tortillas flat on a clean surface and spread an even layer of the herb cream cheese mixture over each tortilla, reaching close to the edges. Arrange cucumber strips, shredded carrot, and sliced spinach evenly across the tortillas in a thin layer, keeping the filling balanced for easy rolling.
- Starting from one side, roll each tortilla tightly into a log without squeezing. Wrap the rolls in plastic wrap and refrigerate for at least 30 minutes to help them hold their shape. Using a sharp knife, slice each roll into even pinwheels and serve chilled or at room temperature.
Puff Pastry Veggie Spirals With Herbed Cream Cheese
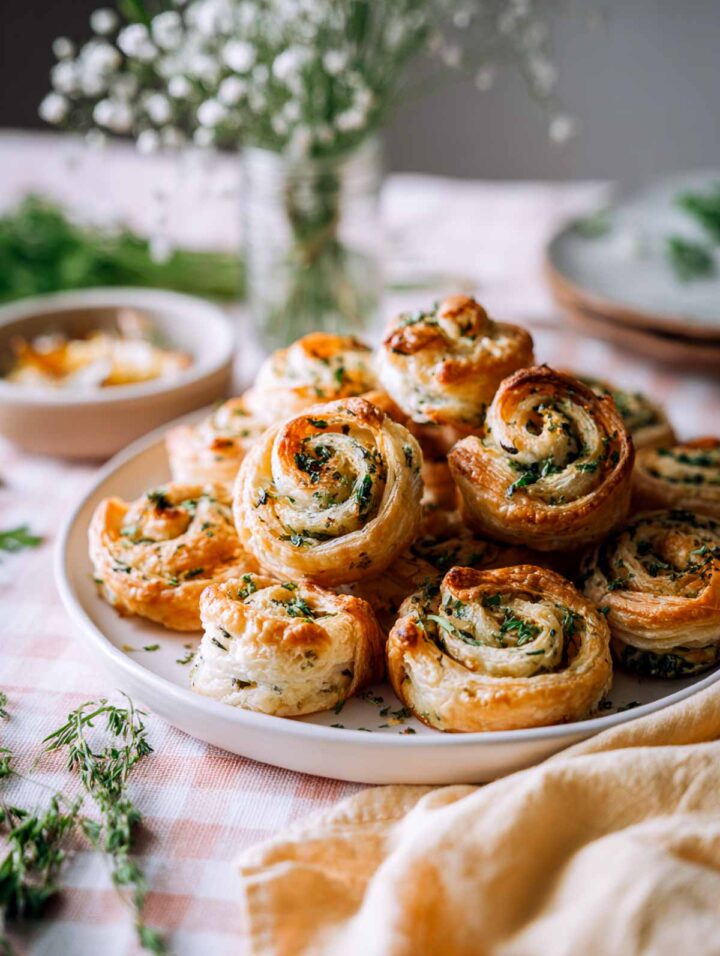
Puff pastry veggie spirals feel just indulgent enough while still being approachable. The flaky layers and herbed cream cheese make them a standout on any baby shower snack table. These spirals fit perfectly into make-ahead baby shower food planning and round out savory baby shower food ideas.
Ingredients
- 2 sheets frozen puff pastry, thawed
- 8 ounces full-fat cream cheese, softened
- 2 tablespoons fresh parsley, finely chopped
- 1 tablespoon fresh chives, finely chopped
- 1 tablespoon fresh dill, finely chopped
- ½ teaspoon garlic powder
- Salt and pepper to taste
- ½ cup finely shredded carrot
- ½ cup finely chopped baby spinach
- 1 tablespoon olive oil
- 1 large egg
Instructions
- Preheat the oven to 400°F and line a baking sheet with parchment paper.
- In a medium bowl, mix the softened cream cheese, parsley, chives, dill, garlic powder, salt, and black pepper until smooth and evenly combined.
- Lightly flour a clean surface and roll out one sheet of puff pastry just enough to smooth the seams. Spread half of the herbed cream cheese mixture evenly over the pastry, leaving a small border along one edge. Sprinkle half of the shredded carrot and chopped spinach evenly over the cream cheese, then lightly drizzle with olive oil.
- Starting from the long edge, roll the pastry tightly into a log. Repeat with the second sheet of puff pastry and the remaining filling. Using a sharp knife, slice each log into even spirals about ¾-inch thick.
- Arrange the spirals cut-side up on the prepared baking sheet, spacing them slightly apart. Whisk the egg, then brush it lightly over the tops. Bake for 18 to 22 minutes, or until the spirals are puffed and golden brown. Let cool slightly before serving warm or at room temperature.
Mini Quiche Bites With Spinach And Cheese

Mini quiche bites with spinach and cheese are filling and delicious. They work well for guests who want something warm and satisfying. These bites fit easily into baby shower menu ideas. Serve them warm or at room temperature with no stress.
Ingredients
- 1 refrigerated pie crust
- 4 large eggs
- ¾ cup whole milk
- 1 cup fresh spinach, finely chopped
- ¾ cup shredded cheese such as cheddar, Swiss, or a blend
- Salt and pepper to taste
- ¼ teaspoon nutmeg
- Cooking spray or butter for greasing
Instructions
- Preheat the oven to 375°F and lightly grease a mini muffin pan.
- Unroll the pie crust on a flat surface and use a round cutter to cut out circles slightly larger than the wells of the pan. Press each circle gently into the muffin cups, smoothing the edges without stretching the dough.
- In a medium bowl, whisk together the eggs, milk, salt, black pepper, and nutmeg until fully combined. Stir in the chopped spinach and shredded cheese.
- Spoon the mixture evenly into the prepared crusts, filling each about three-quarters full. Bake for 18 to 22 minutes, or until the centers are set and the tops are lightly golden. Let cool for a few minutes, then remove from the pan and serve warm or at room temperature.
Veggie Cups With Herb Dip
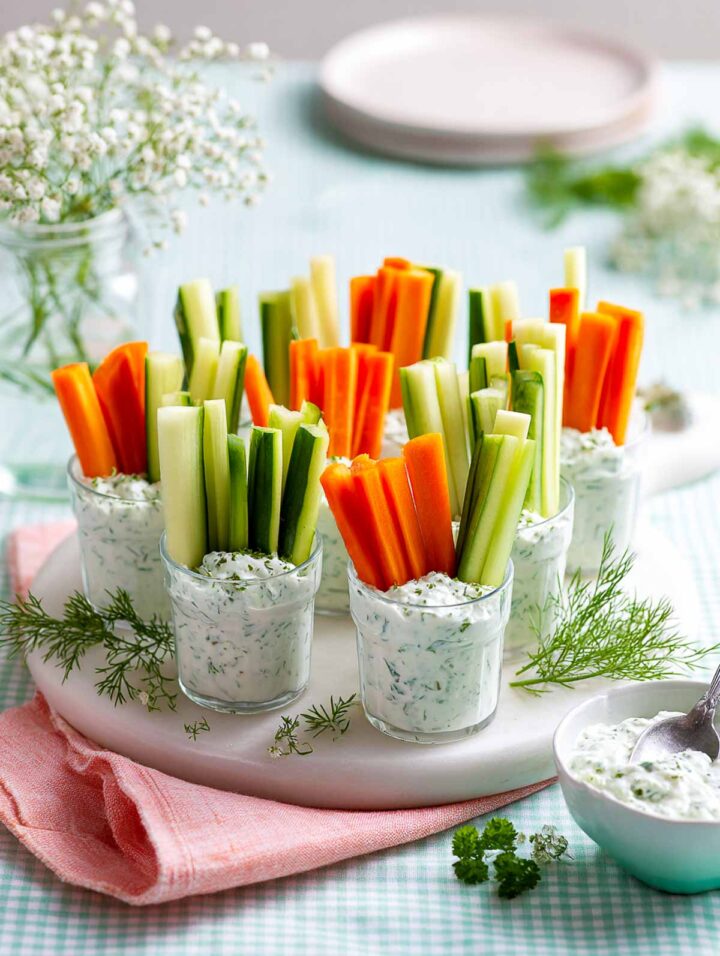
Veggie cups with herb dip are one of those baby shower snacks that is practical, neat, and easy to grab. Each cup feels intentional and keeps the table tidy. They are a smart option for healthy baby shower food ideas. Guests appreciate having something fresh alongside richer dishes.
Ingredients
- For the herb dip
- 1½ cups full-fat Greek yogurt
- 2 tablespoons fresh dill, finely chopped
- 1 tablespoon fresh parsley, finely chopped
- 1 tablespoon fresh chives, finely chopped
- 1½ teaspoons lemon juice
- Salt and pepper to taste
- For the veggie cups
- 2 medium carrots, cut into sticks
- 1 English cucumber, cut into sticks
- 1 red bell pepper, cut into strips
- 1 yellow bell pepper, cut into strips
Instructions
- In a medium bowl, stir together the Greek yogurt, dill, parsley, chives, lemon juice, salt, and black pepper until smooth and evenly combined. Taste and adjust seasoning if needed.
- Refrigerate the dip for at least 15 minutes so it thickens slightly.
- Spoon the herb dip into small clear cups, filling each about halfway. Arrange the vegetable sticks upright in each cup, pressing them gently into the dip so they stand securely. Chill until ready to serve, or serve immediately.
Mini Caesar Salad Cups With Crunchy Croutons
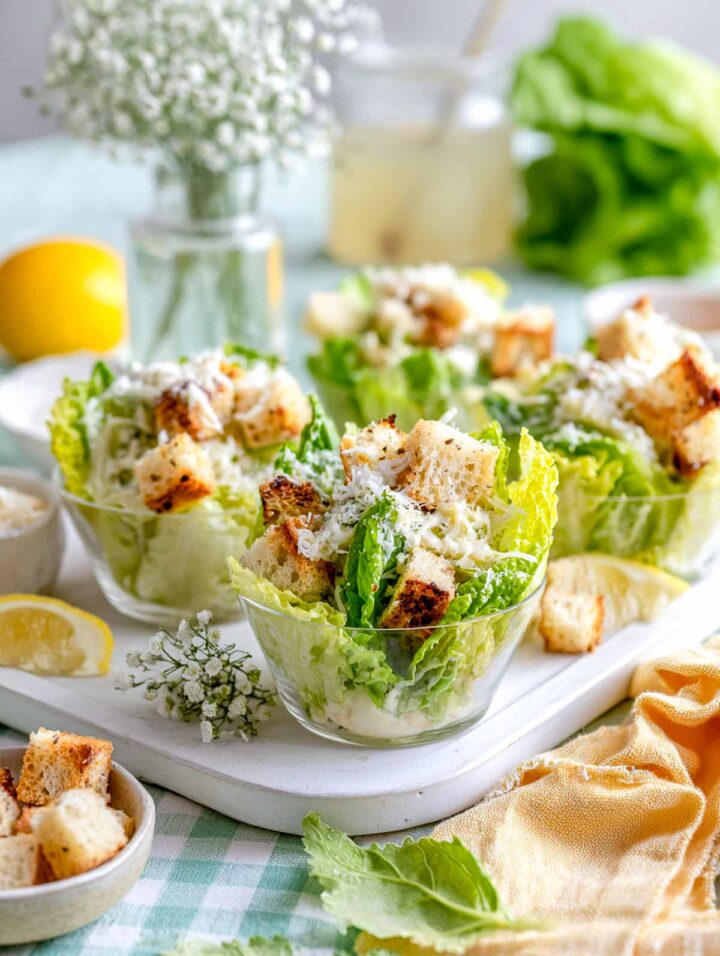
Mini Caesar salad cups turn a familiar favorite into a party-friendly format. The crunchy croutons and creamy dressing make them feel complete in a small serving. These cups fit well with baby shower food trays and add balance to heavier dishes. They also work nicely for work baby shower food setups.
Ingredients
- For the Croutons
- 2 cups day-old bread, cut into small cubes
- 1½ tablespoons olive oil
- ¼ teaspoon garlic powder
- ¼ teaspoon salt
- For the Caesar Dressing
- ½ cup mayonnaise
- 2 tablespoons fresh lemon juice
- 1 teaspoon Dijon mustard
- 1 small garlic clove, finely grated
- ¼ cup finely grated Parmesan cheese
- 1 teaspoon Worcestershire sauce
- ¼ teaspoon black pepper
- For the Salad
- 4 cups chopped romaine lettuce, washed and dried very well
- ¼ cup finely grated Parmesan cheese
Instructions
- Preheat the oven to 375°F. Add the bread cubes to a baking sheet, drizzle with olive oil, sprinkle with garlic powder and salt, and toss until evenly coated. Spread into a single layer and bake for 10 to 12 minutes, stirring once halfway through, until golden and crisp. Remove from the oven and let cool completely.
- While the croutons cool, whisk together the mayonnaise, lemon juice, Dijon mustard, garlic, Parmesan cheese, Worcestershire sauce, and black pepper until smooth and creamy.
- Place the chopped romaine lettuce in a large bowl. Add the dressing gradually, tossing gently until the leaves are evenly coated but still crisp.
- Spoon the dressed lettuce into clear serving cups, filling each about two-thirds full. Top with cooled croutons and a light sprinkle of Parmesan cheese. Serve immediately, or refrigerate for up to 30 minutes before serving for the best texture.
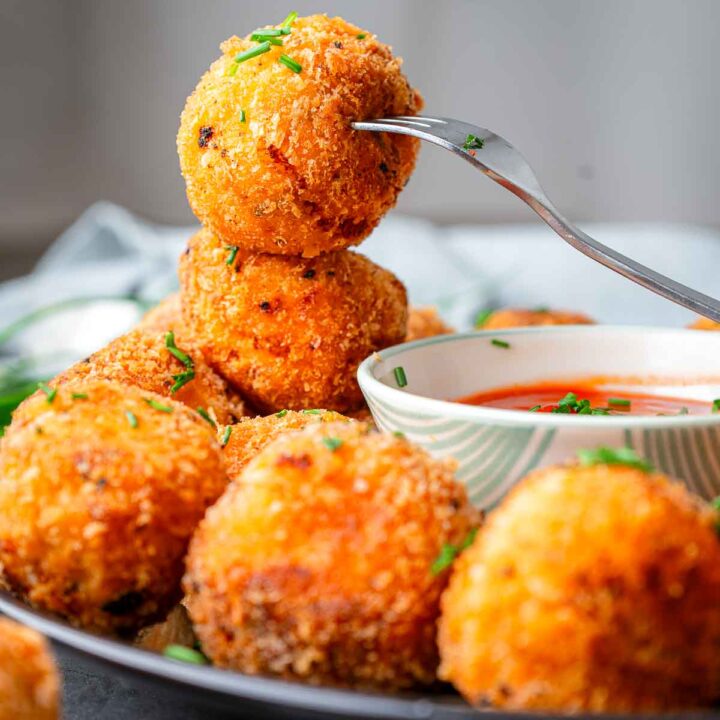
Mac and Cheese Bites
Mac and cheese bites bring comfort food energy in a bite-sized form. Crispy on the outside and creamy inside, they are always popular. These bites belong on any baby shower snack table and effortlessly round out savory baby shower food ideas.
Get the recipe: Mac and Cheese Bites.
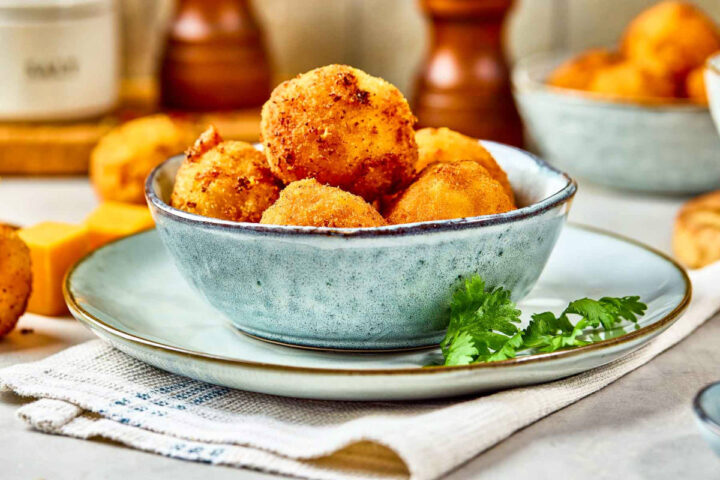
Parmesan Herb Potato Bites
Parmesan herb potato bites feel cozy and familiar while still looking party-ready. The herbs add flavor without overpowering the dish. These bites work well as baby shower appetizers and are easy to serve in bulk. They pair nicely with dips or stand alone.
Get the recipe: Parmesan Herb Potato Bites.
Fried Tortellini Bites
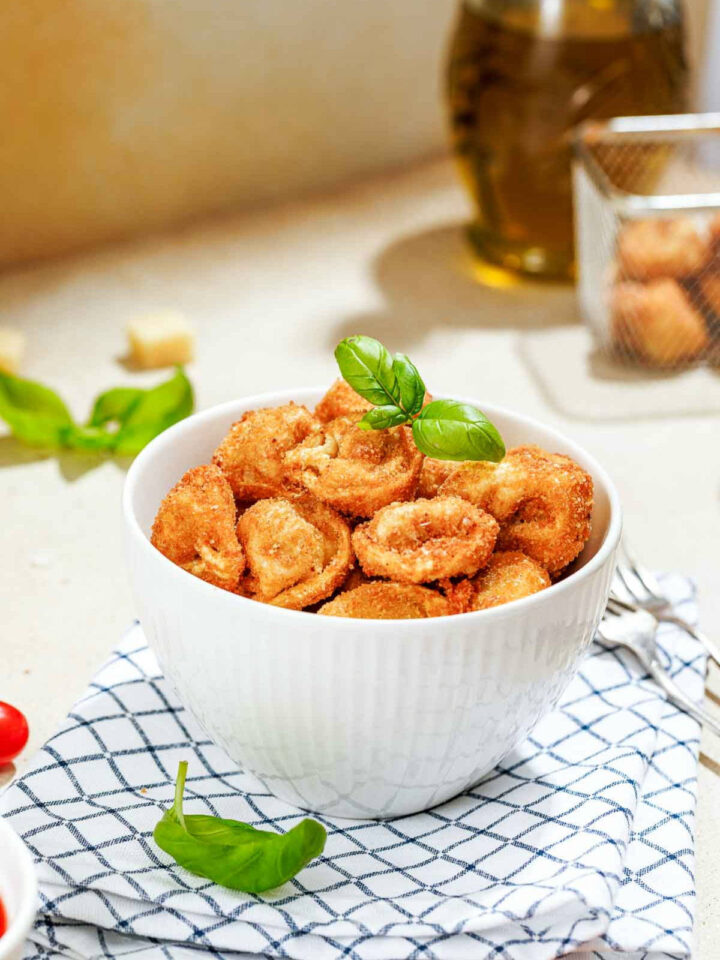
Fried tortellini bites bring crunch and richness to the menu. They feel indulgent and satisfying, especially for afternoon showers. These baby shower finger foods are also the perfect snack when you want to munch on something savory. Serve with marinara for easy dipping.
Get the recipe: Fried Tortellini Bites.
Mini Fruit and Yogurt Parfait Cups

Mini fruit and yogurt parfait cups work beautifully as fruit dessert for a baby shower, adding freshness and color to the table. Layered fruit and yogurt make them visually appealing and light. These cups work as healthy baby shower food ideas. They also balance out richer desserts.
Ingredients
- 1½ cups vanilla wafer cookies, finely crushed
- 2½ cups full-fat vanilla Greek yogurt
- 1 cup fresh strawberries, hulled and sliced
- ½ cup fresh blueberries
- ½ cup fresh raspberries
Instructions
- Place the vanilla wafer cookies in a zip-top bag and crush them into fine crumbs using a rolling pin, or pulse briefly in a food processor. Spoon about 2 tablespoons of the crumbs into the bottom of each small clear serving cup, spreading them evenly.
- Add a layer of vanilla Greek yogurt over the crumbs, using about 2 to 3 tablespoons per cup. Top with a small layer of mixed berries, then add another layer of yogurt. Repeat with another small spoonful of berries, finishing with fruit on top for a clean, colorful finish.
- Chill the parfait cups for at least 20 minutes before serving so the layers settle slightly. Serve cold.
Fresh Fruit Baby Carriage
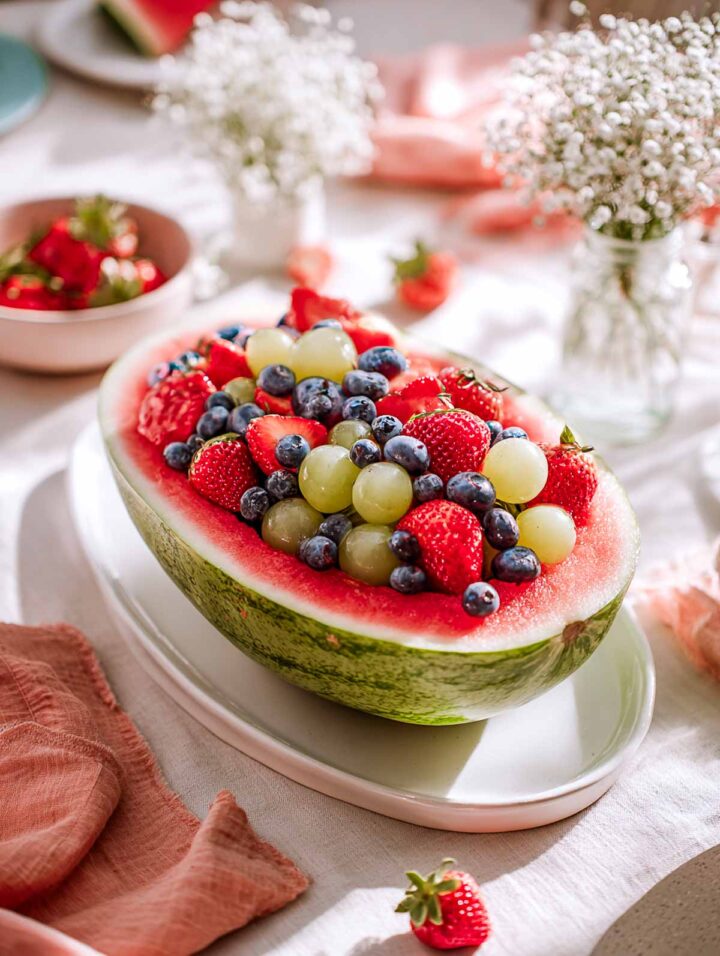
A fresh fruit baby carriage doubles as a creative fruit platter idea for baby showers and a centerpiece. It brings playful charm while offering something refreshing for guests. This display fits perfectly into baby shower fruit table planning. It also complements overall baby shower food ideas seamlessly.
Ingredients
- 1 medium watermelon
- 1½ cups strawberries, hulled and halved
- 1 cup blueberries
- 1 cup seedless green grapes
- 1 cup seedless red grapes
Instructions
- Cut the watermelon lengthwise in half. Place one half cut-side up on a serving platter and set the other half aside for another use. Using a large spoon or melon baller, scoop out the watermelon flesh, leaving a sturdy shell.
- Cut the scooped watermelon into bite-sized pieces or melon balls and place them back into the hollowed watermelon. Add the strawberries, blueberries, and grapes.
- Adjust the fruit so it looks balanced and abundant, with a mix of colors visible from all sides. Refrigerate until ready to serve, then bring out just before the baby shower so the fruit stays fresh and vibrant.
Teddy Bear Cookies
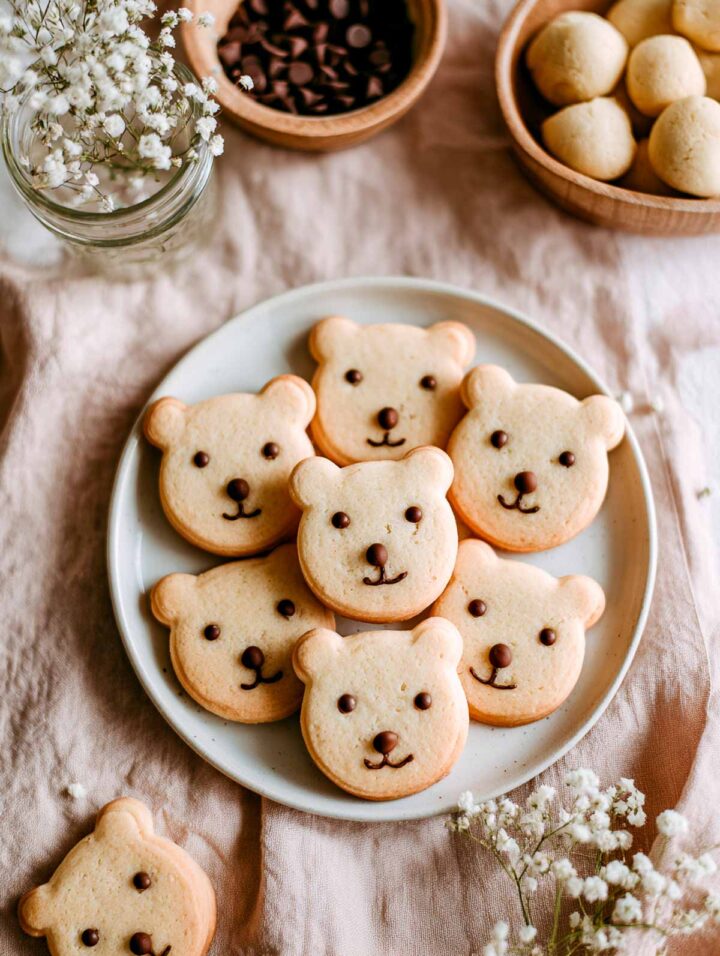
Teddy bear cookies add personality and warmth to the dessert table. Their simple design makes them feel nostalgic and sweet. These cookies work well as baby shower treats and are especially popular with themed showers. They also package easily as favors.
Ingredients
- 2½ cups all-purpose flour
- ½ teaspoon baking powder
- ¼ teaspoon salt
- ¾ cup unsalted butter, softened
- ¾ cup granulated sugar
- 1 large egg
- 1½ teaspoons vanilla extract
- Mini chocolate chips and brown nonpareil, for decorating
- Edible food marker (brown or black), for drawing the mouth
Instructions
- In a medium bowl, whisk together the flour, baking powder, and salt. Set aside. In a large bowl, beat the softened butter and sugar together until light and creamy. Add the egg and vanilla extract and mix until fully combined. Gradually add the dry ingredients and mix just until a soft dough forms.
- Divide the dough in half, flatten each portion into a disc, wrap tightly, and refrigerate for at least 1 hour so the dough firms up and cuts cleanly. Preheat the oven to 350°F and line baking sheets with parchment paper.
- Roll the chilled dough on a lightly floured surface to about ¼-inch thickness. Use a teddy bear-shaped cookie cutter to cut out cookies and transfer them to the prepared baking sheets, spacing them slightly apart. Gently press a mini chocolate chip into the dough for the nose, and use nonpareils to create the eyes.
- Bake for 9 to 11 minutes, until the edges are set, but the cookies remain pale on top. Let the cookies cool completely on a wire rack. Once cooled, use an edible food marker to draw a small mouth on each cookie.
Honey Lavender Shortbread Cookies
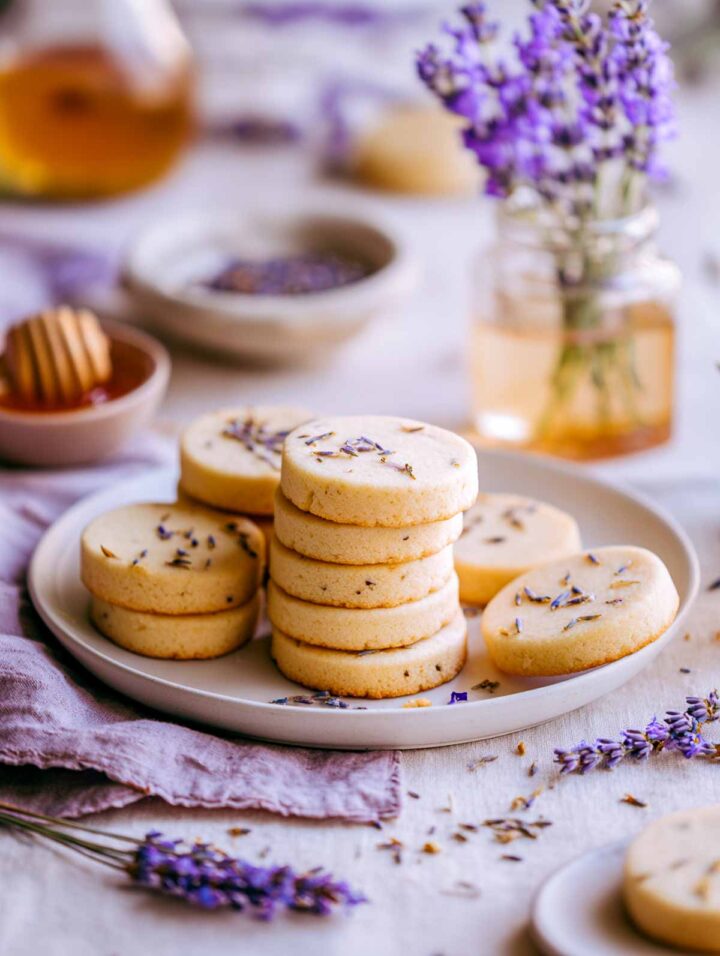
Honey lavender shortbread cookies feel soft, fragrant, and slightly elevated. They add variety without being overly bold. These cookies work well for baby shower dessert table styling and quieter, more elegant themes. Serve them alongside tea or coffee.
Ingredients
- 2 cups all-purpose flour
- ¼ teaspoon salt
- ¾ cup unsalted butter, softened
- ½ cup powdered sugar
- 2 tablespoons honey
- 1 teaspoon vanilla extract
- ½ teaspoon dried culinary lavender, finely crushed
Instructions
- In a medium bowl, whisk together the flour and salt. Set aside. In a separate large bowl, beat the softened butter and powdered sugar until smooth and creamy. Add the honey and vanilla extract and mix until fully combined.
- Sprinkle in the finely crushed lavender and mix gently. Gradually add the dry ingredients and mix just until a soft dough forms. The dough should be smooth and easy to handle.
- Turn the dough out onto a sheet of parchment paper and shape it into a log about 2 inches in diameter. Wrap tightly and refrigerate for at least 1 hour, until firm.
- Preheat the oven to 350°F and line baking sheets with parchment paper. Slice the chilled dough into ¼-inch thick rounds and place them on the prepared baking sheets, spacing them slightly apart. If desired, sprinkle a few lavender buds lightly on top.
- Bake for 11 to 13 minutes, until the edges are just set and the cookies remain pale on top. Let the cookies cool on the baking sheet for 5 minutes, then transfer to a wire rack to cool completely.
Pastel Celebration Cake Pops

Pastel celebration cake pops bring color and fun without overwhelming the table. They are easy to grab and easy to display. These pops fit right into gender reveal baby shower themes and party setups. They also travel well.
Ingredients
- 1 boxed vanilla cake mix, plus ingredients listed on the box
- ½ cup vanilla frosting
- 12 ounces white candy melts or white chocolate
- Pink and blue gel food coloring
- 24 cake pop sticks
- ¼ cup pink and blue sprinkles
Instructions
- Bake the vanilla cake according to the package instructions and let it cool completely. Once cooled, crumble the cake into fine crumbs using your hands or a fork, making sure there are no large pieces left.
- Add the vanilla frosting to the cake crumbs and mix until the mixture holds together easily when pressed. Scoop and roll the mixture into smooth balls about 1½ inches in diameter and place them on a parchment-lined baking sheet. Refrigerate for 30 minutes until firm.
- Melt a small amount of the white candy melts. Dip the tip of each cake pop stick into the melted coating, then insert it halfway into a chilled cake ball. Repeat with all cake balls, then return them to the refrigerator for 10 minutes so the sticks set securely.
- Melt the remaining candy melts and divide into two bowls. Tint one bowl pink and the other blue using gel food coloring. Dip each cake pop into the coating, gently tapping off excess. Immediately sprinkle the tops with pink and blue sprinkles before the coating sets.
- Place the finished cake pops upright in a stand or lay them flat on a parchment-lined tray until the coating is fully set. Store at room temperature or refrigerate until ready to serve.
Baby Shower Sprinkle Cookies
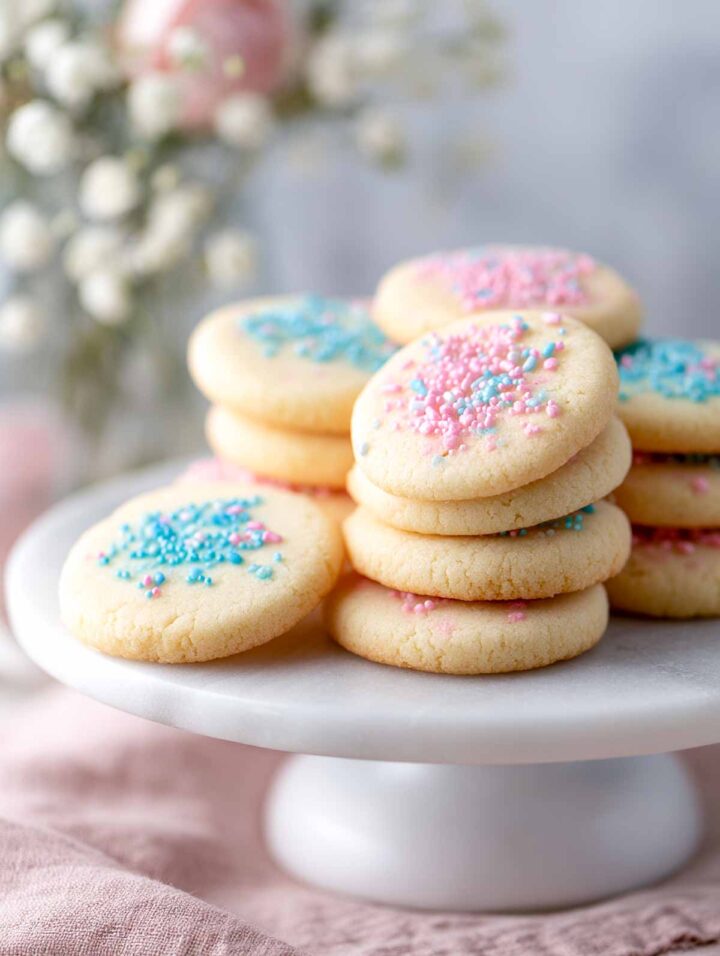
These sprinkle cookies feel cheerful and festive as baby shower treats. The pastel sprinkles tie into color themes naturally. These cookies are perfect for casual baby shower food ideas. They also photograph beautifully for displays.
Ingredients
- 1 cup unsalted butter, softened to room temperature
- ¾ cup granulated sugar
- ¼ cup powdered sugar
- 1 large egg, room temperature
- 2 teaspoons vanilla extract
- 2¼ cups all-purpose flour
- ½ teaspoon baking powder
- ½ teaspoon salt
- 2 tablespoons milk
- Pink and blue nonpareil sprinkles or sugar pearls
Instructions
- Preheat the oven to 350°F. Line two baking sheets with parchment paper.
- In a large bowl, cream the butter, granulated sugar, and powdered sugar together until light and fluffy, about 2 to 3 minutes. Add the egg and vanilla extract and mix until fully combined and smooth. Scrape down the bowl as needed.
- In a separate bowl, whisk together the flour, baking powder, and salt. Add the dry ingredients to the butter mixture and mix just until combined. Stir in the milk. The dough should be soft, smooth, and easy to scoop but not sticky.
- Scoop tablespoon-sized portions of dough and roll gently into balls. Place them on the prepared baking sheets, spacing about 2 inches apart. Lightly press each dough ball with the palm of your hand to flatten slightly. Sprinkle the tops with pink and blue sprinkles, pressing them in gently so they adhere without sinking.
- Bake for 10 to 12 minutes, until the edges are just set and the bottoms are lightly golden. The tops should stay pale. Let the cookies cool on the baking sheet for 5 minutes, then transfer to a wire rack to cool completely.
Blue and Pink Dipped Oreo Cookies

Blue and pink dipped Oreo cookies are playful and instantly recognizable. The half-dipped design keeps them neat and visually striking. These cookies fit seamlessly into Pink and blue snacks for parties and gender reveal baby shower themes. They are easy to prep ahead.
Ingredients
- 24 Oreo sandwich cookies with white cream filling
- 12 ounces white candy melts or white chocolate chips
- Pink and blue gel food coloring
- 1 to 2 teaspoons neutral oil
- 2 tablespoons pastel sugar sprinkles (nonpareils or jimmies)
Instructions
- Line a baking sheet with parchment paper and set aside.
- Melt the white candy melts or white chocolate in a microwave-safe bowl in 20-second intervals, stirring well between each round, until smooth.
- Divide the melted coating evenly into two bowls. Add pink gel food coloring to one bowl and blue gel food coloring to the other, stirring until the color is smooth and even. If the coating feels thick, stir in ½ teaspoon oil per bowl to loosen slightly.
- Hold an Oreo cookie upright and dip half of the cookie into the coating. Lift and allow excess to drip off for a few seconds. Place the cookie flat on the parchment paper and immediately sprinkle lightly with pastel sprinkles.
- Repeat with the remaining cookies, alternating pink and blue. Let set at room temperature for about 20 minutes or refrigerate for 10 minutes until firm.
Little Peanut Sugar Cookies
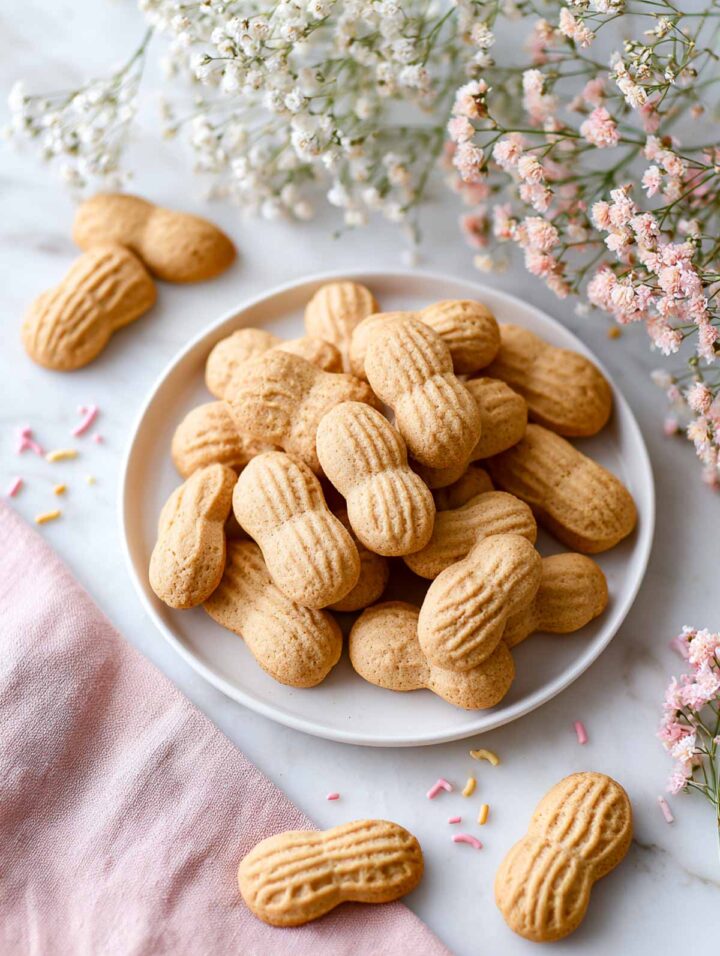
Little peanut sugar cookies bring a subtle theme-forward touch without feeling gimmicky. Their shape adds charm while keeping flavors familiar. These cookies work well as simple baby shower food ideas and pair nicely with other desserts. They also look great grouped on trays.
Ingredients
- ¾ cup unsalted butter, softened
- ¾ cup granulated sugar
- 1 large egg, room temperature
- 1½ teaspoons vanilla extract
- 2 cups all-purpose flour
- ½ teaspoon baking powder
- ¼ teaspoon salt
Instructions
- Preheat the oven to 350°F. Line two baking sheets with parchment paper.
- In a medium bowl, whisk together the flour, baking powder, and salt. Set aside.
- In a large bowl, cream the butter and sugar together until light and smooth, about 2 minutes. Add the egg and vanilla extract and mix until fully incorporated. Gradually add the dry ingredients, mixing just until a soft, pliable dough forms. The dough should not be sticky.
- Method 1: Peanut-Shaped Cookie Cutter
Lightly flour a work surface and roll the dough to about ¼-inch thickness. Use a peanut-shaped cookie cutter to cut out cookies and transfer them carefully to the prepared baking sheets, spacing them slightly apart. Use a fork to gently press shallow ridges across each cookie to mimic the texture of a peanut shell. - Method 2: Hand-Shaped Cookies
Scoop about 1 tablespoon of dough and roll it into a short log. Gently pinch the center to create a peanut shape, then slightly round both ends. Place on the prepared baking sheet. Use a fork to lightly press ridges across the top of each cookie. - Bake for 10 to 12 minutes, until the cookies are set and just lightly golden on the bottom. The tops should remain pale. Let the cookies cool on the baking sheet for 5 minutes, then transfer to a wire rack to cool completely before serving.
Petit Four Cake Squares

Petit four cake squares feel elegant and polished on baby shower food trays. The smooth glaze instantly elevates the presentation. These squares are ideal for baby shower dessert table styling. They offer a refined contrast to playful sweets.
Ingredients
- For the Cake
- 1 cup unsalted butter, softened
- 1 cup granulated sugar
- 4 large eggs, room temperature
- 2 cups all-purpose flour
- 2 teaspoons baking powder
- ¼ teaspoon salt
- ½ cup whole milk
- 2 teaspoons vanilla extract
- For the Vanilla Glaze
- 3 cups powdered sugar, sifted
- ¼ cup whole milk, plus more as needed
- 1 tablespoon light corn syrup
- 1½ teaspoons vanilla extract
- Pinch of salt
- Pastel sugar flowers or pearls for decorating
Instructions
- Preheat the oven to 350°F. Line a 9×13-inch baking pan with parchment, leaving an overhang.
- Cream the butter and sugar until pale and fluffy. Beat in the eggs one at a time. Mix in the vanilla. In a separate bowl, whisk flour, baking powder, and salt. Add the dry ingredients alternately with the milk, beginning and ending with the flour. Spread evenly in the pan and bake for 20 to 25 minutes, until set and lightly golden. Cool completely.
- Lift the cooled cake out using the parchment. Refrigerate for at least 1 hour so it firms up. Trim edges, then cut into even squares using a sharp knife. Return squares to the refrigerator while preparing the glaze.
- In a bowl, whisk powdered sugar, milk, corn syrup, vanilla, and salt until smooth. The glaze should be thick, opaque, and slow-flowing, similar to warm honey. Add milk 1 teaspoon at a time if needed. The corn syrup is essential. It gives the glaze structure and a smooth finish.
- Place cake squares on a wire rack set over a tray. Spoon glaze generously over each square, letting it flow over the top and fully coat the sides. Use an offset spatula to guide the glaze if needed. The glaze will self-level and set, fully covering the cake.
- Immediately top each square with sugar flower or pearls before the glaze sets. Let it sit at room temperature for 30 to 45 minutes until the glaze firms up with a smooth, matte finish. Once set, transfer to a serving platter. Store in a single layer in an airtight container at cool room temperature for up to 24 hours or refrigerate for longer storage.
Blue and Pink Meringue Kisses
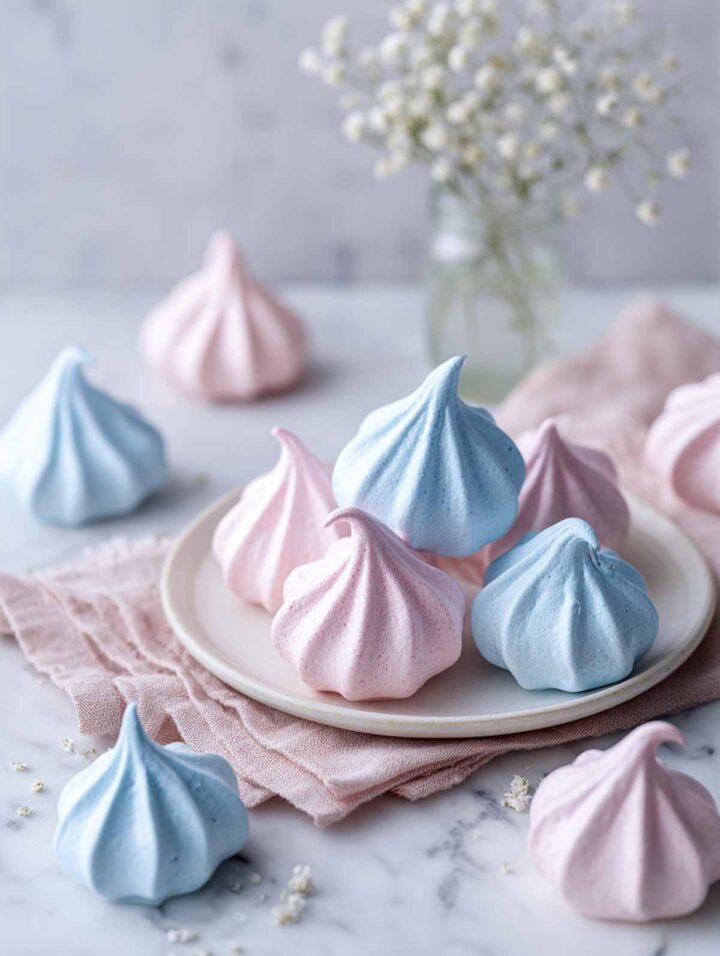
Blue and pink meringue kisses add a light, crisp sweetness that looks beautiful on the baby shower dessert table. They also tuck nicely into favor bags for baby shower treats. These are easy wins for gender-reveal baby shower themes, since the colors do the work without extra decorating. They’re a lovely finishing touch for baby shower food ideas.
Ingredients
- 4 large egg whites, at room temperature
- 1 cup granulated sugar
- ¼ teaspoon cream of tartar
- 1 teaspoon pure vanilla extract
- Pinch of fine salt
- Pink gel food coloring
- Blue gel food coloring
Instructions
- Preheat the oven to 200°F. Line two baking sheets with parchment paper and set aside.
- Add the egg whites to a clean, dry mixing bowl. Beat on medium speed until foamy. Add the cream of tartar and salt.
- Increase the speed to medium-high. Slowly add the sugar, one tablespoon at a time, beating well between additions. This step is essential for structure and smooth texture. Continue beating until the meringue is thick, glossy, and holds stiff peaks that stand straight without drooping. Beat in the vanilla extract.
- Divide the meringue evenly into two bowls. Tint one bowl pink and the other blue using gel food coloring, folding gently to keep the air intact. Transfer each color to a piping bag fitted with a star tip. Pipe small meringue kisses onto the prepared baking sheets.
- Bake for 90 minutes, then turn off the oven and leave the meringues inside with the door closed for another 60 minutes to fully dry. Remove from the oven and allow to cool completely before serving or storing.
Vanilla Pudding Cups With Pink and Blue Crumble
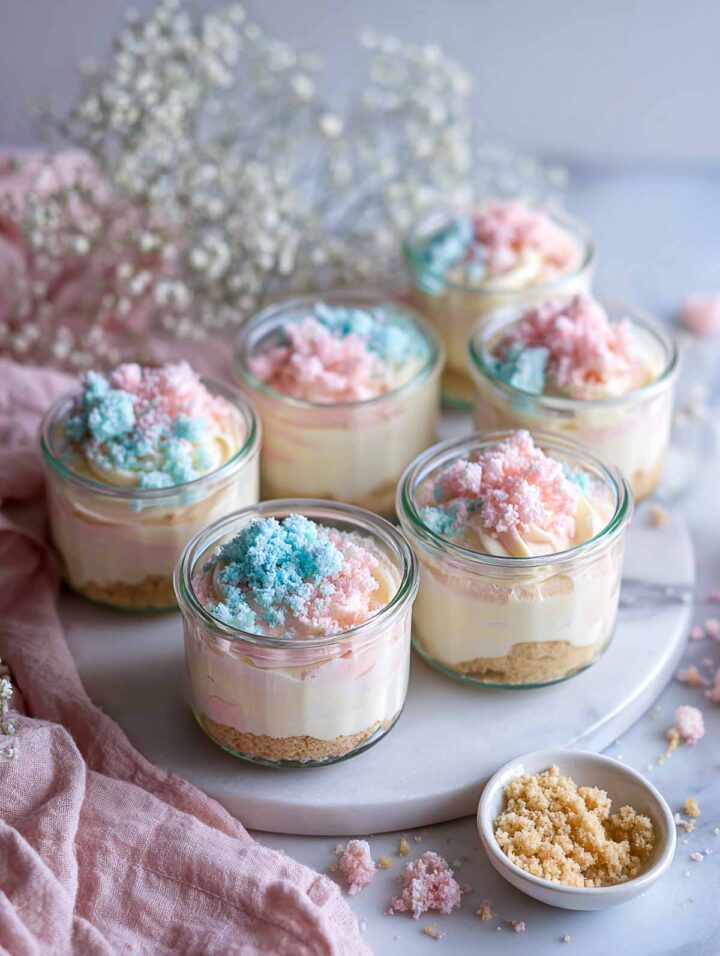
Vanilla pudding cups with pink and blue crumble topping are creamy, comforting, and visually soft. The pastel crumble adds texture without overpowering the dessert. These cups fit perfectly into baby shower snack table planning and round out classic baby shower food ideas beautifully.
Ingredients
- For the Crumb Base
- 40 vanilla wafer cookies (makes about 1½ cups crumbs)
- ¼ cup unsalted butter, melted
- 1 tablespoon granulated sugar
- For the Vanilla Pudding
- 1 (3.4-ounce) box instant vanilla pudding mix
- 2 cups cold whole milk
- For the Pastel Crumble Topping
- 15 vanilla wafer cookies (makes about ½ cup crumbs)
- 1 tablespoon unsalted butter, melted
- Pink gel food coloring
- Blue gel food coloring
Instructions
- Place the vanilla wafers in a food processor and pulse until they are fine, even crumbs. Stir in the melted butter and sugar until the mixture resembles damp sand.
- Spoon about 2 tablespoons of the crumb mixture into the bottom of each small glass or dessert cup. Press down lightly with the back of a spoon to create an even layer. Refrigerate while preparing the pudding.
- In a medium bowl, whisk the instant vanilla pudding mix with the cold milk for about 2 minutes, until thick and smooth. Let it stand for 2 to 3 minutes to fully set.
- Spoon the pudding evenly over the chilled crumb bases, smoothing the tops. Refrigerate for at least 30 minutes to allow the layers to set cleanly.
- Pulse the remaining vanilla wafers into fine crumbs. Add the melted butter until lightly moistened. Divide the crumb mixture into two small bowls. Tint one bowl pink and the other blue using a very small amount of gel food coloring, mixing until evenly colored.
- Just before serving, sprinkle the pink and blue crumble over the tops of the pudding cups. Serve chilled.
More Recipe Collections
- Deviled eggs get a creative Valentine’s Day refresh with these cute and flavorful ideas. From elegant piping to savory twists, these Valentine’s Day deviled eggs ideas are made for party platters, Galentine’s gatherings, and any spread that needs something a little special. They’re the kind of appetizers people notice first and reach for immediately.
- These green deviled egg ideas are a simple way to bring a little St. Patrick’s Day spirit to your party table. From classic favorites with a festive twist to fresh, herb-forward fillings, each one is easy to prep and easy to love. Perfect for potlucks, family gatherings, and holiday spreads that call for something familiar but fun.
- Spring baking has a way of feeling a little more joyful, especially when desserts have soft colors, fresh fruit, and simple details that feel right for the season. These cute spring desserts are the kind you bring out for brunch tables, casual parties, or quiet afternoons when you want something sweet. Think light flavors, pastel touches, and bakes that feel inviting the moment they’re set down to serve.