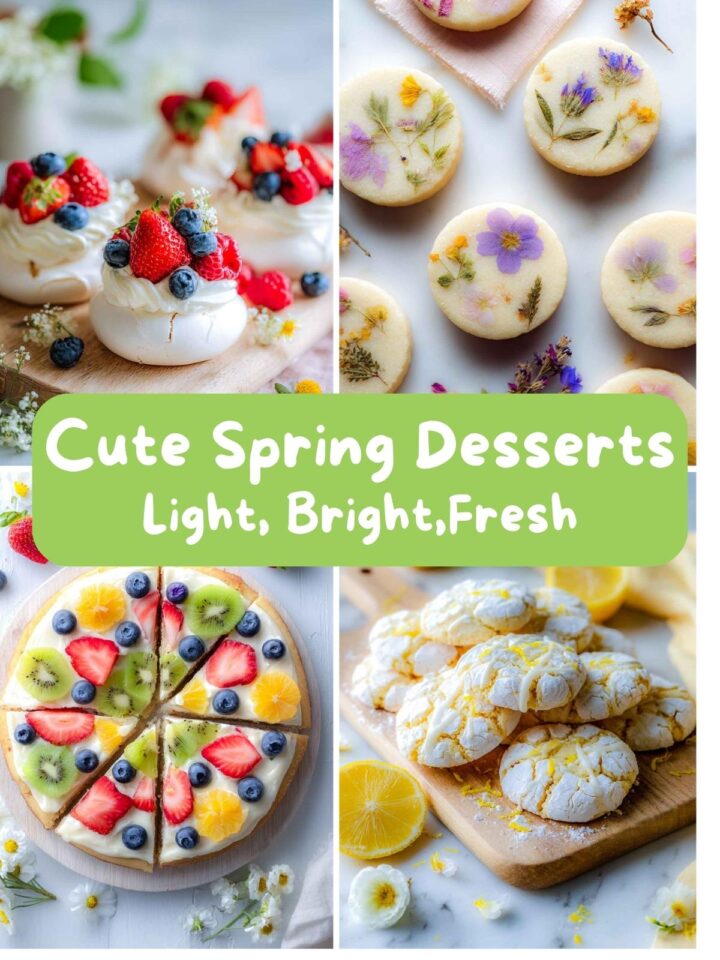
15 Cute Spring Desserts for Brunch Tables, Parties, and Everyday Baking
Spring desserts have a way of feeling lighter, brighter, and a little more playful as the season shifts, especially when soft colors, fresh fruit, and simple bakes take center stage. These cute spring desserts bring together a mix of easy favorites and visually detailed treats, all designed to feel right at home during spring baking, weekend brunches, and casual get-togethers. From pastel-toned cookies to fruit-forward sweets, each recipe is meant to feel inviting, seasonal, and worth making more than once.
Strawberry Bunny Ear Shortbread Cookies

These strawberry bunny ear shortbread cookies are made for spring tables, Easter dessert trays, and any moment that calls for something simple but charming. The cookies are buttery and tender, while the pale pink strawberry glaze adds just enough sweetness and color to make them stand out. Cute spring desserts like this one look special without requiring complicated decorating skills.
Ingredients
- For the shortbread cookies
- 1 cup unsalted butter, softened to room temperature
- ½ cup powdered sugar
- 1 teaspoon vanilla extract
- 2 cups all-purpose flour
- ¼ teaspoon salt
- For the strawberry glaze
- 1 cup powdered sugar
- 2 to 3 tablespoons strawberry milk or strained strawberry puree
- ½ teaspoon vanilla extract
Instructions
- In a large mixing bowl, beat the softened butter and powdered sugar together until smooth and creamy. Add the vanilla extract and mix until fully incorporated. Add the flour and salt to the bowl. Mix on low speed just until a soft dough forms. The dough should hold together when pressed but not feel sticky.
- Turn the dough out onto a lightly floured surface and roll it to about ¼ inch thickness. Use a bunny ear-shaped cookie cutter to cut out cookies, re-rolling scraps as needed.
- Place the cut cookies on a parchment-lined baking sheet, spacing them slightly apart. Chill the tray in the refrigerator for 20 minutes to help the cookies hold their shape.
- Preheat the oven to 325°F. Bake the cookies for 14 to 16 minutes, just until the bottoms are set and lightly golden. The tops should remain pale. Let the cookies cool completely on the baking sheet for 5 minutes, then transfer to a wire rack to cool fully.
- To make the glaze, whisk the powdered sugar, strawberry milk or puree, and vanilla extract until smooth. The glaze should be thick but spreadable and slowly drip off a spoon.
- Spoon or spread the glaze onto each cooled cookie. Allow the glaze to set at room temperature for 30 to 45 minutes before serving or storing.
Mini Lemon Flower Tarts With Honey

These mini lemon flower tarts are bright, delicate, and perfectly sized for spring gatherings. The crisp tart shells hold a smooth, tangy lemon filling, topped with softly whipped honey cream that adds balance and warmth. Each tart feels special, making them ideal for dessert tables, brunch spreads, and cute spring desserts that look as good as they taste. The components can be prepared ahead of time, then assembled just before serving for the best texture.
Ingredients
- For the tart shells
- 1½ cups all-purpose flour
- ½ cup powdered sugar
- ½ teaspoon salt
- ¾ cup unsalted butter, cold and cubed
- 1 large egg yolk
- 1 to 2 tablespoons cold water
- For the lemon filling
- ¾ cup granulated sugar
- 2 large eggs
- ⅓ cup fresh lemon juice
- 1 tablespoon lemon zest
- 6 tablespoons unsalted butter, melted
- For the honey cream
- ¾ cup heavy whipping cream, cold
- 2 tablespoons honey
- 2 tablespoons powdered sugar
- ½ teaspoon vanilla extract
- For topping: raspberries, edible flowers, and honey
Instructions
- To make the tart shells, add the flour, powdered sugar, and salt to a food processor and pulse to combine. Add the cold butter and pulse until the mixture resembles coarse crumbs.
- Add the egg yolk and 1 tablespoon of cold water. Pulse just until the dough begins to come together. If needed, add the remaining water a teaspoon at a time.
- Turn the dough out onto a lightly floured surface and gently press it together. Roll to about ⅛ inch thickness and cut rounds to fit a mini tart pan or mini muffin tin. Press the dough into the cavities and trim the edges.
- Chill the shells for 20 minutes. Preheat the oven to 350°F. Bake for 12 to 14 minutes, until lightly golden. Let cool completely.
- To make the lemon filling, whisk the sugar and eggs together until smooth. Whisk in the lemon juice, lemon zest, and melted butter until fully combined.
- Spoon the lemon mixture into the cooled tart shells, filling each about three-quarters full. Bake at 325°F for 10 to 12 minutes, until the centers are just set and no longer liquid. Cool completely before topping.
- To make the honey cream, whip the cold heavy cream with honey, powdered sugar, and vanilla until medium peaks form. Transfer to a piping bag fitted with a star tip. Pipe the honey cream onto each cooled tart. Top with a raspberry, honey, and edible flowers. Chill briefly before serving for the best texture.
Pastel Layer Marshmallow Rice Treat Squares
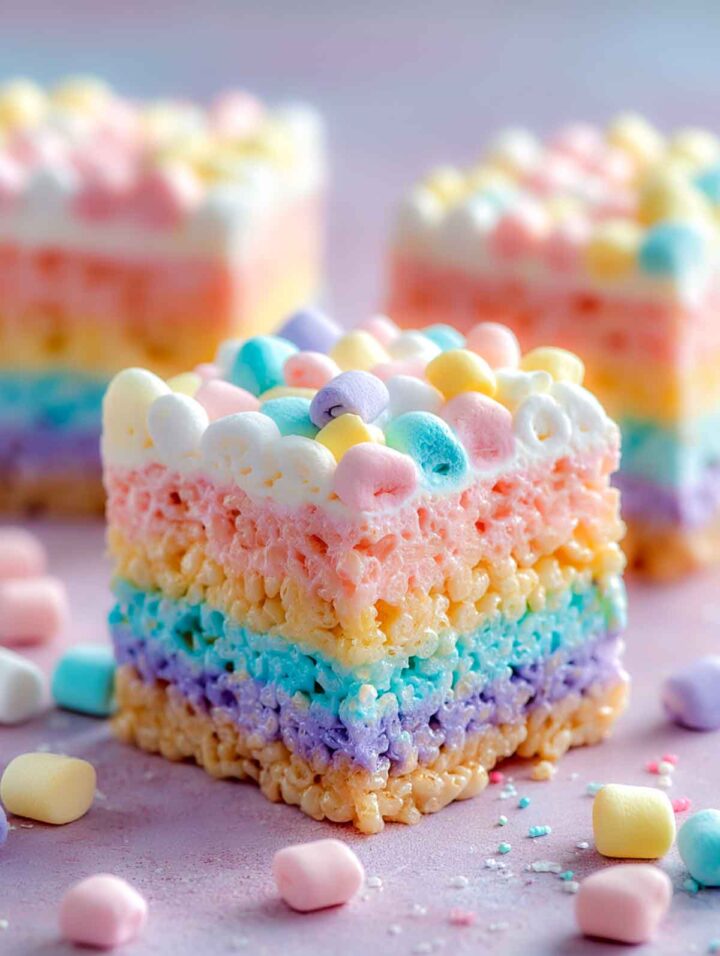
Pastel layer marshmallow rice treat squares are nostalgic, colorful, and easy to love, especially for casual gatherings or a spring-themed dessert table. The layered look gives them visual interest, making them a great choice for easy spring desserts. They’re a fun addition to any roundup of cute spring desserts, especially when you want something no-bake and crowd-friendly.
Ingredients
- 8 cups of puffed rice cereal
- 4 tablespoons unsalted butter
- 10 ounces mini marshmallows
- ½ teaspoon vanilla extract
- ¼ teaspoon salt
- Gel food coloring in pastel pink, yellow, blue, purple, and orange
- For topping: 1 cup mini marshmallows
Instructions
- Line an 8×8-inch baking pan with parchment paper, leaving overhang on two sides. Lightly grease the parchment. Divide the puffed rice cereal evenly into five bowls. Set aside.
- In a large saucepan over low heat, melt the butter. Add the mini marshmallows and salt, stirring constantly until fully melted and smooth. Remove from heat and stir in the vanilla extract.
- Quickly divide the melted marshmallow mixture evenly into 5 portions. Tint each portion with a small amount of gel food coloring, mixing until pastel shades form.
- Working one layer at a time, pour one colored marshmallow mixture over one bowl of cereal. Stir gently until evenly coated. Press the mixture firmly into the prepared pan to form the first layer. Use lightly buttered hands or a spatula to compress it well.
- Repeat with the remaining colors, pressing each layer firmly and evenly before adding the next. Compact layers are key for clean slices. While the top layer is still warm, gently press the mini marshmallows over the surface so they adhere without sinking.
- Let the bars set at room temperature for at least 45 minutes. Do not refrigerate them, or they will harden too much. Lift the slab out using the parchment overhang, then cut into squares with a lightly greased, sharp knife.
Carrot Patch Dirt Cups With Candy Veggies
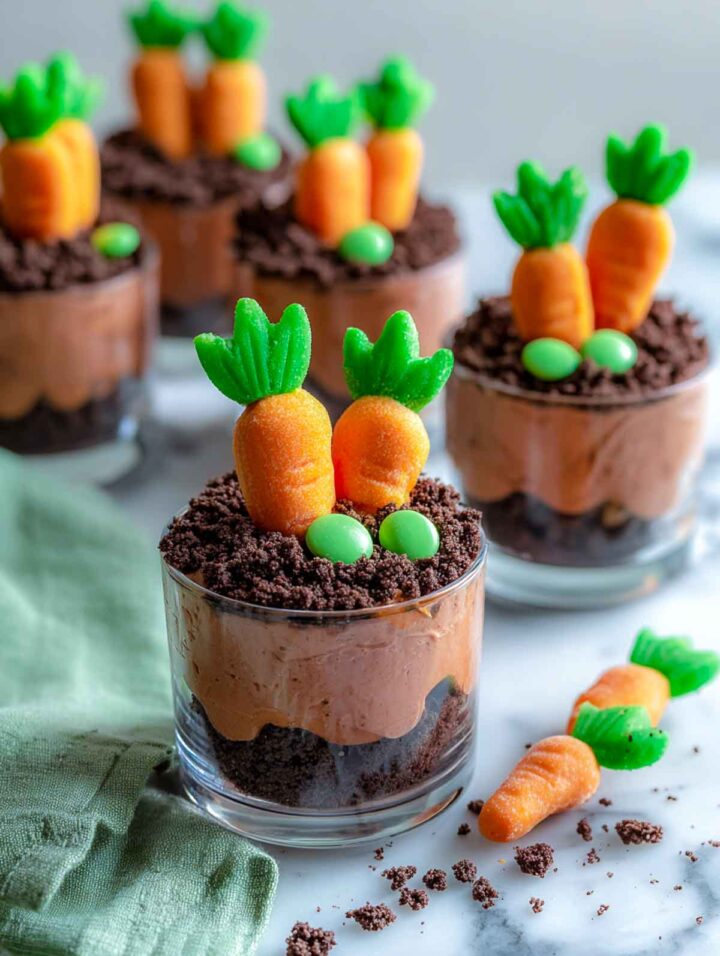
Carrot patch dirt cups with candy veggies lean fully into playful presentation, making them a standout among spring sweets and spring treats for kids. The layered cups feel familiar and comforting, while the candy details keep them festive and seasonal. They fit right in with spring dessert recipes that focus on fun.
Ingredients
- For the pudding layer
- 1 package (3.9 ounces) instant chocolate pudding mix
- 2 cups cold whole milk
- ½ cup heavy whipping cream
- ½ teaspoon vanilla extract
- Pinch of salt
- For the dirt layer: 16 chocolate sandwich cookies, finely crushed (cream filling included)
- For topping: Store-bought candy carrots and green candy-coated chocolates
Instructions
- In a mixing bowl, whisk the pudding mix and cold milk for about 2 minutes until thickened. Add the heavy cream, vanilla extract, and salt. Whisk again until smooth and slightly lighter in texture.
- Spoon a layer of crushed chocolate cookies into the bottom of each small dessert cup, pressing lightly to create an even base. Pipe or spoon the chocolate pudding over the cookie layer, filling the cups about three-quarters full. Smooth the tops.
- Sprinkle a generous layer of crushed cookies over the pudding to create the “dirt.” Gently press the candy carrot into the dirt layer. Add a few green candy pieces.
- Chill the cups for at least 30 minutes before serving to allow the layers to set and flavors to come together.
Blossom Sugar Cookie Sandwiches With Berry Filling
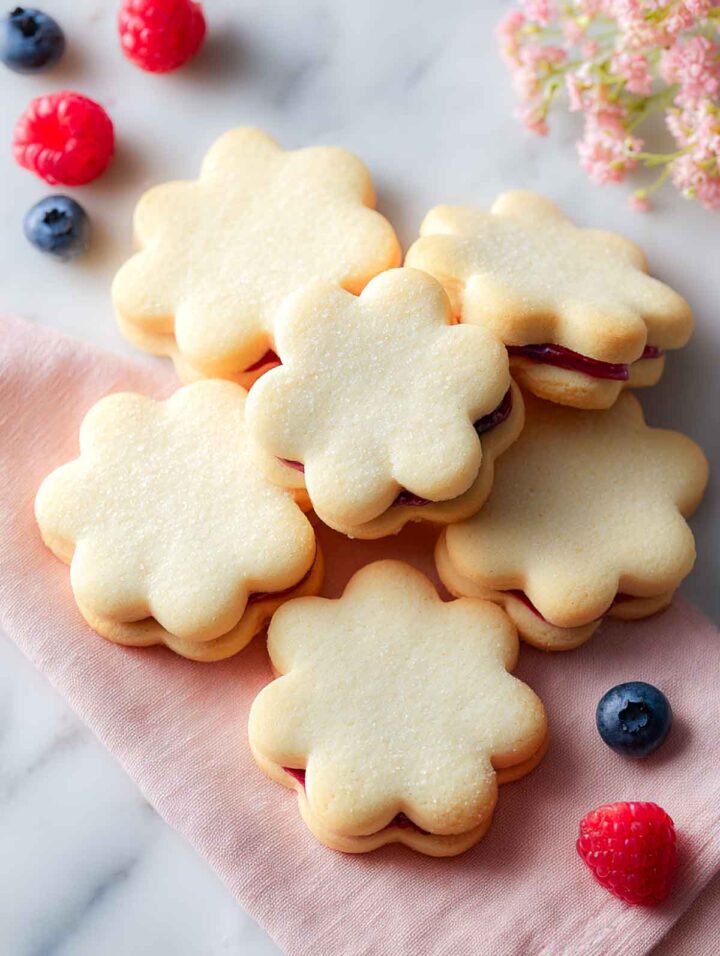
Blossom sugar cookie sandwiches feel soft, cheerful, and perfect for spring cookies with a little extra charm. The berry filling adds color and contrast while keeping the cookies approachable and bakery-style. These are the kind of spring baked goods that work just as well for brunch as they do for dessert tables.
Ingredients
- For the sugar cookies
- ¾ cup unsalted butter, softened
- ¾ cup granulated sugar
- 1 large egg
- 1 teaspoon vanilla extract
- 2¼ cups all-purpose flour
- ½ teaspoon baking powder
- ¼ teaspoon salt
- For the berry filling
- ½ cup thick berry jam or preserves (raspberry or mixed berry works best)
- 2 tablespoons cream cheese, softened
- 1 tablespoon powdered sugar
Instructions
- In a mixing bowl, cream the butter and granulated sugar together until light and smooth. Add the egg and vanilla extract and mix until fully incorporated.
- In a separate bowl, whisk together the flour, baking powder, and salt. Add to the butter mixture and mix just until a soft dough forms. Divide the dough in half, flatten into discs, wrap each disc, and chill for 30 minutes.
- Preheat the oven to 350°F and line baking sheets with parchment paper.
- Roll the dough on a lightly floured surface to about ¼ inch thickness. Cut into blossom shapes and place on the prepared baking sheets. Bake for 9 to 11 minutes, until the edges are set and the bottoms are lightly golden. The tops should remain pale. Cool completely.
- In a small bowl, stir together the berry jam, cream cheese, and powdered sugar until smooth. The filling should be thick enough to stay put when sandwiched.
- Spread a thin layer of filling onto the flat side of one cookie, then top with a second cookie and press gently. Repeat with the remaining cookies. Let the sandwiches rest for 10 minutes before serving so the filling settles.
Mini Blueberry Cloud Cheesecake Jars
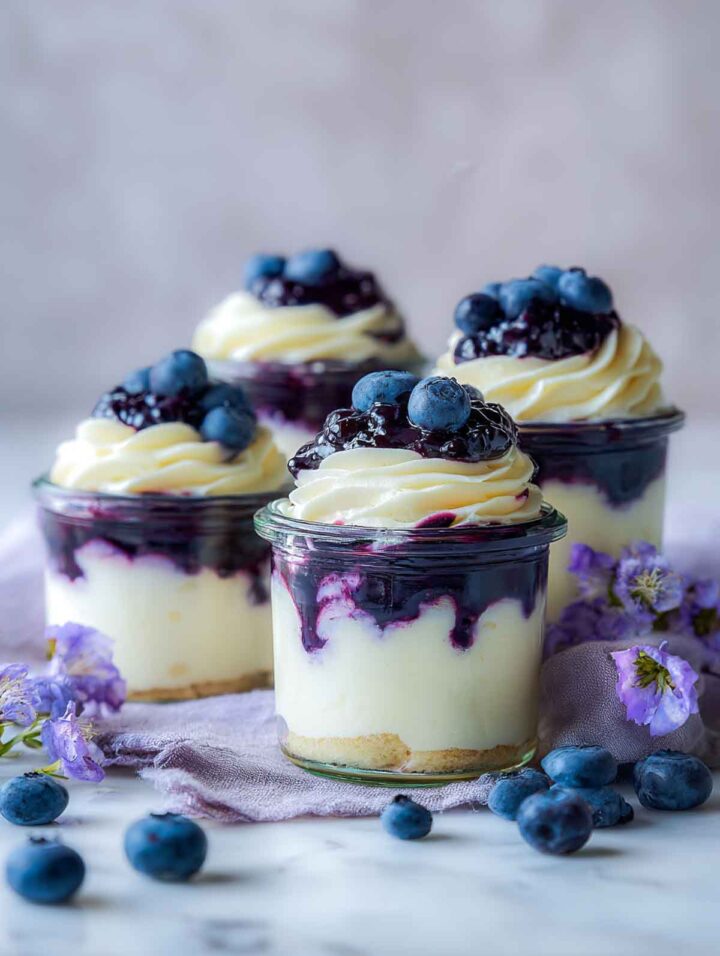
Mini blueberry cloud cheesecake jars are light, creamy, and visually striking. The layered jars highlight fresh spring flavors while keeping portions tidy and shareable. They fit beautifully into collections of cute spring desserts, especially when you want spring dessert ideas that feel fresh but still indulgent.
Ingredients
- For the blueberry topping
- 1 cup fresh or frozen blueberries
- 2 tablespoons granulated sugar
- 1 tablespoon lemon juice
- 1 teaspoon cornstarch mixed with 1 tablespoon water
- For the cake base
- 1½ cups vanilla sponge cake or pound cake, cut into small cubes
- 1-2 tablespoons milk
- For the cloud cheesecake
- 8 ounces full-fat cream cheese, softened
- ½ cup powdered sugar
- 1 teaspoon vanilla extract
- Pinch of salt
- 1 cup heavy whipping cream, very cold
- For finishing: Whipped cream and fresh blueberries
Instructions
- Combine blueberries, sugar, and lemon juice in a small saucepan over medium heat. Cook until the berries burst and release their juices. Stir in the cornstarch slurry and cook for 1-2 minutes until thickened but still spoonable. Remove from heat and cool completely.
- Place the cake cubes into the bottom of each mini jar. Gently press just enough to level the surface. Lightly drizzle with a small amount of milk. Set aside.
- In a bowl, beat the softened cream cheese until completely smooth. Add powdered sugar, vanilla extract, and salt. Mix until creamy and lump-free.
- In a separate bowl, whip the cold heavy cream to soft peaks. The cream should hold its shape but still look airy. Fold the whipped cream into the cream cheese mixture in two additions, using light strokes. Stop as soon as the mixture is uniform and fluffy. This keeps the “cloud” texture.
- Spoon or pipe the cheesecake mixture over the cake base, filling each jar about ¾ full. Smooth the tops lightly. Spoon the cooled blueberry topping over the cheesecake layer.
- Finish with a swirl of whipped cream, blueberry topping, and a few fresh blueberries. Refrigerate for at least 1 hour before serving so the layers set and the jars hold their shape.
Spring Chick Lemon Cake Pops
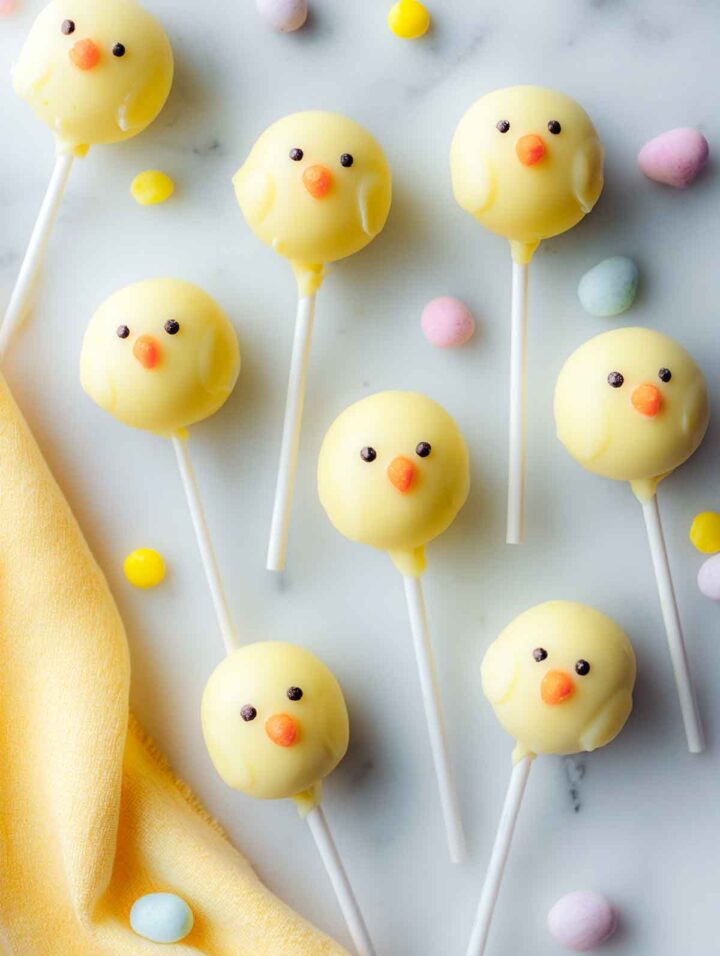
Spring chick lemon cake pops are bright, playful, and instantly recognizable as spring time desserts. The lemon flavor keeps them from feeling overly sweet, while the design makes them perfect for spring treats for kids. These cake pops slide easily into spring baking recipes that focus on charm and color.
Ingredients
- 1 box lemon cake mix and ingredients listed on the box (eggs, oil, water)
- ¾ cup prepared vanilla frosting
- 16 ounces yellow candy melts
- Cake pop sticks
- Black edible marker for eyes
- Orange candy pearls or small orange candy pieces (for beaks)
Instructions
- Bake the lemon cake according to package directions. Let it cool completely. Crumble the cooled cake into fine crumbs in a large bowl. Add the vanilla frosting and mix until the texture resembles a soft dough that holds together when pressed.
- Scoop the mixture into evenly sized balls and roll them into smooth balls. Place on a parchment-lined baking sheet and chill for 20 to 30 minutes until firm.
- Melt a small amount of yellow candy melts. Dip the tip of each cake pop stick into the melted candy, then insert it halfway into a cake ball. Chill again for 10 minutes to secure the stick.
- Melt the remaining yellow candy melts until smooth. Dip each cake pop fully into the coating. Before tapping off excess, gently rotate the cake pop once and allow a small amount of candy melt to naturally settle on each side of the pop. This creates the soft, rounded cheek look.
- While the coating is still wet, put two small dots for eyes and one orange candy piece for the beak. Let the cake pops set upright in a stand or block of foam until fully hardened.
Mini Strawberry Shortcake Cups with Whipped Cream
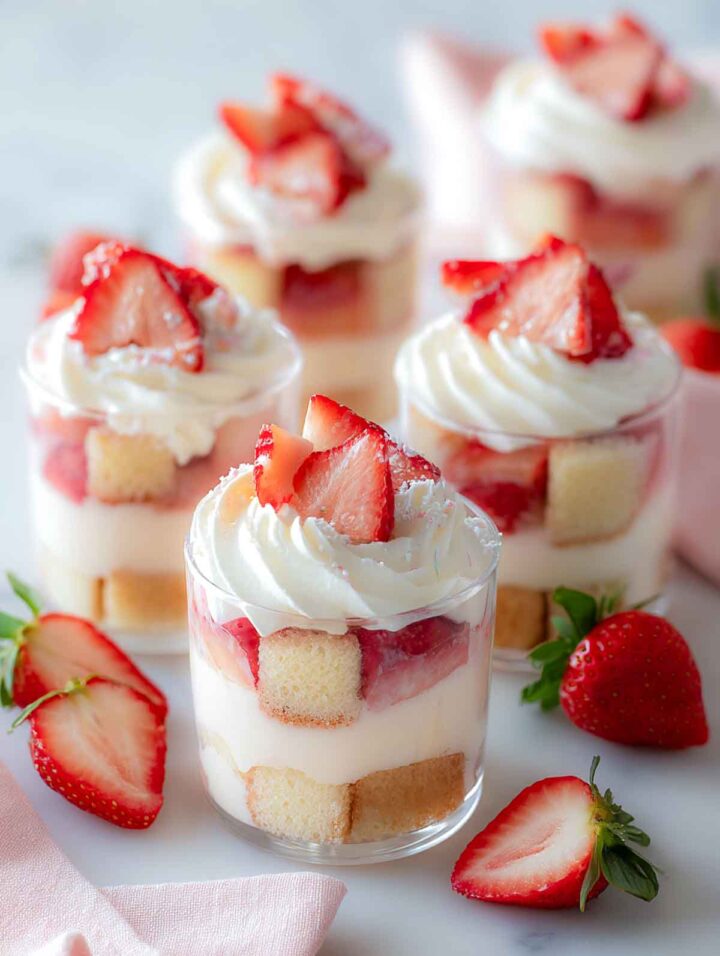
Mini strawberry shortcake cups are simple, familiar, and always welcome at spring gatherings. The layered presentation keeps them neat while highlighting fresh fruit and soft textures. They’re an easy win for cute spring desserts, especially when you need spring sweets that feel timeless rather than trendy.
Ingredients
- 2 cups fresh strawberries, hulled and sliced
- 2 tablespoons granulated sugar
- 1 teaspoon fresh lemon juice
- 2 cups cubed vanilla sponge cake or pound cake
- 1 cup cold heavy whipping cream
- 2 tablespoons powdered sugar
- 1 teaspoon vanilla extract
Instructions
- Add the sliced strawberries, granulated sugar, and lemon juice to a bowl. Stir gently and let sit for 15 to 20 minutes until the berries release their juices and soften.
- In a cold mixing bowl, whip the heavy cream, powdered sugar, and vanilla extract until soft peaks form. Stop once the cream holds its shape but still looks smooth and spoonable.
- Spoon a small layer of cake cubes into the bottom of each mini glass or jar. Add a layer of strawberries along with a little of their juices. Follow with a layer of whipped cream.
- Add another layer of cake cubes, strawberries, and whipped cream, finishing with whipped cream on top. Refrigerate for 20 to 30 minutes. Serve cold.
Raspberry Rose Heart Thumbprint Cookies

Raspberry rose heart thumbprint cookies feel delicate and thoughtful, with a soft note that pairs naturally with spring flavors. The heart shape keeps them visually special. They’re a lovely option for spring cookies when you want something subtle and refined.
Ingredients
- 1 cup unsalted butter, softened
- ½ cup granulated sugar
- 1 large egg yolk
- 1 teaspoon vanilla extract
- ½ teaspoon rose water
- 2¼ cups all-purpose flour
- ¼ teaspoon salt
- ½ cup raspberry jam
Instructions
- Preheat the oven to 350°F. Line two baking sheets with parchment paper.
- In a large bowl, cream the softened butter and granulated sugar until smooth and creamy. Mix in the egg yolk, vanilla extract, and rose water until fully combined. Add the flour and salt and mix just until a soft dough forms. Refrigerate it for 15-20 minutes.
- Roll the dough between two sheets of parchment paper to about ¼-inch thickness. Use a small heart-shaped cookie cutter to cut out cookies and transfer them to the prepared baking sheets, spacing slightly apart.
- Using the back of a teaspoon or a rounded measuring spoon, gently press a shallow heart-shaped indentation into the center of each cookie. Take care not to press all the way through the dough. Spoon a small amount of raspberry jam into each indentation.
- Bake for 11-13 minutes, until the edges are set and just beginning to turn pale golden. The centers should remain light in color. Let the cookies rest on the baking sheet for 5 minutes, then transfer to a wire rack to cool completely. The jam will firm up as the cookies cool.
Mini Pavlova Nests With Spring Berries
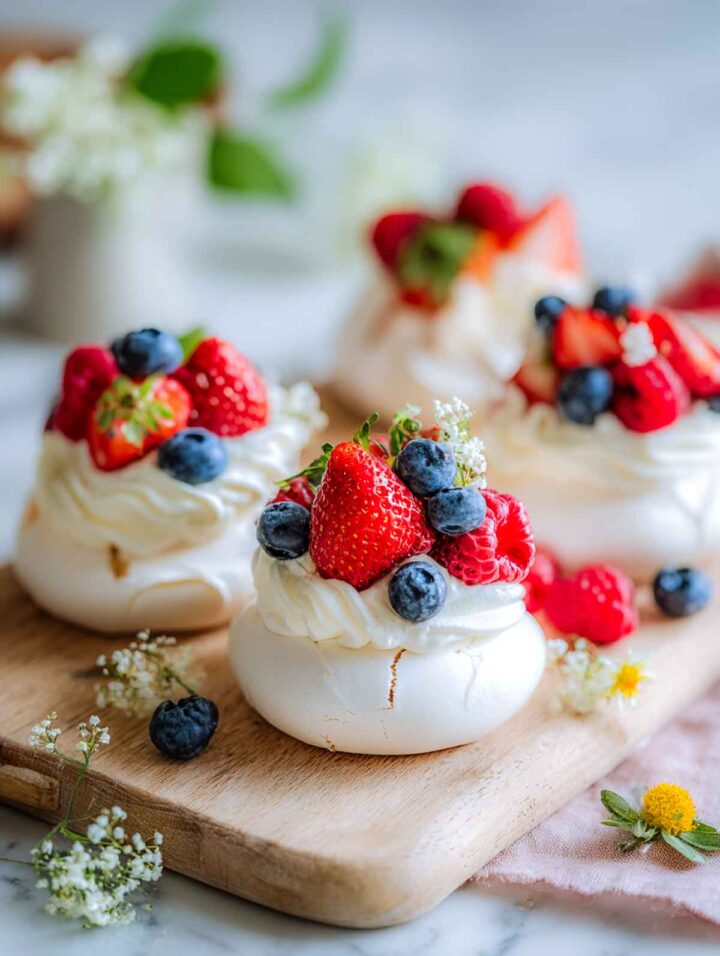
Mini pavlova nests with spring berries bring a light, airy feel that works beautifully for spring bakes and brunch sweets. The crisp shells and soft centers create contrast without feeling heavy. These are ideal for spring dessert recipes that lean into elegance and fresh ingredients.
Ingredients
- For the pavlova nests
- 4 large egg whites, at room temperature
- 1 cup granulated sugar
- 1 teaspoon cornstarch
- 1 teaspoon white vinegar
- ½ teaspoon vanilla extract
- For the topping
- 1 cup cold heavy whipping cream
- 2 tablespoons powdered sugar
- ½ teaspoon vanilla extract
- 1½ cups mixed fresh berries (strawberries, blueberries, raspberries)
Instructions
- Preheat oven to 225°F. Line a baking sheet with parchment paper.
- Beat egg whites on medium speed until soft peaks form. Gradually add the sugar, one tablespoon at a time, beating until the mixture becomes thick, glossy, and holds stiff peaks. Gently fold in the cornstarch, vinegar, and vanilla extract until just combined.
- Spoon the meringue into 6 equal mounds on the baking sheet. Use the back of a spoon to create a shallow well in the center of each mound, forming a nest shape.
- Bake for 1 hour and 15 minutes, until the pavlovas are dry to the touch and lift easily from the parchment. Turn off the oven and let them cool completely inside with the door closed.
- Beat the heavy cream, powdered sugar, and vanilla until soft peaks form. Pipe or spoon the whipped cream into the center of each pavlova nest and top with fresh berries.
Pressed Flower Shortbread Cookies
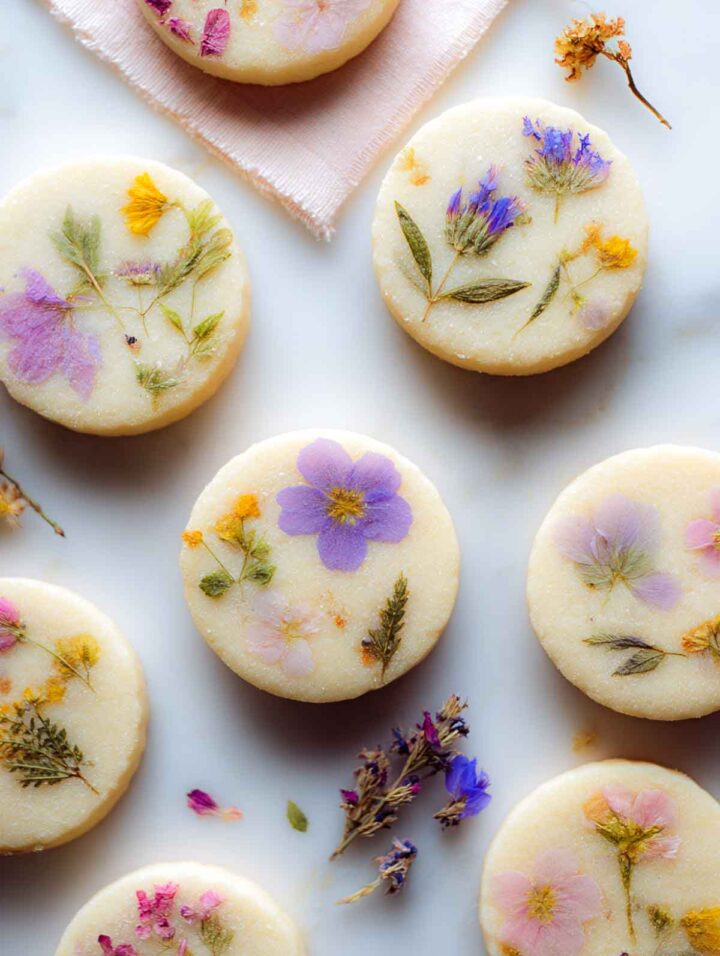
Pressed flower shortbread cookies feel calm, artistic, and naturally suited for spring baking ideas. The clean shortbread base keeps the focus on the visual detail. They’re a strong fit for spring-themed desserts and flower desserts with a softer, more thoughtful look.
Ingredients
- 1 cup unsalted butter, softened
- ½ cup powdered sugar
- 1 teaspoon vanilla extract
- 2 cups all-purpose flour
- ¼ teaspoon salt
- Assorted edible dried flowers (such as pansies, violets, calendula, or chamomile)
Instructions
- Preheat oven to 325°F. Line two baking sheets with parchment paper.
- In a large bowl, beat the butter and powdered sugar until smooth and creamy. Mix in the vanilla extract. Add the flour and salt and mix just until a soft dough forms.
- Roll the dough out between two sheets of parchment paper to about ¼-inch thickness. Cut into round or scalloped cookies and place on the prepared baking sheets.
- Gently press edible dried flowers onto the surface of each cookie, so they sit flat and adhere to the dough. Do not push all the way through.
- Bake for 14-16 minutes, until the cookies are set and the edges are just beginning to turn pale golden. The tops should remain light in color. Let the cookies cool on the baking sheet for 5 minutes, then transfer to a wire rack to cool fully.
Mini Strawberry Milk Tea Cupcakes
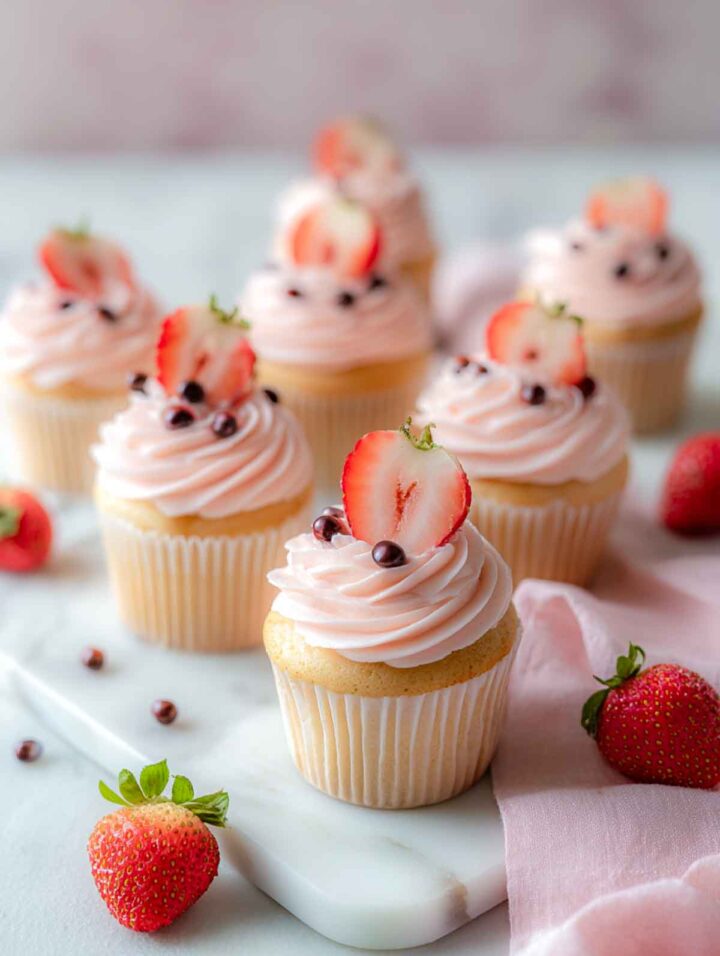
Mini strawberry milk tea cupcakes combine familiar cupcake comfort with gentle spring flavors that feel fresh and modern. The subtle tea note keeps them balanced, while the strawberry adds brightness. They belong naturally in a collection of cute spring desserts, especially for spring baked goods that feel slightly unexpected.
Ingredients
- For the cupcakes
- 1 cup all-purpose flour
- ¾ teaspoon baking powder
- ¼ teaspoon salt
- ½ cup granulated sugar
- ¼ cup unsalted butter, softened
- 1 large egg, at room temperature
- ¼ cup whole milk
- ¼ cup strongly brewed black tea, cooled
- 1 teaspoon vanilla extract
- For the strawberry milk tea frosting
- ½ cup unsalted butter, softened
- 1¾ cups powdered sugar
- 2 tablespoons strawberry puree
- 1 tablespoon strongly brewed black tea, cooled
- ½ teaspoon vanilla extract
- Pinch of salt
- For topping: Fresh strawberries and cooked boba pearls
Instructions
- Preheat oven to 350°F. Line a mini muffin pan with paper liners.
- In a small bowl, whisk together the flour, baking powder, and salt. In a mixing bowl, beat the butter and sugar until light and creamy. Add the egg and mix until fully combined. Stir in the milk, brewed tea, and vanilla extract. Add the dry ingredients and mix just until smooth.
- Divide the batter evenly among the liners, filling each about three-quarters full. Bake for 12-14 minutes, until the tops spring back lightly when touched. Cool completely before frosting.
- Beat the butter until smooth. Gradually add powdered sugar, then mix in strawberry puree, brewed tea, vanilla extract, and salt. Beat until light and creamy.
- Pipe or swirl frosting onto cooled cupcakes. Top with sliced strawberries and a few boba pearls.
Lemon Crinkle Cookies With Vanilla Glaze Drizzle
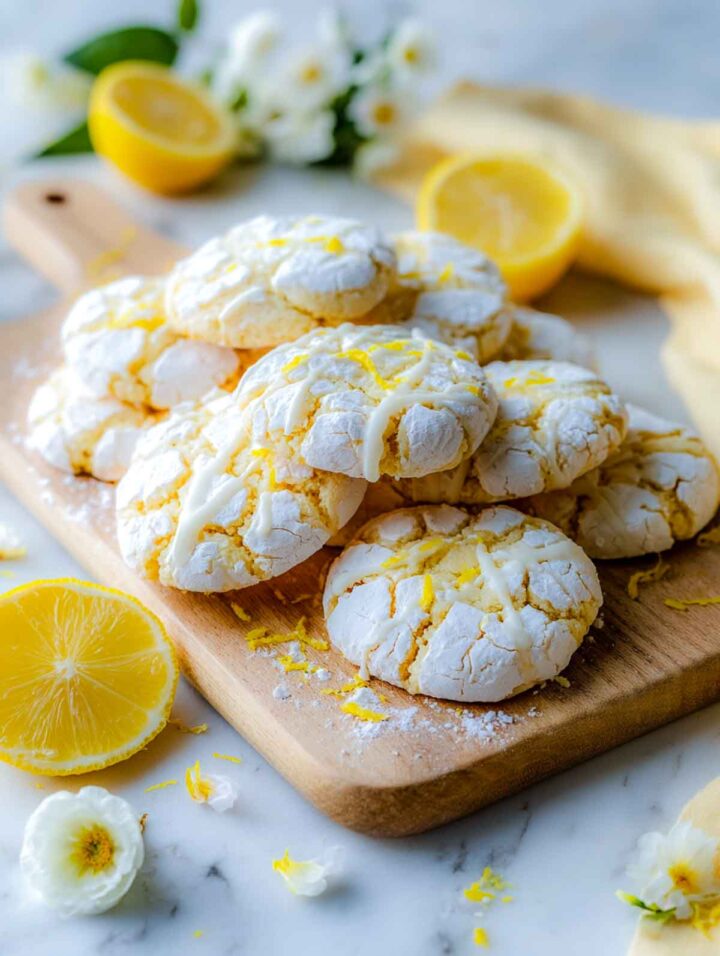
Lemon crinkle cookies bring contrast and texture that work well for spring cookies and easy spring desserts. The cracked tops and soft centers make them visually appealing without needing extra decoration. These cookies fit seamlessly into spring baking recipes focused on flavor and simplicity.
Ingredients
- For the Cookies
- 1¾ cups all-purpose flour
- 1 teaspoon baking powder
- ¼ teaspoon salt
- ½ cup unsalted butter, softened
- ¾ cup granulated sugar
- 1 large egg, room temperature
- 1 tablespoon fresh lemon zest
- 2 tablespoons fresh lemon juice
- 1 teaspoon vanilla extract
- ½ cup powdered sugar, for rolling
- For the Lemon Glaze
- ½ cup powdered sugar
- 1-2 tablespoons fresh lemon juice
Instructions
- In a medium bowl, whisk together the flour, baking powder, and salt. Set aside. In a large mixing bowl, beat the butter and granulated sugar until light and creamy, about 2 minutes.
- Add the egg and mix until fully combined. Stir in the lemon zest, lemon juice, and vanilla extract. Gradually add the dry ingredients and mix just until a soft dough forms. The dough should be slightly sticky but scoopable. Cover the dough and refrigerate for 30 minutes.
- Preheat the oven to 350°F and line a baking sheet with parchment paper.
- Scoop tablespoon-sized portions of dough and roll into balls. Roll each ball generously in powdered sugar. Place cookies 2 inches apart on the prepared baking sheet.
- Bake for 10-12 minutes, until the cookies are puffed, cracked on top, and set around the edges. The centers should remain soft. Allow cookies to cool on the baking sheet for 5 minutes, then transfer to a wire rack to cool completely.
- Whisk the powdered sugar and lemon juice together until smooth, forming a thick but pourable glaze. Drizzle glaze over cooled cookies and allow it to set before serving.
Mini Lemon Loaf Cakes With Pastel Glaze
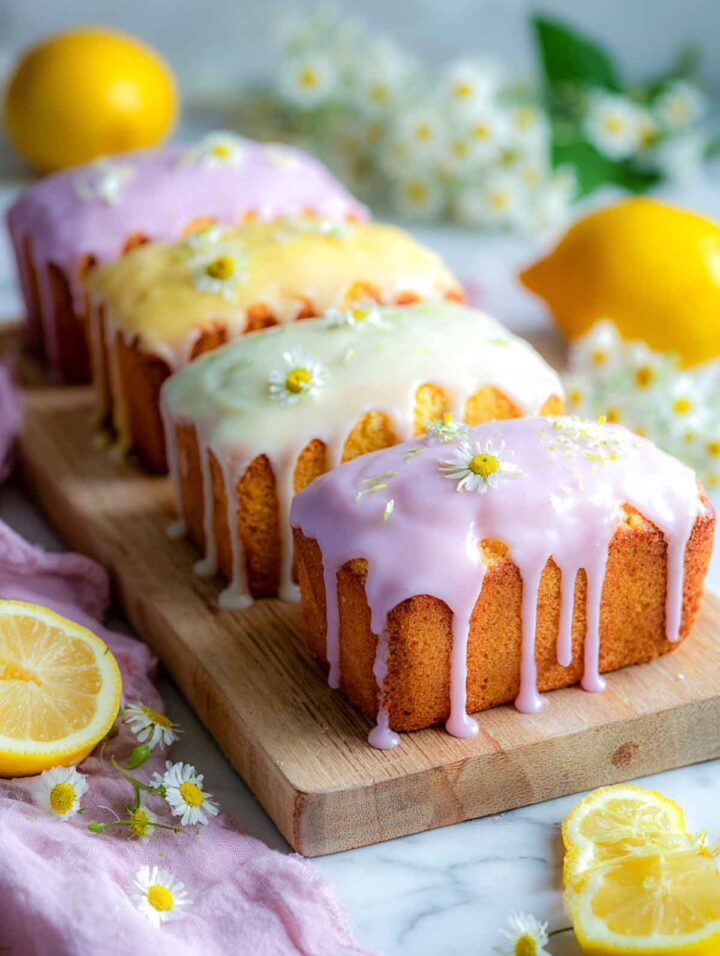
Mini lemon loaf cakes feel bakery-style and polished while staying easy. The pastel glaze adds just enough color to make them pop among spring sweets and spring bakes. They work especially well for sweet brunch tables and spring dessert ideas that feel put-together.
Ingredients
- For the Mini Lemon Loaf Cakes
- 1½ cups all-purpose flour
- 1 teaspoon baking powder
- ¼ teaspoon baking soda
- ¼ teaspoon salt
- ¾ cup granulated sugar
- Zest of 2 lemons
- 2 large eggs, room temperature
- ½ cup neutral oil (avocado or vegetable)
- ½ cup whole milk
- ¼ cup fresh lemon juice
- 1 teaspoon vanilla extract
- For the Pastel Lemon Glaze
- 1½ cups powdered sugar
- 2 to 3 tablespoons fresh lemon juice
- 1 tablespoon milk or cream
- Gel food coloring in soft pastel shades (pink, lavender, pale yellow)
Instructions
- Preheat oven to 350°F. Grease and lightly flour a mini loaf pan or line with parchment.
- In a medium bowl, whisk together flour, baking powder, baking soda, and salt. In a large bowl, rub the lemon zest into the granulated sugar using your fingers until fragrant. This step matters for flavor.
- Whisk in the eggs until smooth, then add oil, milk, lemon juice, and vanilla. Mix until fully combined. Add the dry ingredients and gently whisk just until no dry streaks remain. Do not overmix. Divide batter evenly among the mini loaf pans, filling each about three-quarters full.
- Bake for 22 to 26 minutes, until the tops spring back lightly and a toothpick inserted in the center comes out clean. Cool in the pan for 10 minutes, then transfer loaves to a rack to cool completely.
- For the glaze, whisk powdered sugar, lemon juice, and milk until thick but pourable. Divide into small bowls and tint each with a tiny amount of pastel gel coloring. Spoon glaze over cooled loaves, letting it drip naturally down the sides. Allow glaze to set before serving.
Spring Garden Fruit Pizza Cookies
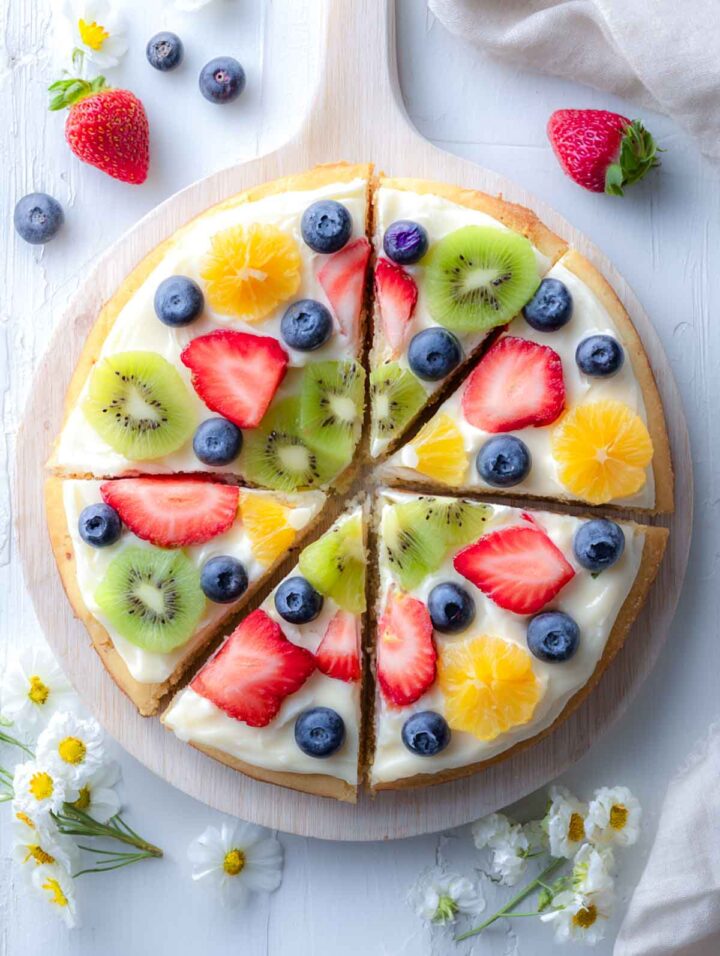
Spring garden fruit pizza cookies are vibrant, fresh, and designed to stand out on any dessert table. The fruit arrangement makes them feel playful while still clearly dessert-focused. They’re a natural closer for a collection of cute spring desserts, tying together spring flavors, pastel desserts, and spring time desserts in one final dish.
Instructions
- For the cookie base
- 1 cup unsalted butter, softened
- ¾ cup granulated sugar
- 1 large egg
- 1 teaspoon vanilla extract
- 2 cups all-purpose flour
- ½ teaspoon baking powder
- ¼ teaspoon salt
- For the cream cheese topping
- 8 ounces cream cheese, softened
- ⅓ cup powdered sugar
- ½ teaspoon vanilla extract
- For the fruit topping
- Fresh strawberries, thinly sliced
- Kiwi, peeled and sliced
- Blueberries
- Mandarin orange segments, patted dry
Instructions
- Preheat the oven to 350°F and line a round baking pan or pizza pan with parchment paper.
- In a large bowl, cream the butter and sugar together until light and fluffy. Beat in the egg and vanilla until fully combined. In a separate bowl, whisk together the flour, baking powder, and salt. Gradually mix the dry ingredients into the butter mixture until a soft dough forms.
- Press the dough evenly into a round about 9 to 10 inches wide, smoothing the surface with your hands or the back of a spoon. Bake for 14-16 minutes, until lightly golden around the edges but still soft in the center. Let cool completely.
- In another bowl, beat the cream cheese, powdered sugar, and vanilla until smooth and spreadable. Spread the cream cheese mixture evenly over the cooled cookie base, leaving a small border around the edge.
- Arrange the fruit in sections so each slice has a balanced mix of colors and textures. Slice using a sharp knife.
More Recipe Collections
- Deviled eggs get a creative Valentine’s Day refresh with these cute and flavorful ideas. From elegant piping to savory twists, these Valentine’s Day deviled eggs ideas are made for party platters, Galentine’s gatherings, and any spread that needs something a little special. They’re the kind of appetizers people notice first and reach for immediately.
- These green deviled egg ideas are a simple way to bring a little St. Patrick’s Day spirit to your party table. From classic favorites with a festive twist to fresh, herb-forward fillings, each one is easy to prep and easy to love. Perfect for potlucks, family gatherings, and holiday spreads that call for something familiar but fun.