16 Graduation Desserts That Look Impressive But Are Actually Easy to Make
Graduation season is here, and if you're the mom behind the dessert table, you already know the pressure is real. You want a graduation sweets table that looks like it came from a bakery, but you also have 47 other things on your to-do list this week. Good news: every single idea in this graduation desserts roundup is designed to be approachable, make-ahead friendly, and full of smart shortcuts that save time and have that wow factor.
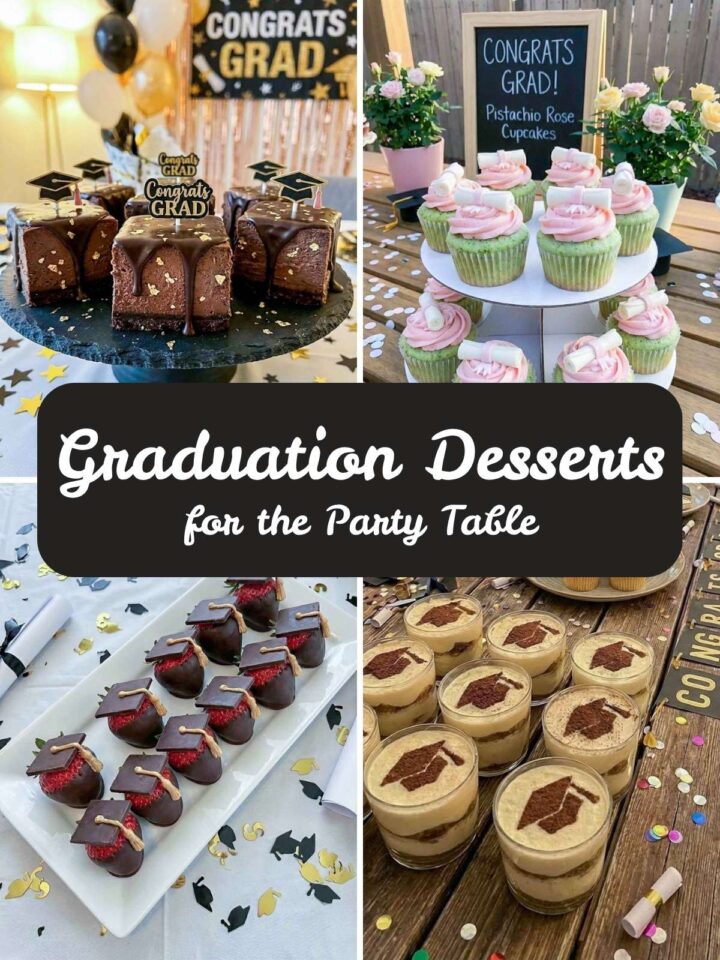
Whether you're building out a full graduation dessert table for a big backyard bash or putting together a sweet little spread for a small family celebration, there's something here for every skill level and every color scheme. These are the graduation-themed treats that look like you spent days on them - but actually didn't. Let's get into it.
Disclosure: This post may contain affiliate links, including Amazon affiliate links. As an Amazon Associate, I earn from qualifying purchases. This means I get a small commission if you decide to make a purchase through my links at no extra cost to you.
Diploma Scroll Cream Puff Tower With Gold Dust
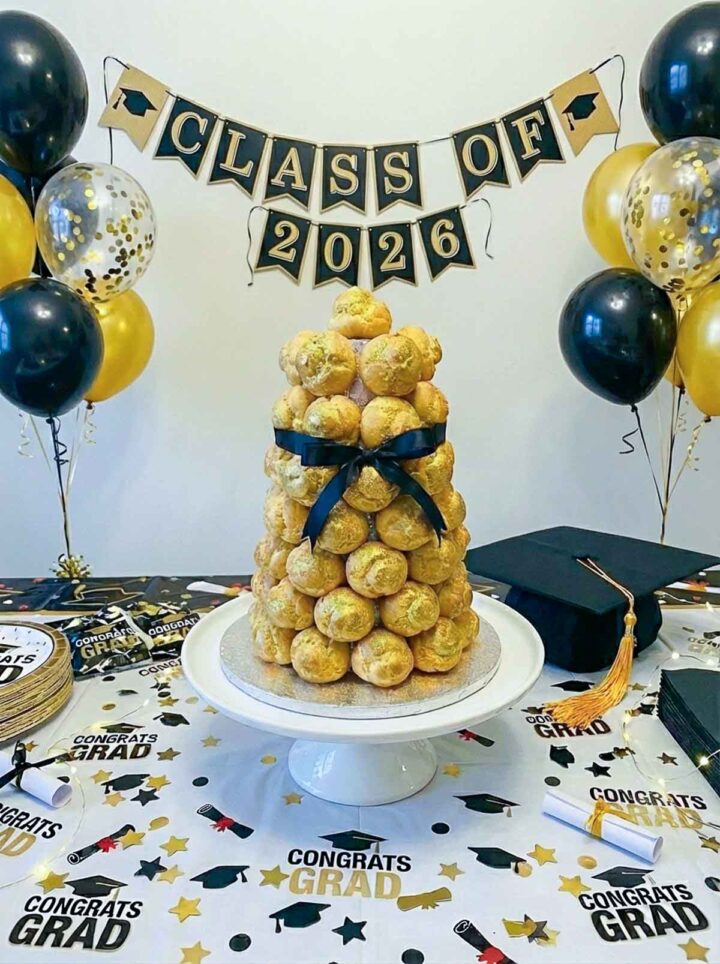
This showstopper is the centerpiece of any graduation party treat table: a tower of golden cream puffs stacked on a cake stand and tied with a black satin ribbon bow. It looks like a French croquembouche but takes a fraction of the effort. The puffs are lightly dusted with edible gold shimmer, and the whole thing is a total centerpiece moment that guests will photograph from across the room.
Shortcut Recipe (makes approx. 40 cream puffs)
- 2 boxes store-bought frozen cream puffs (like Trader Joe's or Sam's Club mini cream puffs, thaw per package directions)
- Edible gold shimmer dust (available at craft stores or online)
- 1 wide black satin ribbon
- A styrofoam cone or cake stand to build your tower on
- Optional: clear piping gel to help puffs stick together in the stack
Instructions
- Thaw cream puffs completely. Brush or dust lightly with gold shimmer dust. A dry pastry brush works perfectly for this.
- Stack them on a styrofoam cone in a pyramid shape, using a small dab of piping gel between layers to help them hold.
- Tie the black ribbon around the middle of the tower in a neat bow. Serve within 2 hours of assembling.
Shortcut tip: The entire assembly takes about 20 minutes. Do it the morning of the party and keep it somewhere cool. The frozen cream puffs are the ultimate shortcut here - nobody will know.
Black And Gold Cheesecake Bars
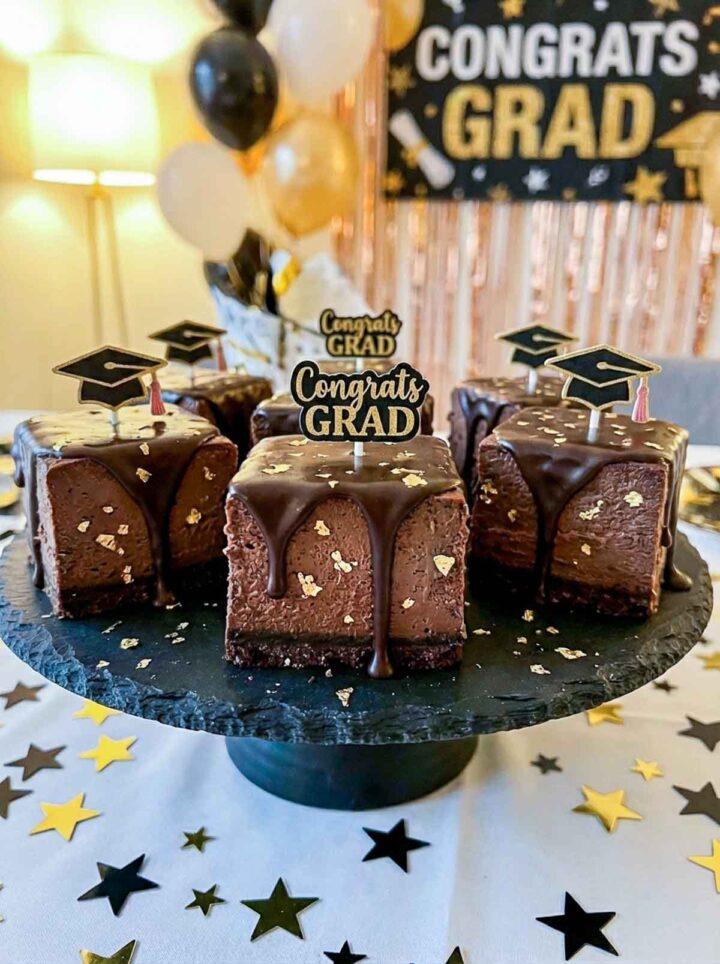
These rich chocolate cheesecake bars are the definition of elegant and effortless; exactly the kind of graduation party chocolate ideas that make the biggest splash for the least amount of effort. Each square is topped with a glossy chocolate ganache drip and scattered gold leaf flakes, finished off with a little "Congrats Grad" topper pick. They look like they came from a fancy patisserie, but the secret is a store-bought Oreo crust and a homemade no-fuss chocolate cheesecake filling.
Shortcut Recipe (makes 12 bars)
- 1 package Oreo crumbs (or crush 24 Oreos)
- 4 tablespoon melted butter
- 2 packages (8 oz each) full-fat cream cheese, softened
- ½ cup cocoa powder
- 1 can (14 oz) sweetened condensed milk
- 2 eggs
- 1 teaspoon vanilla extract
- ½ cup semi-sweet chocolate chips + 3 tablespoon heavy cream (for ganache drip)
- Edible gold leaf flakes (find these at craft stores or Amazon)
- Grad topper picks (available at party stores or Amazon)
Instructions
- Mix Oreo crumbs with melted butter and press firmly into a parchment-lined 9x9 pan.
- Beat cream cheese until smooth, then mix in cocoa, condensed milk, eggs, and vanilla. Pour over the crust.
- Bake at 325°F for 35-40 minutes until just set.
- Cool completely, then refrigerate at least 4 hours.
- Melt chocolate chips with cream in 30-second microwave bursts, stir smooth, and drizzle over the top, letting it drip down the sides slightly.
- Add a few pinches of gold leaf, slice into squares, and press in the grad topper picks just before serving.
Shortcut tip: Make these up to 2 days ahead and keep refrigerated. Add the gold leaf and toppers the morning of the party.
Strawberry Shortcake Caps With White Chocolate

These might be the most elegant single-serving desserts for a graduation party you'll find anywhere. Small, round, individual shortcake rounds are layered with whipped cream and sliced strawberries, then topped with a flat square of white chocolate as the mortarboard, with a tiny white fondant diploma scroll. They are absolutely beautiful, plated on a round white serving dish surrounded by fresh strawberries.
Shortcut Recipe (makes 12)
- 1 pound cake or angel food cake, sliced into rounds using a 2.5-inch round cookie cutter
- 1 lb fresh strawberries, sliced
- 1 container (8 oz) Cool Whip or whipped cream
- 1 block (8 oz) full-fat cream cheese, softened
- ½ cup powdered sugar
- 1 teaspoon vanilla extract
- 2 cups white chocolate melting wafers
- Pre-made fondant diploma decorations
Instructions
- Make the cream cheese discs first. Beat cream cheese with powdered sugar and vanilla until completely smooth.
- Line a baking sheet with parchment. Using the same round cookie cutter you used for the cake, pipe or spoon the cream cheese mixture into the cutter to about ½ inch thick, smooth the top flat, and slide the cutter off. Repeat for all 12.
- Refrigerate at least 1 hour until firm. Meanwhile, melt white chocolate and pour into a square mold. Let it set completely.
- To assemble: place one cake round on your work surface, add a dollop of Cool Whip and a layer of sliced strawberries. Press a second cake round on top, then place one firm cream cheese disc on top of that.
- Finish with a white chocolate square and press a fondant diploma decoration on top. Store in the refrigerator until ready to serve.
Shortcut tip: Make the cream cheese discs and white chocolate squares the day before and refrigerate. Assemble the stacks the morning of the party - they hold their shape well for several hours in the fridge.
Lemon Lavender Graduation Cake
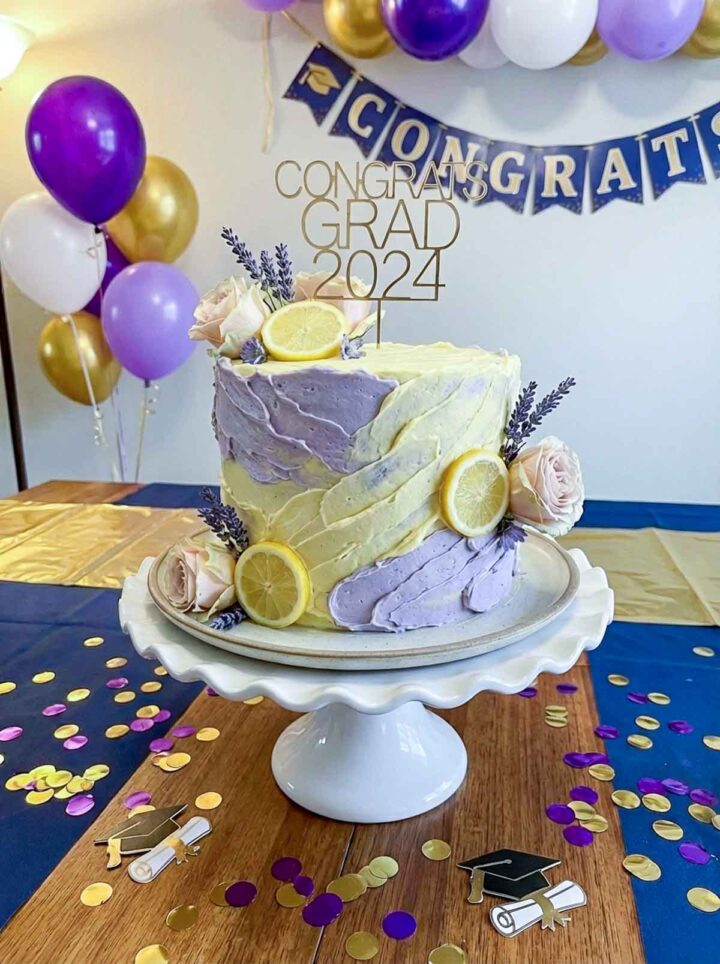
This is the cake for when you want your graduation dessert table to feel like a florist designed it. The two-tone lemon and lavender buttercream is applied in loose, painterly swooshes: no smooth sides, no perfection required. It's decorated with fresh lemon slices, dried lavender sprigs, and soft blush roses, and finished with a gold "Congrats Grad" cake topper. The rustic palette knife technique actually means less skill is needed, not more.
Shortcut Recipe (makes one 6-inch 2-layer cake)
- 1 box lemon cake mix + eggs, oil, water per package
- 2 sticks (1 cup) unsalted butter, softened
- 3 cups powdered sugar
- 2-3 tablespoon heavy cream
- Purple/lavender gel food coloring
- Yellow gel food coloring
- 1 lemon, sliced thin
- Dried culinary lavender (available at Whole Foods or online)
- Small fresh roses or rose buds
- Gold "Congrats Grad" cake topper (available on Etsy or Amazon)
Instructions
- Bake the lemon cake in two 6-inch round pans per the box instructions. Cool completely.
- Make buttercream by beating butter until fluffy, then adding powdered sugar gradually with cream until spreadable.
- Divide the frosting into two bowls. Tint one yellow and one lavender.
- Stack the cooled cake layers with a thin layer of white or yellow buttercream between them. Apply a thin crumb coat all over, then refrigerate for 20 minutes.
- Using a palette knife or butter knife, apply yellow buttercream in sweeping strokes on one side of the cake and lavender on the other, letting them blend slightly in the middle for that beautiful two-tone look.
- Add lemon slices, lavender, and roses around the cake. Add the gold topper.
Shortcut tip: The cake layers can be baked and wrapped tightly and kept for up to 2 days ahead. Frost and decorate the day before and refrigerate. Let it sit at room temperature for 30 minutes before serving.
Chocolate Mousse Cups With Edible Printed Years

These are some of the most crowd-pleasing grad party desserts ideas you'll find: individual chocolate mousse cups assembled in glass jars, layered with chocolate pudding and whipped cream, and topped with a round printed edible topper that reads "Class of [Year]" in gold on white. The best part? The entire thing is built from store-bought pudding.
Shortcut Recipe (makes 12 cups)
- 2 boxes (3.9 oz each) instant chocolate pudding mix
- 3 cups cold whole milk
- 1 container (8 oz) Cool Whip, thawed
- 1 cup heavy cream (optional, for an extra whipped layer)
- Custom edible toppers printed with "Class of [Year]". You can order these on Etsy or from a local cake supply shop using your grad's year
Instructions
- Whisk pudding mix with cold milk for 2 minutes and let sit for 5 minutes to thicken.
- In each glass jar, add a layer of chocolate pudding, then a layer of Cool Whip. Repeat layers ending with Cool Whip on top. Refrigerate for at least 1 hour.
- Just before serving, press one edible printed topper onto the top of each cup.
Shortcut tip: Assemble the cups the night before and refrigerate covered. Order the custom edible toppers at least a week in advance from an Etsy seller - search "Class of 2026 edible toppers."
Vanilla Bean Macaron Stack In School Color Layers
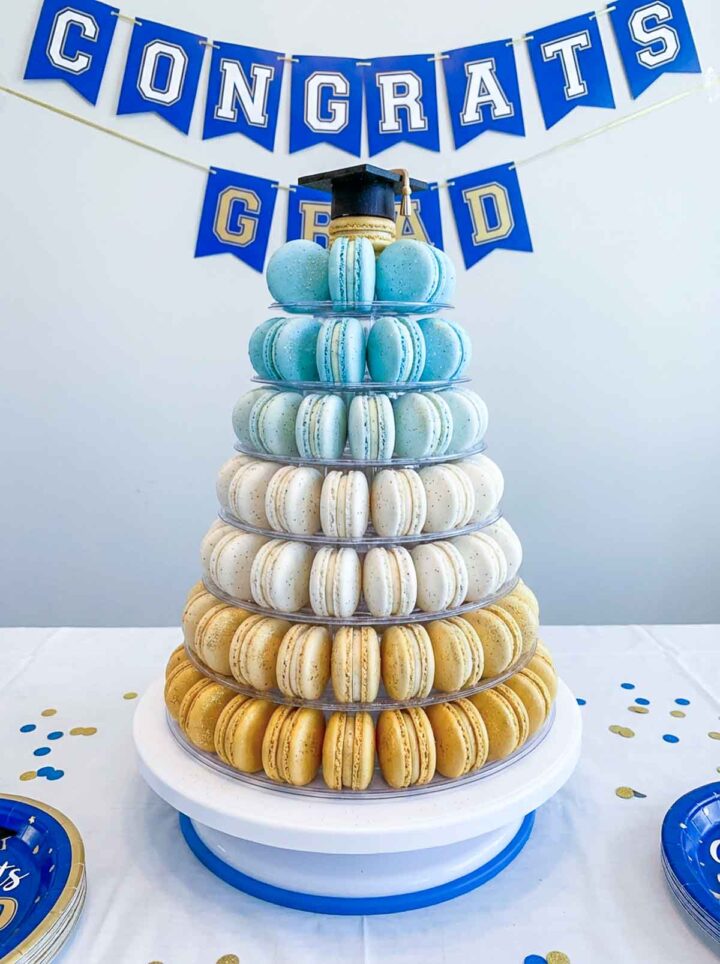
This macaron tower is one of the most stunning graduation party treat ideas that exists, and you don't have to bake a single macaron. The tower uses a graduated display stand with layers moving from deep gold at the bottom through ivory in the middle to sky blue at the top, topped with a miniature graduation cap. Every single macaron is store-bought, and the assembly takes about 20 minutes.
Shortcut Recipe / Assembly Guide
- 60-80 macarons in school colors, ordered from a French bakery, Costco, or Trader Joe's (many bakeries will dye to order colors with a few days' notice)
- A macaron tower display stand (available on Amazon)
- Edible gold shimmer spray (optional, for extra sparkle)
- 1 small graduation cap decoration for the top (available on Amazon or at party stores)
Instructions
- There is truly no baking here; it's all about the assembly. Sort your macarons by color.
- Starting at the bottom tier of your display stand, fill each ring with the darkest color (gold), then move to the next lightest (ivory/white) in the middle tiers, and finish with the lightest (blue) at the top.
- Lightly mist with edible shimmer spray. Add the graduation cap to the very top. Assemble up to 2 hours before serving.
Shortcut tip: Order the macarons at least a week ahead and keep them refrigerated. Take them out an hour before assembly so they're easy to handle.
Confetti Sugar Cookie Plaque With Royal Icing
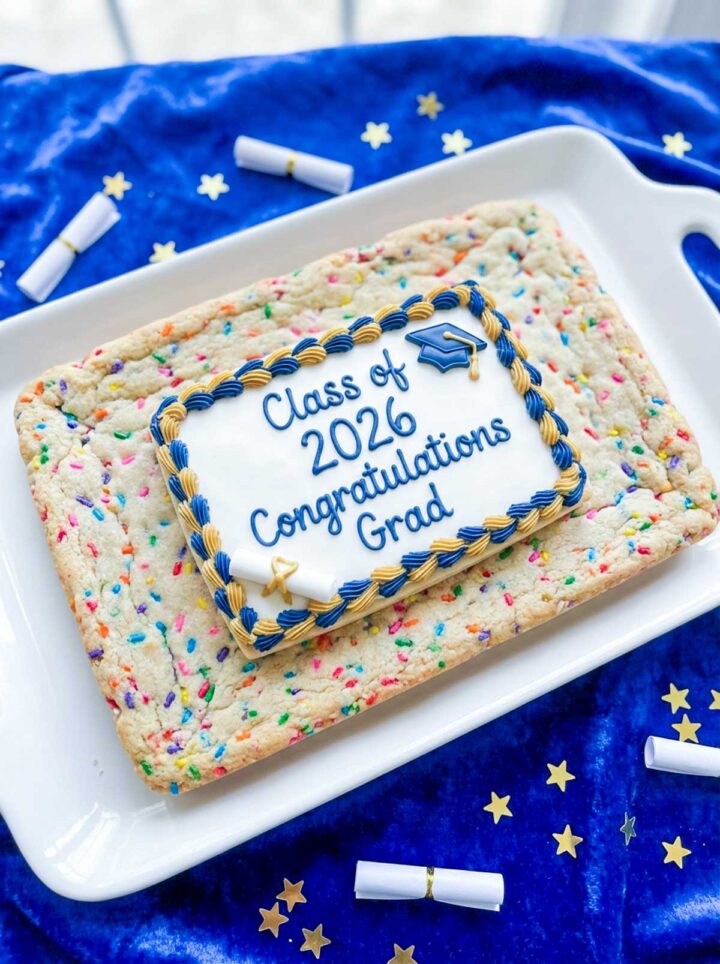
A giant sprinkle-packed sugar cookie with a smaller decorated plaque cookie sitting right on top: this is one of those senior graduation party food ideas that looks like it took great skill but is actually very manageable. The base is a big, thick rectangle cookie loaded with rainbow confetti sprinkles. The overlay is a smaller white iced cookie with a simple navy and gold rope border, a graduation-cap candy in the corner, and the grad's message written with a food-safe pen. No advanced decorating required.
Shortcut Recipe (makes 1 large plaque + 1 overlay)
- 2 rolls refrigerated sugar cookie dough (like Pillsbury)
- ½ cup rainbow sprinkles
- 2 cups royal icing (store-bought or made with meringue powder mix)
- Navy blue and gold gel food coloring
- Black food-safe marker for writing text (or use a stencil)
- 1 small navy graduation cap candy decoration
- 1 small gold diploma candy decoration
- A star piping tip (Wilton #18 or similar) and two piping bags
Instructions
- Knead rainbow sprinkles into both rolls of dough until evenly distributed. Roll out and cut one large rectangle (roughly 9x6 inches) and one smaller rectangle (roughly 6x4 inches).
- Bake both per package instructions and cool completely.
- Divide your royal icing into three bowls. Leave one portion white, tint one navy blue, and one gold.
- Flood the smaller cookie with white royal icing and let it dry completely, at least 4 hours or overnight.
- Once dry, use your food-safe pen to write "Class of 2026 / Congratulations / Grad" in the center.
- Pipe the rope border around the edge of the smaller cookie by alternating a zigzag of navy and gold using a star tip. Just press and pull in a continuous motion all the way around.
- Press the graduation cap candy into the top right corner and the diploma candy at the bottom center. Place the finished overlay cookie centered on top of the large sprinkle base cookie. Serve on a white rectangular platter.
Shortcut tip: The white royal icing layer on the overlay cookie needs to be fully dry before you write on it - don't rush this step or the pen will drag. Do it the night before, and write the text and pipe the border the morning of the party. The whole decorating process takes about 20 minutes once the icing is set.
Champagne Jelly Parfaits With Gold Leaf Berry Garnish
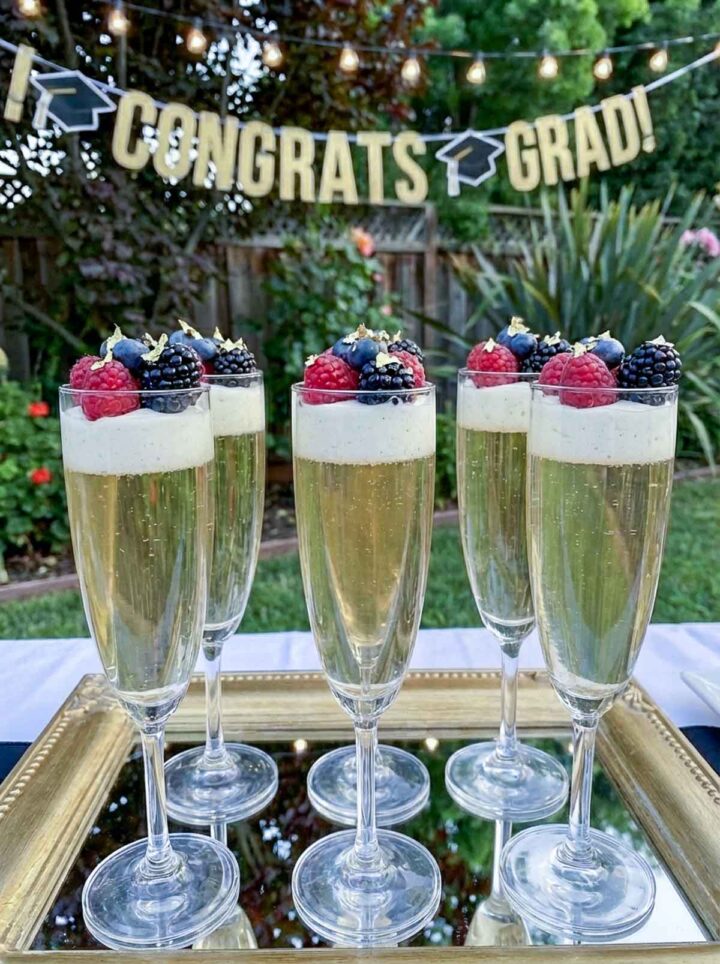
If you want one item on your grad dessert table that genuinely stops people in their tracks, this is it. These champagne flutes are doing a lot of heavy lifting. They look incredibly sophisticated but come together in about 10 minutes of active work. The flutes are filled with chilled sparkling lemonade jelly and a vanilla cream layer, then topped with fresh raspberries, blackberries, blueberries, and a few pieces of edible gold leaf.
Shortcut Recipe (makes 8 Flutes)
- 1 bottle (750 ml) of champagne (or non-alcoholic sparkling apple cider or sparkling lemonade)
- 2 packets (7g each) unflavored gelatin
- 3 tablespoon sugar
- 1 cup heavy whipping cream
- 2 tablespoon powdered sugar
- ½ teaspoon vanilla extract
- Mixed fresh berries (raspberries, blackberries, blueberries)
- Edible gold leaf flakes
Instructions
- Heat 1 cup of the champagne or cider until steaming (don't boil).
- Sprinkle gelatin over the warm cider, add sugar, and stir until fully dissolved. Pour in the remaining cold champagne or cider gently to preserve the bubbles.
- Divide among the champagne flutes, filling about ⅔ of the way. Refrigerate for at least 3 hours until set.
- Whip cream with powdered sugar and vanilla to soft peaks and spoon over the set jelly. Top with berries and a pinch of gold leaf right before guests arrive.
Shortcut tip: The jelly layer can be made the night before. Add the cream and berries the day of.
Mini Bundt Cakes With Fondant Tassels And Glaze

If you want individual graduation sweets that feel genuinely fancy, these mini bundt cakes are it. Each one has a beautiful metallic gold-and-silver drip glaze, and is topped with a flat square of dark chocolate (the mortarboard) and a piped fondant tassel in blue, gold, or black. Displayed on a three-tiered acrylic stand, they're one of the most polished grad dessert table ideas in this entire roundup.
Shortcut Recipe (makes 18 mini bundts)
- 1 box chocolate cake mix + eggs, oil, water per package
- 1 cup powdered sugar 2-3 tablespoon milk
- Gold and silver luster dust
- 1 bag dark chocolate melting wafers (for the mortarboard caps)
- Pre-made fondant in blue, black, and gold (like Wilton ready-to-use fondant)
- A small square chocolate candy mold (for the caps)
Instructions
- Bake chocolate cake batter in a greased mini bundt pan per box directions (typically 18-22 minutes at 350°F). Cool completely.
- Make a simple glaze: whisk powdered sugar with milk until pourable. Mix in luster dust (start with gold, then do a second batch with silver to get the two-tone metallic drip look). Drizzle over the mini bundts.
- While those set, melt chocolate wafers and pour into square candy molds. Refrigerate until firm.
- Roll small pieces of colored fondant into tassel shapes: a flattened cylinder with thin strips cut at the bottom works perfectly. Alternatively, use a tassel fondant mold.
- Attach to the chocolate square with a dab of melted chocolate. Press the finished caps gently onto the top of each bundt.
Shortcut tip: Buy the mini bundt cakes from Nothing Bundt Cakes or a local bakery if you want to skip the baking entirely. Just add the glaze and caps at home.
White Chocolate Bark With Edible Name Tags
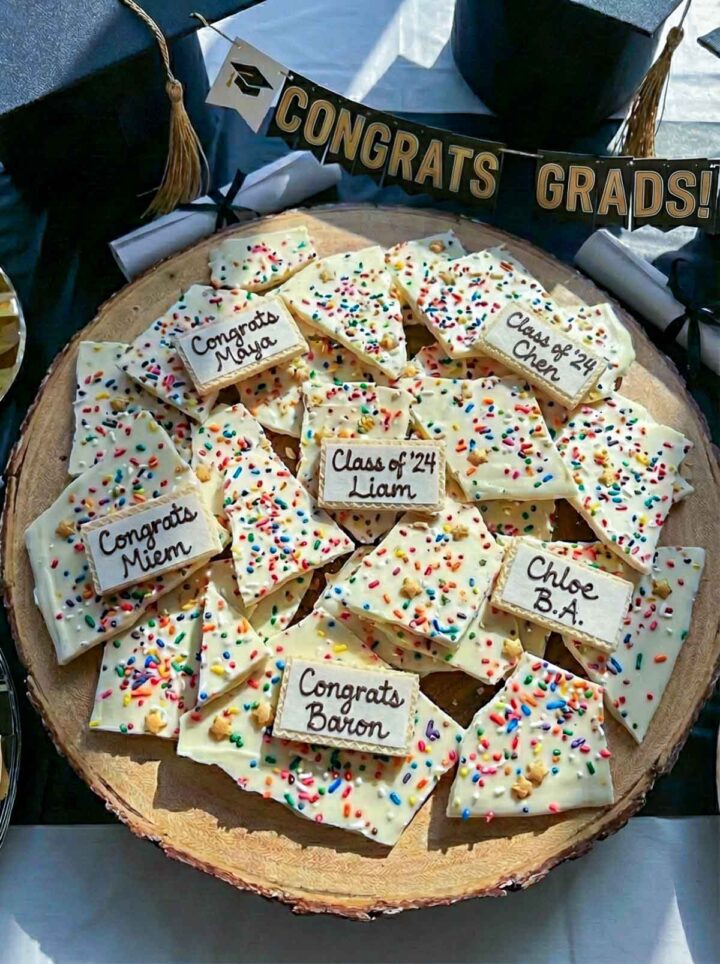
This is the most personal item on any graduation sweets table - and one of the most shareable. White chocolate bark loaded with rainbow sprinkles and gold star bits, broken into jagged pieces, with small personalized name tag cookies on top for each guest. Each tag reads "Congrats [Name]" or "Class of [Year] [Name]" - it doubles as a dessert and a keepsake. The bark is broken into irregular pieces, which means there's no precision required at all.
Shortcut Recipe (makes a large batch for 20-25 guests)
- 3 cups white chocolate melting wafers
- ½ cup rainbow sprinkles
- 2 tablespoon gold star sprinkles
- Personalized name tag cookies
Instructions
- Buy small blank rectangular sugar cookies from a bakery and use a food-safe writing pen (like Wilton FoodWriter) to write names yourself, OR order pre-written edible name tags from an Etsy bakery.
- Melt white chocolate in 30-second bursts in the microwave, stirring until smooth. Pour onto a parchment-lined baking sheet and spread to about ¼ inch thick.
- Immediately scatter rainbow sprinkles and gold star pieces all over the surface. Refrigerate for 30 minutes until firm.
- Break into irregular pieces with your hands - no two pieces should be the same shape, and that's what makes it beautiful.
- Arrange on a serving board. Write each guest's name on a small cookie using a food-safe pen and tuck them throughout the bark pieces.
Shortcut tip: The bark itself can be made 3-4 days ahead and kept in a cool, dry place. Write the name tag cookies the day before and add them to the board right before the party.
Tiramisu Cups With Cocoa Stenciled Graduation Caps
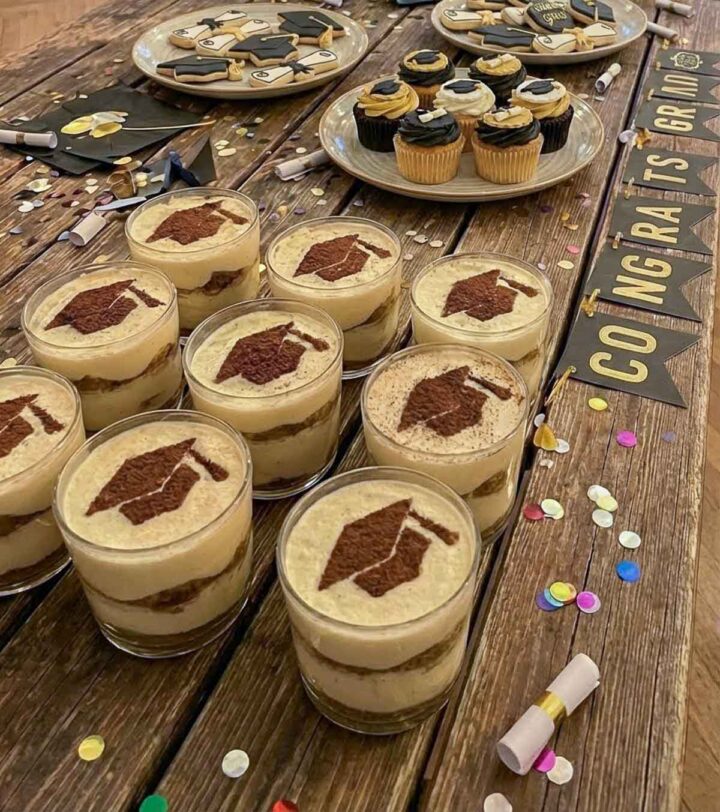
These individual tiramisu cups are one of those graduation party treat ideas that feel sophisticated without requiring any special skills. Made in wide, short glasses and layered with coffee-soaked ladyfingers and mascarpone cream, the finishing touch is a graduation cap shape dusted in cocoa powder using a simple cardstock stencil. The easiest decoration that makes the biggest impact on a grad dessert table.
Shortcut Recipe (makes 12)
- 24 ladyfinger biscuits (savoiardi)
- 1.5 cups strong brewed coffee, cooled
- 2 tablespoon coffee liqueur or 1 teaspoon espresso powder dissolved in extra coffee (optional)
- 2 containers (8 oz each) mascarpone cheese
- ½ cup powdered sugar
- 1 teaspoon vanilla extract
- 1 cup heavy whipping cream
- Cocoa powder for dusting
- A graduation cap stencil
Instructions
- Mix cooled coffee (and liqueur if using) in a shallow bowl. Quickly dip each ladyfinger (1-2 seconds per side; don't soak) and place in the bottom of each glass.
- Beat mascarpone with powdered sugar and vanilla until smooth. Whip heavy cream to soft peaks and fold into the mascarpone mixture.
- Spoon the cream over the ladyfinger layer, then add another layer of dipped ladyfingers, and finish with a generous layer of cream.
- Refrigerate at least 4 hours or overnight.
- Just before serving, hold your graduation cap stencil just above the surface of each cup and dust cocoa powder through the cutout using a small sieve or spoon.
Shortcut tip: Make these the night before - tiramisu actually tastes better after a full night in the fridge. Dust them all in about 10 minutes the morning of the party.
Rainbow Layer Pavlova With Star Meringue Bites

This is the most dramatic dessert for a graduation party in this entire roundup: five large disc-shaped meringue layers in rainbow colors (blue, green, yellow, orange, pink), stacked with whipped cream and fresh berries between each layer, topped with a cloud of colorful mini meringue kisses, rainbow sprinkles, raspberries, and blueberries. It looks impossible to make. It isn't.
Shortcut Recipe (makes one 5-layer pavlova)
- 6 large egg whites, at room temperature
- 1.5 cups caster (superfine) sugar
- 1.5 teaspoon cornstarch
- 1 teaspoon white vinegar
- Gel food coloring in blue, green, yellow, orange, and pink
- 2 cups heavy whipping cream
- 3 tablespoon powdered sugar
- Mixed fresh berries (raspberries, blueberries)
- Rainbow sprinkles
- Grad cap topper picks
Instructions
- Beat egg whites to soft peaks, then gradually add sugar one tablespoon at a time, beating to stiff glossy peaks. Fold in cornstarch and vinegar.
- Divide the meringue into 5 portions and tint each a different color. Pipe or spread each into an 8-inch circle on parchment-lined baking sheets.
- Use any remaining tinted meringue to pipe small star kisses onto a separate sheet of parchment.
- Bake all at 225°F for 60-75 minutes, then turn off the oven and leave inside for another hour.
- Whip cream with powdered sugar to soft peaks.
- Stack the layers, starting with blue at the bottom, then spread whipped cream and scatter berries between each layer. Top with mini meringue kisses, sprinkles, and berries. Add grad cap picks.
Shortcut tip: Bake all the meringue layers and kisses 1-2 days ahead and store in an airtight container at room temperature (not the fridge). Assemble the day of the party with fresh cream and berries.
Chocolate Covered Strawberries With Cap And Tassel
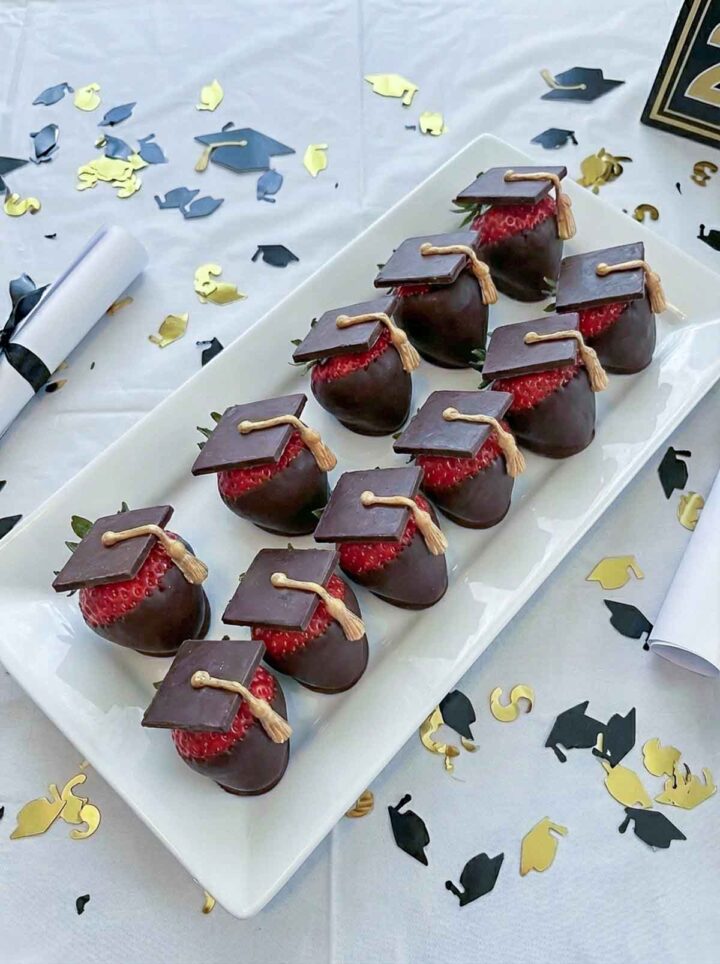
One of the most classic graduation sweets you can make, and one of the most impressive-looking. Each large strawberry is dipped in dark chocolate, then topped with a small square chocolate cap made in a candy mold, decorated with a piped gold tassel. These are one of those things that look incredibly detailed but only require a little patience and a chocolate mold. The result is a full graduation hat on every berry.
Shortcut Recipe (makes 18-20)
- 18-20 large fresh strawberries, dried completely
- 2 cups dark chocolate melting wafers (like Ghirardelli or Wilton)
- ¼ cup white chocolate melting wafers
- Gold gel food coloring
- A small square chocolate mold (for the mortarboard caps - available on Amazon)
- Tassel silicon mold
- Toothpicks or a dipping fork
Instructions
- Melt dark chocolate in a deep microwave-safe bowl in 30-second bursts, stirring between each.
- Dip each strawberry, leaving the green top exposed, let excess drip off, and place on parchment.
- While those set, melt additional dark chocolate and pour into the square candy molds. Refrigerate 15 minutes until firm, then pop them out.
- Melt white chocolate, add a tiny drop of gold gel coloring, and use a piping bag or zip-lock bag with a tiny snipped corner to pipe a tassel (a dot with hanging strings) on each chocolate square. Alternatively, use a tassel mold to set them.
- Attach the cap to the top of each strawberry using a small dab of melted chocolate. Let set fully before plating.
Shortcut tip: Dip the strawberries and make the caps the day before. Pipe the tassels and assemble the morning of the party. For convenience, you can also use a tassel mold to make them.
Pistachio Rose Cupcakes With Diploma Swirls
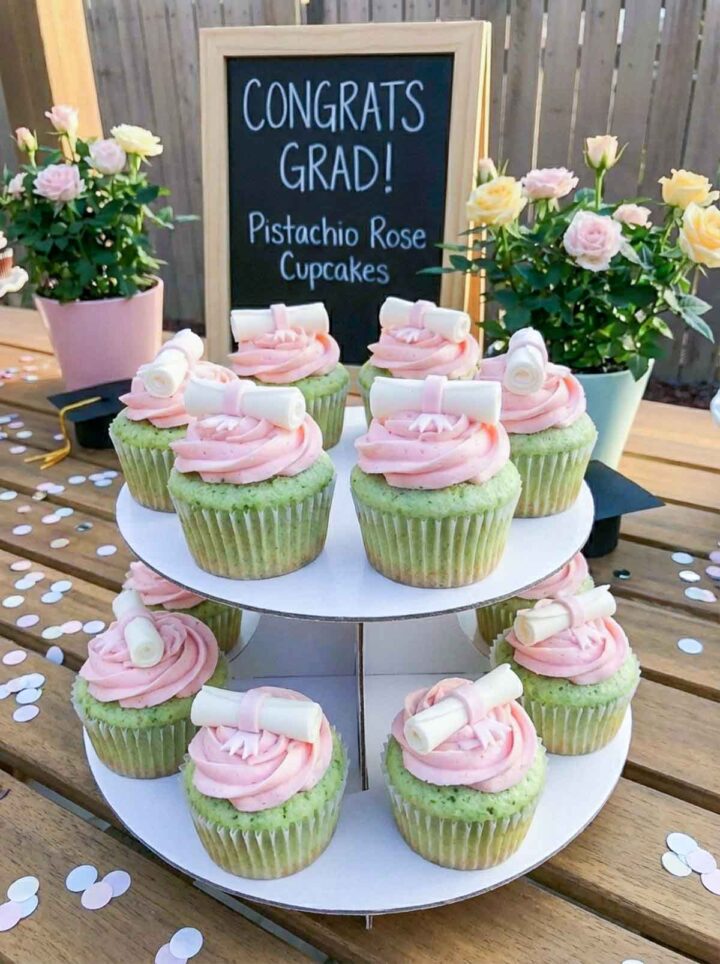
These cupcakes bring such a beautiful, unexpected color story to a grad party desserts: soft green pistachio bases, swirled with rose pink buttercream, each topped with a tiny fondant diploma scroll. The green-and-pink palette is genuinely stunning, especially for spring graduations, and the whole thing comes together faster than you'd think, thanks to a pudding mix shortcut.
Shortcut Recipe (makes 18 cupcakes)
- 1 box white cake mix
- 1 box (3.4 oz) instant pistachio pudding mix (this is the shortcut. It flavors AND colors the batter naturally green)
- 3 eggs
- ⅓ cup oil
- 1 cup water (or per box instructions)
- 2 sticks (1 cup) unsalted butter, softened
- 3 cups powdered sugar
- 3 tablespoon heavy cream
- Pink gel food coloring
- Pre-made fondant diploma decorations or use fondant and a mold
Instructions
- Mix the white cake batter with the pistachio pudding mix dry. This naturally turns the batter a soft, speckled green.
- Fill cupcake liners ⅔ full and bake per box instructions (usually 18-20 minutes at 350°F). Cool completely.
- Make buttercream by beating butter until fluffy, adding powdered sugar and cream, and tinting with pink gel food coloring until you reach a soft rose shade.
- Pipe a tall swirl onto each cooled cupcake using a large star tip. Press one fondant diploma decoration into the top of each swirl.
Shortcut tip: Buy the diploma fondant decorations from Etsy to save yourself the work of making them. Search "graduation diploma fondant toppers" - they're usually sold in packs of 12 or 24.
Ice Cream Sandwiches Rolled In School Color Sprinkle
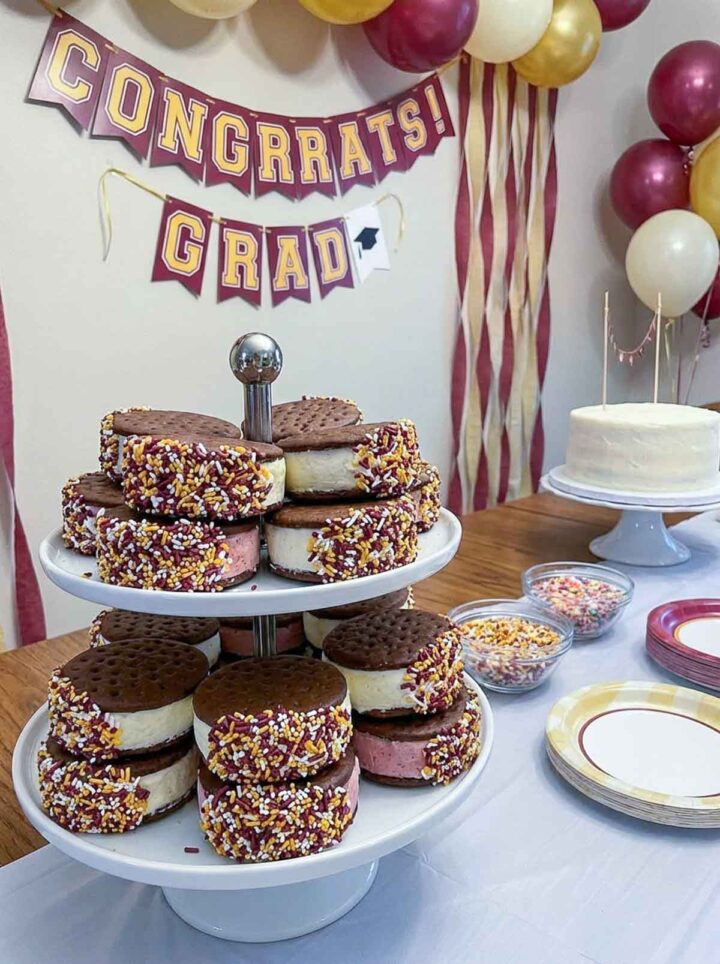
When it comes to cute dessert table ideas that kids and adults both love, ice cream sandwiches are hard to beat. These ones are extra special because the sprinkle mix matches the grad's school colors exactly. The sandwiches use vanilla and strawberry ice cream between dark chocolate wafer cookies, with the edges rolled in a custom mix of maroon, gold, and white sprinkles. Displayed on a tiered stand, they look incredible.
Shortcut Recipe (makes 12)
- 24 dark chocolate wafer cookies
- 1 carton vanilla ice cream
- 1 carton of strawberry ice cream
- Sprinkle mix in your grad's school colors (mix and match the colors)
Instructions
- Line a baking sheet with parchment and place it in the freezer for 10 minutes.
- Scoop a generous ball of softened ice cream onto one wafer cookie and press a second cookie on top, pressing gently until the ice cream spreads to the edges.
- Roll the exposed ice cream edge immediately in your sprinkle mix, pressing lightly to coat. Place on the cold parchment and return to the freezer. Repeat for all sandwiches.
- Freeze at least 2 hours until firm, then wrap individually in plastic wrap and store in a zip-lock bag.
Shortcut tip: Make these up to a week ahead. Take them out of the freezer 5 minutes before serving so they're easy to bite into.
Mirror Glaze Chocolate Cake With Graduation Seal
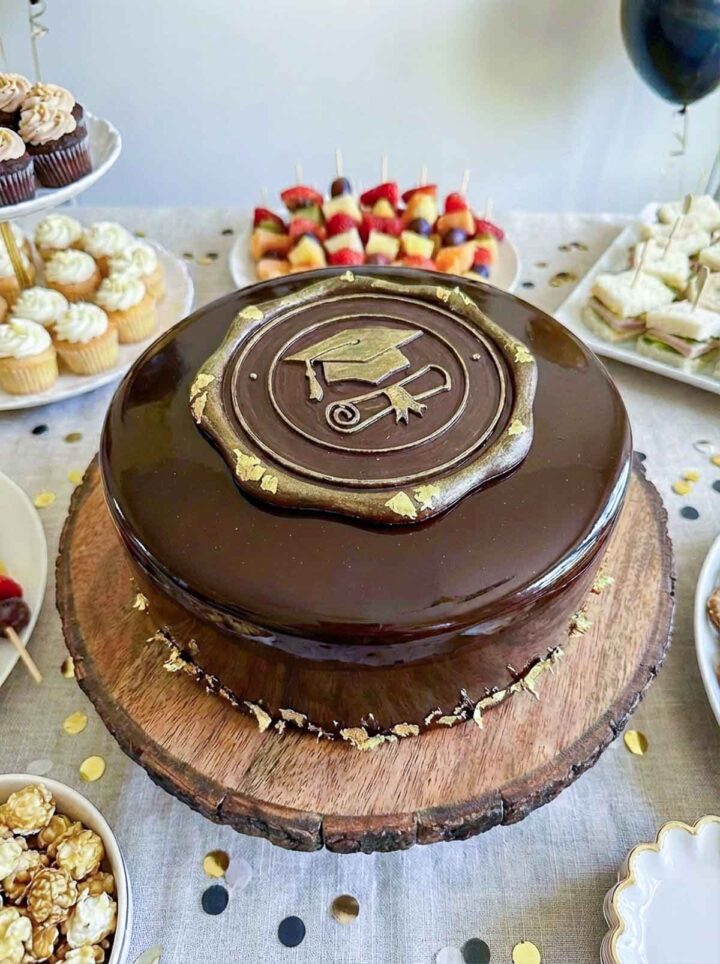
This is the statement cake of any graduation party dessert table: a dark chocolate layer cake covered in a perfect mirror-finish chocolate glaze, topped with a circular embossed chocolate plaque showing a graduation cap and diploma, painted with gold luster. It looks incredibly professional, but the mirror glaze is actually easier than it looks once you understand the technique (and the frozen cake is the secret).
Shortcut Recipe (makes one 8-inch round cake)
- 1 box dark chocolate cake mix + eggs, oil, water per package
- 1 can store-bought chocolate frosting (for the crumb coat)
- For the mirror glaze:
- 1 cup heavy cream
- 1.5 cups dark chocolate chips
- 2 tablespoon corn syrup
- 1 teaspoon gelatin bloomed in 2 tablespoon cold water
- Edible gold luster dust
- A silicone graduation seal mold OR a pre-made chocolate plaque from a cake store
- Gold leaf flakes (for the base and sides)
Instructions
- Bake cake in two 8-inch round pans. Cool, fill with frosting, stack, and apply a smooth crumb coat.
- Freeze the cake for at least 1 hour. This is the key step for a successful mirror glaze.
- Make the glaze: heat the cream until steaming, pour it over the chocolate chips, let sit for 2 minutes, then stir until smooth.
- Add corn syrup and bloomed gelatin, stir until fully incorporated. Let cool to about 90°F - use a thermometer.
- Place the frozen cake on a wire rack over a baking sheet and pour the glaze over the top in one steady stream, letting it flow down the sides. Let it sit for 15 minutes without touching.
- Meanwhile, pour a little melted chocolate into the graduation mold and refrigerate until firm.
- Pop out, paint with gold luster dust mixed with a few drops of vodka or lemon extract. Center the plaque on top of the glazed cake. Press gold leaf flakes around the base.
Shortcut tip: The most important shortcut here is starting with a store-bought frosted cake from a grocery store bakery. Ask for a simple round chocolate cake with a smooth crumb coat and no final frosting - just a sticky base for the glaze to adhere to.
There you have it - 16 graduation party desserts that are as fun to make as they are to eat. Whether you put one on the table or build out a whole dessert table for graduation party guests to graze from, every single one of these is designed to make you feel confident in the kitchen - not stressed. That's the whole point of a celebration, after all.
Bookmark this post, share it with a fellow grad mom, and come back to it every time you need graduation sweets table inspiration that actually works.
More Recipes Collections
- A good tailgate starts with food that's easy to carry, easy to share, and worth the trip. These 20 tailgating recipes check every box, with simple snacks and game day bites that hold up and taste great when it's time to eat.
- That hot griddle sear, the smell of garlic butter, and meals that come together right where you cook them. These Blackstone recipes cover everything from juicy steak and chicken to shrimp, fried rice, and breakfast favorites. Simple, filling, and built for real-life cooking.
- Cinco De Mayo Crockpot Recipes that take the pressure off dinner. Think slow-cooked meats that stay juicy, taco fillings that hold their flavor, and easy sides that round out the table. Set it up early, let it cook, and come back to a full spread that's ready to serve.
- Have a bottle of limoncello and no idea what to do with it? These 16 limoncello recipes turn it into creamy no-bake desserts, showstopper cakes, and cocktails worth making on repeat.
- If you love bold, make-ahead breakfast ideas, this roundup of Mexican breakfast casserole recipes covers everything from a saucy huevos rancheros casserole to a crockpot version that practically makes itself overnight.